
To replace your Yamaha golf cart headlights, you’ll first identify the bulb type—typically H3 halogen on G1–G29 models—then disconnect the battery to prevent shorts. Remove the front cowl assembly using a Phillips #2 screwdriver and 9/16″ socket, disconnect the multi-pin connector by squeezing the plastic tabs, and twist the bulb socket counterclockwise. Install the new bulb wearing gloves to avoid oil contamination, reconnect the wiring harness, and test functionality before reassembly. This guide covers model-specific variations and LED upgrade considerations.
Identifying the Correct Bulb Type for Your Yamaha Golf Cart
How do you determine which replacement headlight bulb fits your Yamaha golf cart when aftermarket listings show dozens of options? Start by removing your current bulb and inspecting the base—H3 halogen bulbs with ceramic bases and lead wires dominate G1–G29 models. Check for OEM part numbers stamped on the bulb or housing; 4KB-84314-01 appears frequently in G-series carts. Consult your owner’s manual or Yamaha parts fiche to confirm factory specifications for bulb compatibility and voltage ratings. Modern lighting technologies include halogen, LED retrofit modules (12–48V rated), and integrated LED assemblies that replace entire housings. Photograph your headlight assembly and compare it against vendor spec sheets to verify fit. Match electrical system voltage—12V single-battery or 36V/48V multi-battery—because LED kits often require voltage reducers for proper operation. When evaluating replacement options, consider important factors like lumens output and color temperature to ensure optimal visibility, as different bulb types offer varying levels of brightness and performance across the lighting spectrum. Replacement bulbs typically cost $39.99 for OEM-compatible units, though budget alternatives and premium LED options range from $22 to $99 depending on features.

Precision Fit for Yamaha G29/Drive – Designed specifically for Yamaha G29 Drive gas and electric golf carts from 2007 to 2016. NOT compatible with Yamaha Drive2 (2017+) models. Direct replacement for factory headlights.

[LED Golf Cart Lights Kit] - Specifically designed for YAMAHA G14, G16, G19, and G22 models, this headlight kit features a complete wiring harness with pre-terminated plugs for easy installation.

12V Headlight Taillight Kit Compatible with YAMAHA G29 Golf Carts. For gas and electric models
Gathering the Necessary Tools and Materials
Before starting any headlight replacement project, assemble four categories of equipment: hand tools, safety gear, electrical supplies, and replacement components. Your hand tools must include a ratchet with 9/16″ socket, Phillips #2 screwdriver, flathead screwdriver, cordless drill with 7/16″ bit, and hole cutting tool for retrofit installations. Safety equipment encompasses protective glasses, work gloves, painter’s tape, shop towels, and electrical tape. Electrical supplies require replacement wiring harnesses, butt connectors rated for 12V circuits, inline fuses, a multimeter, and zip ties. Replacement parts include OEM halogen bulbs or LED assemblies, mounting hardware, lenses, and voltage reducers. Consider FlexVolt™ Technology Benefits for installations that operate on 12-48 volts without needing a voltage reducer, eliminating the risk of burned-out lights. Proper tool organization on a clean, level workspace guarantees efficiency. Workspace safety demands engaging the parking brake, removing keys, and disconnecting the negative battery terminal before beginning electrical work.

Versatile Lighting Kit: Includes 2 LED headlights, 2 LED taillights, and a basic wiring harness for easy installation on your YAMAHA G22 golf cart.

【LED Golf Cart Lights Kit For Yamaha Drive 2】 - This Golf Cart headlight taillight is designed for Yamaha Drive 2 2017-UP gas & electric models. Only fit for Yamaha drive 2 golf cart .
Removing the Turn Signal and Headlight Assembly
Position your Yamaha golf cart on level ground and turn the key to the off position, then engage the parking brake and shift into tow mode. Shut off power completely and remove front tires for additional workspace. Pry the upper rocker panel free from the front cowl, then locate six bolts securing the cowl—three per side. Remove these bolts using 27mm and 45mm torque bits, feeling behind the dash for hidden fasteners. Pull the front cowl away and disconnect light connectors.
For turn signal removal, identify three tabs on the headlight assembly. Use a flathead screwdriver and pliers to remove barbs, pushing tabs down to slide the assembly forward. Pull from the bottom due to the top hook. Unplug the wiring harness while leaving turn signal bulb wires attached during headlight assembly extraction. Before proceeding with installation, gather your tools including a flathead screwdriver and pliers.
Disconnecting the Wiring and Extracting the Old Bulb
With the headlight assembly now free from its mounting position, you’ll need to disconnect the electrical connections and extract the old bulb. Locate the multi-pin connector near the front cowling and squeeze the plastic tabs to release the locking mechanism. Pull the connectors apart without twisting, noting the white ground wire configuration for proper bulb installation later. Before proceeding, verify zero voltage using a multimeter to guarantee wiring safety. Twist the bulb socket counterclockwise to detach it from the housing, then pull the halogen bulb straight out. Avoid touching the glass envelope, as skin oils cause premature failure. Inspect the socket contacts for corrosion and clean with electrical cleaner if necessary. Check all wiring for damage before proceeding with replacement. If you’re working with an electric model that uses a 36-volt system, ensure your replacement bulbs are designed to operate on 12 volts derived from two of the six-volt batteries connected in series.

Super bright white light, 12SMD 3030, OEM/factory headlights or fog light replacement bulbs, includes 2 bulbs
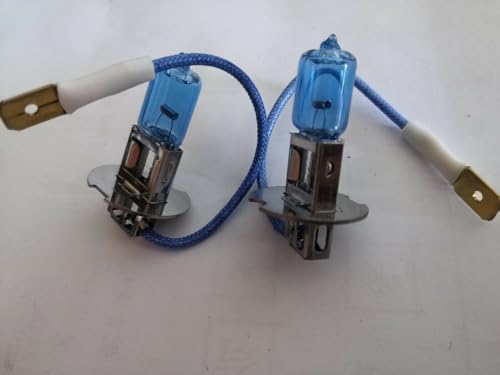
Fits EZGO, Club Car, Yamaha Golf Cart H3 Headlight Blue Bulb Halogen (2) BULBS

Universal golf cart headlight bulbs for EZGO, Club Car Precedent and Club Car DS with plug-and-play ports; Each bulb measures 2.23*1.02 inch and replaces standard 881 bulbs, compatible with P/N 886 889 894 896 898
Installing the New Headlight Bulb Properly
Selecting the correct H3 halogen bulb or LED replacement kit guarantees compatibility with your Yamaha golf cart’s electrical system and mounting configuration. Wear gloves when handling the new bulb—bare fingers leave oil residue that creates hot spots, causing premature failure. Gloves also protect electrical contacts from contamination.
Insert the bulb gently into the socket from the rear of stock Yamaha assemblies. For LED kits, align the adapter harness’s 2-pin or 3-pin connector with factory harness terminals, matching driver and passenger side labels. Push connectors firmly until they click. Ascertain proper bulb alignment within the housing before securing components.
Test both headlights by activating your cart’s lighting system. Verify driver and passenger side operation confirms successful installation. New bulbs provide a brighter and more reliable output compared to used alternatives. Proper socket maintenance and careful handling prevent fitment issues and extend bulb longevity.

Perfect Fitment: Our LED headlight kit is specifically designed to be compatible with YAMAHA Drive G29 2007-2016 Gas or Electric Golf Cart Models. It serves as a perfect replacement for the factory headlights, ensuring a seamless fit and enhanced visibility on the road.

✅Perfect Fit for Drive 2:Orle Oko street legal light kit compatible with golf cart lights YAMAHA Drive 2 2017-UP Gas and Electric ,Seamless installation with pre-cut mounting points and wiring harness included.(Replaces YAMAHA Drive 2 Modified Factory Headlights OEM)

Complete Compatibility: This Deluxe light Kit Fits on Yamaha Driver G29 Electric golf cart. Not only Provides you with better light output at night but also upgrades your golf cart with turn signal light, hazard light and horn. It is not original lights
Reconnecting Wires and Reassembling Components
After verifying successful headlight operation, disconnect the battery’s negative terminal before proceeding with permanent wire connections. Label each wire by function using your kit diagram to prevent miswiring. Confirm connector compatibility with your headlight assembly—whether 3-pin, blade, or Deutsch-style—and use crimp terminals rated for 18–14 AWG automotive applications. Apply heat-shrink insulated butt connectors or solder joints with tubing to prevent moisture ingress. Route harnesses away from moving parts and hot surfaces, securing them with UV-rated zip ties every 6–12 inches for proper wire management. Fasten ground wires to clean, bare metal using star washers. Seat the headlight assembly fully into the cowling, install gaskets, and tighten mounting screws incrementally to recommended torque. Reinstall trim components while verifying no harness pinching occurs.
Testing Your New Headlights Before Final Assembly
Before reconnecting the battery’s negative terminal, you’ll conduct a systematic pre-assembly test to verify electrical continuity and headlight functionality. Set your voltmeter to 20 volts DC and measure battery output—expect 12-13 volts. Probe the blue and white headlight wire for constant 12 volts DC, grounding through the fuel gauge’s black wire. Toggle the headlight switch multiple times, verifying consistent illumination on both driver and passenger sides. Match input voltage across the headlight fuse to confirm circuit integrity. Watch for troubleshooting indicators: no light despite proper voltage suggests switch failure, while loose socket connections prevent activation. If voltage testing confirms 12 volts but headlights remain dark, replace the defective bulb. Check for corroded wiring connections using a wire brush to clean any oxidation that could disrupt electrical flow. Successful dual-headlight glow signals readiness for final component reassembly and secure lens cover installation.
Essential Safety Precautions When Handling Bulbs
While your new headlights await installation, proper safety protocols protect both you and your Yamaha golf cart’s electrical system from damage. Start by disconnecting the battery near the cart’s underside to prevent accidental shorts. Verify power cutoff by testing the light switch. These bulb safety fundamentals prevent electrical hazards.
Wear cotton or lint-free gloves for best grip and protection. Handle bulbs exclusively by their base, never touching the glass envelope, as finger oils contaminate the surface and reduce bulb lifespan. If the bulb shatters, gloves shield your hands from cuts. Always wear safety glasses when cutting or drilling during the installation process.
Apply gentle pressure when removing old bulbs—forceful tugging damages sockets. Place removed components on soft surfaces to prevent breakage. For handling tips that promote longevity, avoid dropping bulbs and inspect for filament damage before discarding. After installation, consider applying a UV sealant to protect your new headlights from oxidation and clouding over time.
Model-Specific Considerations and LED Upgrade Options
Your Yamaha’s model year and headlight configuration determine which access method you’ll use and whether an LED upgrade requires additional adapters. G1–G9 models with round headlights need complete bezel removal via 3–4 bolts, then rear bulb access after disconnecting the 2-wire harness. Drive/Drive2/G29 series often require cowl trimming for aftermarket LED bezels, following kit-specific templates. Confirm your bulb type—many older Yamahas use H3 halogens—before purchasing replacements.
Model differences affect electrical compatibility: stock 12V circuits typically use two- or three-pin connectors. LED upgrades may need adapter harnesses to match original pinouts and prevent polarity errors. Check your charging system and fuse ratings when installing higher-output LED kits. Always re-aim headlights using factory adjustment screws after any assembly removal to restore proper beam pattern. Installation kits typically include mounting hardware, screws, zip ties, and wiring harnesses to complete the setup.

✅Perfect Fits For YAMAHA G29 DRIVE Golf Cart Gas and Electric 2007-UP: Headlight Taillight kit compatible with Gas and Electric YAMAHA G29 DRIVE golf carts 2007 2008 2009...


