To replace your Mercedes-Benz headlight, you’ll need a T25 screwdriver, 8mm and 10mm sockets, and plastic trim tools. First, disconnect the battery and locate the mounting bolts in your engine compartment. Remove the electrical connectors by releasing their locking tabs, then carefully extract the assembly. When handling replacement bulbs, only touch the base to prevent premature failure. After installation, park 20-25 feet from a wall and adjust the vertical and horizontal alignment screws for proper beam positioning. Understanding your specific model’s configuration and assembly variations will guarantee a successful repair.
Tools and Equipment You’ll Need
Before attempting any Mercedes-Benz headlight replacement, you’ll need to assemble the proper tools and equipment to secure a successful procedure without damaging expensive components. Essential hand tools include a T25 bit screwdriver, 8mm and 10mm sockets, ratchet sets with extensions, and plastic trim tools for safe disassembly. Power tools like an impact wrench expedite bolt removal, while a heat gun softens adhesive sealants. You’ll require automotive-grade butyl sealant, isopropyl alcohol, and microfiber towels for proper resealing. Different bulb types may necessitate specific handling procedures, including LED bulbs for improved visibility and energy efficiency. Consider comparing brightness levels and lifespan across halogen, LED, and HID options before installation. Wear nitrile gloves for protection and keep spare plastic clips available. A torque wrench secures correct bolt tightening to manufacturer specifications. For improved accessibility during the removal process, turn the wheels to the right to create more working space in the wheel well area. Post-installation, verify headlight alignment using proper adjustment tools to meet safety standards and prevent blinding oncoming traffic.

KIT INCLUDES: 1 - Disc Pad Holder, 3.25 in (8,2 cm) 6 - 3M Gold Sanding Discs 500 Grit, 3 in (7,6 cm) each 4 - 3M White Finishing Discs 800 Grit, 3 in (7,6 cm) each 1 - 3M Trizact Refining Disc 3000 Grit, 3 in (7,6 cm) 2 - 3M Quick Headlight Clear Co

Instructions for Use: The first yellow drill attachment installed on the drill, cushion pad white surface and drill attachment black surface paste, use the first in the lamps on the spray water and then use the cleaning pad to dry in a circle, and then according to the grain size from small to large in order to use the waterproof abrasive disc on the lamps for polishing, and finally use the sponge polishing pad for polishing

▶️ Plug-n-Play Operation, Direct Bolt-on OE Fitment or Replacement for the Stock Unit
Removing the Headlight Assembly
Removing a Mercedes-Benz headlight assembly requires precise identification of your vehicle’s specific model and headlight configuration, as mounting methods vary considerably across the model lineup. Open the engine compartment and locate all mounting bolts—typically 8mm and 13mm hex or Torx fasteners positioned on top of the assembly, beneath the bumper skin, and near the wheel well. Apply masking tape to protect painted surfaces during the procedure. You’ll often need to loosen the front bumper or perform partial bumper removal to gain adequate clearance. Disconnect all electrical connectors by releasing locking tabs, then carefully manipulate the headlight assembly outward. The lower section features a ball-and-socket joint that must be disengaged by lifting and levering the assembly. Verify all mounting tabs clear the bumper skin completely before extraction. A plastic pry bar can be used to assist with alignment and help guide the assembly during the removal process.
Replacing the Headlight Bulb
Replacing a Mercedes-Benz headlight bulb involves five critical steps that guarantee proper installation and peak lamp performance. First, access the bulb housing by opening the hood and removing the protective cover counterclockwise. Second, rotate the bulb holder anti-clockwise a quarter-turn and extract it carefully from the reflector assembly. Third, disconnect the electrical connector without forcing. Fourth, handle the replacement bulb exclusively by its base—never touch the glass envelope, as skin oils compromise headlight brightness and reduce bulb lifespan. Align tabs with housing slots, insert, and rotate clockwise to lock. Fifth, reconnect the wiring harness securely and test functionality before resealing. Reinstall protective covers clockwise, ensuring rubber seals seat properly to maintain water resistance and preserve peak bulb performance. The procedure to access outer bulb mirrors that of the inner bulb, requiring removal of the plastic cover in both cases.

Lights Dim Over Time, Replace In Pairs: Your lights are a pair, one is never turned on without the other. If one bulb burns out, the other isn't far behind. Replace your H7 XtraVision Halogen bulbs in pairs for optimum performance.

Get the best lighting performance and an increased visibility and comfort on the road compared to basic bulbs

Experience 8X Enhanced Brightness: Equipped with advanced chip technology, Marsauto H7 bulbs deliver 800% greater brightness than standard bulbs, projecting crisp 6500K white light for farther visibility and quicker reaction times, day or night.
Model-Specific Variations and Considerations
While the bulb replacement procedure remains consistent across the Mercedes-Benz lineup, headlight assemblies vary greatly between model generations and trim levels. Classic W108, W109, W111, and W112 models feature interchangeable one-piece headlights, though American variants and the 300SEL 6.3 differ remarkably. You’ll find V8 models often incorporate stacked headlight configurations combining indicators and parking lights. Modern vehicles present greater complexity—halogen systems allow straightforward bulb replacement, while LED clusters contain integrated modules requiring complete assembly replacement. When sourcing components, verify model compatibility and bulb specifications carefully. Before beginning any replacement work, release the retaining clips and bolts that secure the headlight assembly to the vehicle frame. LHD and RHD versions utilize different lens focus patterns despite sharing core components. The 300SEL 6.3 and select V8 models accept replaceable halogen bulbs, offering superior illumination compared to fixed-bulb predecessors. The glass lenses and reflectors within these assemblies are replaceable and can be professionally refurbished. LED systems deliver 40% greater effectiveness than traditional xenon but demand professional servicing due to integrated ECU controls.

Kit Includes: 1 Driver Side Headlight Assembly; 1 Passenger Side Headlight Assembly

SUITABLE MODELS: This headlight assembly is specifically designed to be compatible with the 2017 2018 2019 2020 Mercedes Benz E Class, including models such as E300, E350, E400, E450, E43 AMG and E53 AMG, and is NOT designed for models equipped with Active Lighting. Full LED Configuration: both the high and low beam bulbs are LED. The bulbs are included with this headlamp assembly
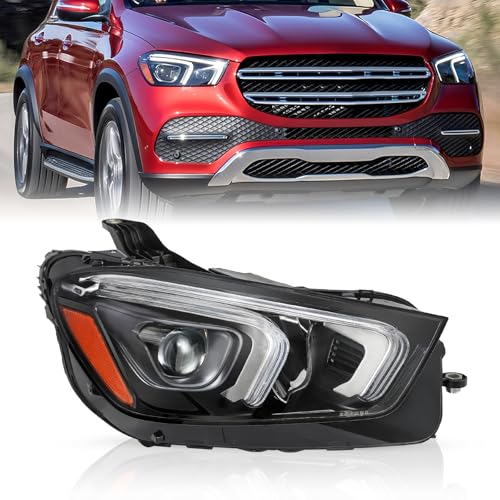
SUITABLE MODELS: This headlight assembly is specifically designed to be compatible with the 2020 2021 2022 Mercedes Benz GLE 167 GLE450 / GLE350 / GLE63 / AMG S GLE53 / AMG GLE580. Full LED Configuration: both the high and low beam bulbs are LED. The bulbs are included with this headlamp assembly
Testing and Adjusting Your New Headlights
After installing your new headlights, you’ll need to verify proper beam alignment to confirm ideal road illumination and prevent blinding oncoming traffic. Park your Mercedes 20-25 feet from a flat wall on level ground. Mark the wall with masking tape at each headlight’s beam center and vehicle centerline. Draw horizontal reference lines two inches below each beam center mark.
Locate the adjustment screws behind each headlight assembly—typically one vertical and one horizontal. Use a Phillips screwdriver or 6mm hex key depending on your model. Turn the vertical adjuster to align the beam’s lower edge with your reference line. Adjust horizontal screws to center beams over your marks. Both adjustments confirm beam clarity and alignment accuracy. Modern LED headlights produce significantly more lumens than halogen bulbs, making proper alignment even more critical to avoid glare for oncoming drivers. LED lights also emit a whiter, crisper light that improves visibility and road marker recognition compared to the yellower light of traditional halogen bulbs.
Test-drive in darkness to verify even road coverage without glare. Watch for reflection off street signs and other vehicles to ensure your headlights are properly positioned and not too high.
Safety Tips and Maintenance Recommendations
Proper headlight functionality extends beyond correct installation and alignment—your safety depends on recognizing warning signs and maintaining your Mercedes-Benz lighting system throughout its service life. Monitor for dim output, flickering patterns, or moisture ingress indicating immediate replacement needs. Implement routine headlight maintenance by cleaning lenses with appropriate solutions and applying UV protectant coatings to prevent yellowing. Replace bulbs every five years regardless of apparent function, as aging reduces brightness considerably.
Follow strict safety precautions during replacement: disconnect the battery, wear protective eyewear and gloves, and secure your vehicle with wheel chocks. Use calibrated torque wrenches and correct socket sizes for proper assembly. Inspect headlight seals and housings regularly for cracks permitting moisture infiltration. Replace both headlights simultaneously to guarantee balanced illumination and ideal visibility. Consider halogen bulb assemblies for reliable performance and compatibility with your vehicle’s electrical system. Some vehicle models, like certain Nissan Leafs, have daytime running lights that cannot be fully disabled due to design specifications, so verify your Mercedes-Benz’s lighting configuration before making adjustments.