To replace your GMC Sierra’s headlight bulbs, first identify the correct bulb type for your model year (9006/9005 for 1999-2006, H11/9005 for 2007-2013). Turn off the engine and let bulbs cool for 30 minutes. Access the assembly by removing the grille and unfastening the headlight bolts with appropriate tools. Disconnect the electrical connector, remove the dust cap, and twist the old bulb counterclockwise. Install the new bulb without touching the glass, rotate clockwise to lock, and test before reassembling. We’ll cover troubleshooting and upgrade options below.
Identifying the Correct Bulb Type for Your GMC Sierra
Knowing which bulb type your GMC Sierra requires prevents costly mistakes and guarantees you’ll complete the replacement on the first attempt. Your Sierra’s bulb types vary markedly across model years and trim configurations. For 1999-2006 models, you’ll need 9006 (HB4) low beams and 9005 (HB3) high beams. The 2007-2013 Sierra switched to H11 low beams while retaining 9005 high beams, though the 2007 Classic continues using 9006. If you own a 2016-2021 Sierra 1500 with factory HID headlights, you’ll require D5A bulbs. It’s important to note that the 2020 Sierra 1500 Elevation typically comes with factory-installed LED headlights, which are not replaceable with standard bulb options. Consult your owner’s manual for definitive confirmation, as Denali and specific trim packages sometimes deviate from standard configurations. When selecting replacement bulbs, consider brightness levels and color temperature to ensure optimal visibility and performance for your specific needs. Different bulb technologies such as halogen, LED, and HID options offer varying advantages in terms of longevity and nighttime driving safety. Verify bulb identification by checking your current headlight assembly before purchasing replacements.

Fit for 99% of vehicles - SYJIIP Halogen headlamp are close to the wattage of the stock halogen headlamp bulb, which can reduce the occurrence of CANBUS problems, avoid erroneous and flickering. As long as your stock light bulb model is the same as ours, then SYJIIP's light bulb will be suitable for your car.
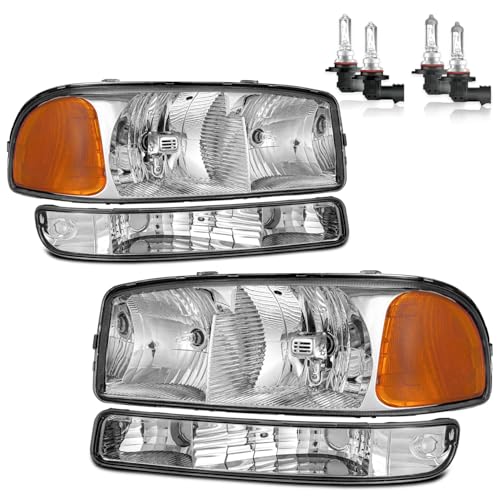
【Perfect OE Fitment】OEM#15850351/15850352.Partslink#GM2502188/GM2503188.Headlights assembly 100% perfect fitment for OE type 𝟏𝟗𝟗𝟗-𝟐𝟎𝟎𝟔 𝐆𝐌𝐂 𝐒𝐢𝐞𝐫𝐫𝐚 𝟏𝟓𝟎𝟎 / 𝟐𝟓𝟎𝟎 / 𝟑𝟓𝟎𝟎 ; 𝟐𝟎𝟎𝟕 𝐆𝐌𝐂 𝐒𝐢𝐞𝐫𝐫𝐚 𝟏𝟓𝟎𝟎 / 𝟐𝟓𝟎𝟎 / 𝟑𝟓𝟎𝟎 𝐜𝐥𝐚𝐬𝐬𝐢𝐜 ; 𝟐𝟎𝟎𝟎-𝟐𝟎𝟎𝟔 𝐆𝐌𝐂 𝐘𝐮𝐤𝐨𝐧 𝟏𝟓𝟎𝟎 / 𝟐𝟓𝟎𝟎 𝐗𝐋 ; 𝐍𝐨𝐭 𝐜𝐨𝐦𝐩𝐚𝐭𝐢𝐛𝐥𝐞 𝐰𝐢𝐭𝐡 𝟏𝟗𝟗𝟗 𝐒𝐢𝐞𝐫𝐫𝐚 𝐎𝐥𝐝 𝐁𝐨𝐝𝐲 𝐬𝐭𝐲𝐥𝐞 𝐦𝐨𝐝𝐞𝐥𝐬:𝐍𝐨𝐭 𝐜𝐨𝐦𝐩𝐚𝐭𝐢𝐛𝐥𝐞 𝐰𝐢𝐭𝐡 𝟐𝟎𝟎𝟕 𝐒𝐢𝐞𝐫𝐫𝐚 𝐍𝐞𝐰 𝐁𝐨𝐝𝐲 𝐬𝐭𝐲𝐥𝐞 𝐦𝐨𝐝𝐞𝐥𝐬;𝐍𝐨𝐭 𝐜𝐨𝐦𝐩𝐚𝐭𝐢𝐛𝐥𝐞 𝐰𝐢𝐭𝐡 𝐆𝐌𝐂 𝐘𝐮𝐤𝐨𝐧 𝐃𝐞𝐧𝐚𝐥𝐢.Low/High Beam: HB4 9006/HB3 9005(bulbs included) Turn Signal Light:3157A(bulbs not included)
Gathering the Necessary Tools and Safety Equipment
Replacing your GMC Sierra’s headlight bulbs requires assembling the right tools and safety equipment before you begin work. You’ll need a Phillips head screwdriver, 7mm and 10mm sockets, and a T15 Torx driver for fasteners. Include trim removal tools and a small flathead screwdriver for clips. Safety protocols demand protective gloves to prevent skin oils from damaging halogen bulbs and safety glasses to shield against debris. Add dielectric grease for electrical connections and clean rags for handling components. Proper tool organization means using magnetic trays or small containers to secure bolts during disassembly. If wheel well access is required, gather a floor jack, jack stands, and wheel chocks. Since most GMC Sierra headlight replacements can be completed without removing the entire headlight housing, you may only need basic hand tools to access the bulb compartment. When selecting replacement bulbs, prioritize those that meet DOT regulations to ensure legal compliance and optimal safety performance. Keep your owner’s manual accessible to verify bulb specifications and torque requirements throughout the replacement process. The new light assembly may include test bulbs for initial functionality verification.

Fit For - These light bulbs combo compatible with GMC Sierra 1500 2500 3500 2007 2008 2009 2010 2011 2012 2013 high low beam and fog lights. Our bulbs are suitable for Off-Road use only. If you need assistance or have any questions, please contact us via Amazon message for a free kit.

Fit For - These light bulbs combo compatible with Chevrolet Silverado 1500/ 2500HD/ 3500HD and GMC Sierra 1500/ 2500 HD/ 3500 HD high low beam and fog lights (Year: 2003 2004 2005 2006). Our bulbs are suitable for Off-Road use only. If you need assistance or have any questions, please contact us via Amazon message for a free kit.

Fit For - These light bulbs combo compatible with Chevrolet Tahoe high and low beams 2000 2001 2002 2003 2004 2005 2006; compatible with Chevrolet silverado 1500/2500/3500 high and low beams 1999 2000 2001 2002 2003 2004 2005 2006;compatible with GMC Sierra 1500/2500/3500 high and low beams 1999 2000 2001 2002 2003 2004 2005 2006. Our bulbs are suitable for Off-Road use only. If you need assistance or have any questions, please contact us via Amazon message for a free kit.
Preparing Your Vehicle for Bulb Replacement
Before touching any components, position your GMC Sierra on a flat, level surface and engage the parking brake to prevent vehicle movement during the replacement process. If working on an incline, place wheel chocks behind the tires to enhance vehicle stability.
Turn off the engine and all lights, then allow the headlight bulbs to cool for at least 30 minutes to avoid burns. Verify the headlight switch is in the “off” position to maintain electrical safety throughout the procedure.
Clear the workspace around the front of your vehicle and guarantee adequate lighting for visibility. Inspect the headlight lenses and housing for cracks or moisture buildup. Check the wiring harness and bulb socket for corrosion or damage. Verify you have the correct replacement bulb for your specific Sierra model year, as bulb types and sizes vary across different model years. Gather your essential tools including screwdrivers and a socket wrench for removing panels and accessing the headlight assembly. Wear gloves during installation to prevent contamination of the new bulb’s glass surface.
Accessing the Headlight Assembly
Since the GMC Sierra’s headlight assembly is secured behind multiple layers of trim and fasteners, you’ll need to systematically remove these components to gain access. Start by removing the grille, which typically involves removing four bolts and gently prying upward on metal tabs. Next, detach plastic trim pieces around the headlight using trim tools to pop out clips without causing damage.
Locate the headlight assembly fasteners—usually four bolts requiring 10mm, 7mm, or T15 Torx drivers. Some models use rivets or plastic clips that need careful removal. When working with rivets, pry up the center first to unlock it before removing the base of the fastener. In certain Sierra configurations, bumper removal or partial displacement is necessary. Pull the bumper outward after loosening its connecting bolts and clips, creating clearance to swing the headlight assembly forward for complete access. Be gentle during this process to avoid damaging clips or bumper parts that may be fragile. After gaining access to the assembly, you’ll want to identify the specific bulb sizes needed for your model before proceeding with bulb replacement.

【Note Before Purchase 】-There may be more than 2 assembly configurations for the same model, and our bulbsmay only fit one of them. Please check the correct vehicle age when place order

【Suitable for 1999-2006 GMC Sierra】9005 9006 high low beams lights for GMC Sierra 1999 2000 2001 2002 2003 2004 2005 2006 car light bulb,2PCS Map Lights,3PCS Dome Lights,2PCS Trunk/Cargo Lights,1PCS Glove Box Lights,2PCS License Plate Lights,2PCS Courtesy Door Lights,totally pack of 16.The bulb precisely mimic the factory halogen bulbs, and after hundreds of tweaks and calibrations, achieved the best light pattern and clearer visibility.

Vehicle Compatibility:The bulbs are compatible with GMC Sierra 1500 2500HD 3500HD 2007 2008 2009 2010 2011 2012 2013. Package included: 2 pcs high beams, 2 pcs low beams, all meticulously designed for Sierra 1500 2500HD 3500HD models
Removing the Old Headlight Bulb
With the headlight assembly now accessible, you’re ready to extract the old bulb from its housing. First, locate the electrical connector on the bulb’s back and lift the retaining tab to disconnect it. Pull straight back gently. Next, twist or pull off the dust cap using a plastic trim tool if needed. Identify the retaining mechanism—metal spring clips or plastic tabs—and press or lift to disengage. For twist-lock styles, rotate the bulb counterclockwise approximately one quarter turn. Pull the bulb straight out by its base, never touching the glass. To avoid premature wear and ensure optimal performance, avoid touching the bulb glass directly with your bare hands. These bulb removal techniques prevent damage to delicate components. Inspect the headlight assembly for corrosion or debris. Many vehicles use dual-beam bulbs that feature two filaments for both low and high beam functionality. Following these headlight assembly tips guarantees successful replacement without breaking clips or contaminating surfaces. Test that new bulbs are functioning before reassembling all components to avoid repeating the entire process.

【Note Before Purchase 】-Package Include Pair 9005 High Beam and H11 Low Beam ,Fit for GMC Sierra 1500 2500 3500 2007 2008 2009 2010 2011 2012 2013. Please check the correct vehicle age when place order

[Product Composition]: This product Fit for 1999-2006 Chevy Silverado 1500 2500 3500 / GMC Sierra 1500 2500 3500, this 4-bulb set includes 2*HB3/9005 high beam bulbs, 2*HB4/9006 low beam bulbs,totally 4 Halogen headlight bulbs in the package.

【Fit for Chevrolet Silverado 1500 2500 3500 & GMC Sierra 1500 2500 3500】 A pair of high light bulbs, a pair of low light bulbs, and a pair of fog light bulbs. Fit for 2003-2006 Chevrolet Silverado 1500 2500 3500 & GMC Sierra 1500 2500 3500. Please check whether the model matches before purchasing. If you have any questions, please do feel free to contact us.
Installing the New Headlight Bulb
After removing the damaged bulb, you’re ready to install its replacement. Avoid touching the glass portion to prevent premature failure from oil deposits. Align the bulb’s tabs precisely with the socket’s three notches, then insert without forcing. Rotate clockwise until locked securely—don’t over-tighten. Confirm the bulb sits fully seated to maintain proper light projection.
Next, plug the wiring connector into the bulb’s base until you hear a click, ensuring solid electrical connections. Tuck excess wire and LED drivers neatly inside the housing to prevent pinching. Perform a gentle tug test to verify the connector’s locked.
Before reassembly, turn on your headlights to verify bulb alignment and function. Check both high and low beams. For LED bulbs, confirm correct polarity—reverse polarity prevents illumination. Consider upgrading to premium bulb brands like Sylvania or Philips for improved brightness and longevity over standard factory options. Pay attention to color temperature ratings when selecting replacement bulbs, as they affect both visibility and driving safety. If flickering occurs, reseat all connections immediately. If you’re uncertain about any step in the installation process, consider consulting a professional mechanic for guidance.

900% Luminosity Enhancement - OXILAM 9005 9006 bulb delivers 9X the brightness of conventional halogens with 6500K pure white spectrum, dramatically improving road illumination and nighttime driving safety

Perfect Beam Pattern – The OXILAM 9005 9006 bulbs feature an ultra-thin 0.03-inch chip spacing that emulates halogen filament positioning, providing a 360° uniform beam with no dark spots, enhancing road visibility while minimizing glare for a safer driving experience

[140,000LM Ultra-Bright Output & Daylight Clarity] Termitor 9005 9006 powersports light bulbs deliver 140,000 lumens of crisp 6500K Daylight White light, dramatically improving contrast on trails and roads. Whether in dense fog, heavy rain, or darkness, you get a wide, clear field of view for safer off-road driving. Pack of 4 covers both sets in one complete upgrade.
Proper Handling Techniques to Prevent Bulb Damage
Proper handling techniques directly impact headlight bulb longevity and performance. Always wear clean gloves or use a lint-free cloth during bulb handling to prevent skin oils from depositing on the glass surface, which causes hot spots and premature failure. If you accidentally touch the bulb, clean it immediately with isopropyl alcohol and a soft cloth.
Handle bulbs exclusively by the base to protect the delicate filament from physical shock. Never drop or force bulbs into sockets, as this damages the fragile internal components. Filament protection requires gentle alignment and insertion without excessive twisting.
Before installation, disconnect your vehicle’s battery to prevent electrical issues. Inspect the bulb for cracks, clean the socket of corrosion, and verify no fingerprints remain on the glass surface for peak performance. Understanding the differences in brightness between bulb options helps ensure you select the right replacement for your needs. Secure wires with zip ties to avoid interference with bulb operation. During installation, ensure proper alignment of tabs to securely lock the bulb into position.
Testing Your New Headlights Before Final Assembly
Once you’ve installed the new bulb using clean handling practices, verify its operation before reassembling the headlight housing. Turn your ignition to the accessory position and activate both low and high beams to confirm the bulb illuminates without flickering. Test bulb performance under real driving conditions by starting the engine and cycling through all lighting modes, including daytime running lights. Watch for proper beam pattern, uniform brightness, and absence of dark spots or distortion. Listen for unusual buzzing that might indicate electrical issues. Use a multimeter to check continuity and resistance at the socket terminals, ensuring power availability. Set the multimeter to resistance continuity mode and touch the probe leads to the socket wires—a beeping sound confirms proper electrical connection. Verify no dashboard warning lights appear. This systematic testing prevents uncovering bulb performance problems after final assembly, saving time and ensuring road safety.
Troubleshooting Common Installation Problems
Even with careful installation, headlight problems can occur due to electrical faults, compatibility issues, or mechanical misalignment. First, verify you’ve installed the correct 9012 single filament bulb for your Sierra model year. Bulb fitment issues often stem from incorrect orientation or debris in the socket—inspect for corrosion and clean thoroughly. Test fuses and relays for continuity even if they appear intact, as internal failures aren’t always visible. Check the battery ground cable and wiring harness connections, since poor grounding frequently causes headlight malfunctions. If lights still don’t work, use diagnostic tools to confirm proper voltage supply, which should be verified at the relay and fuse to ensure adequate current handling. Reset any error codes in the body control module (BCM) to restore full functionality. Poor headlight aim may also create perceived dimness requiring readjustment. Consider comparing brightness levels between your old and new bulbs to ensure you’ve selected appropriate replacements. When handling new bulbs, avoid touching them with your fingers, as skin oils can contaminate the glass surface and reduce bulb lifespan.
Maintenance Tips and Upgrade Options
After successfully installing your GMC Sierra headlight bulbs, you’ll need to maintain them properly to maximize performance and longevity. Establish a maintenance frequency tied to your oil changes—inspect lenses for cloudiness, check wiring connections, and verify seal integrity. Clean lenses with dedicated headlight cleaners and microfiber cloths to prevent dimming from oxidation and grime. Regular professional inspections help identify severe headlight issues early on, ensuring safe driving conditions.
When considering upgrades, LED or HID bulbs offer significant upgrade benefits including extended lifespan and improved brightness. However, some GMC models require a Body Control Module reflash to prevent premature failure. Always use OEM-approved or certified aftermarket bulbs like German Vosla for ideal compatibility. Handle all bulbs by the base with gloves, and replace in pairs to maintain uniform light output. Apply dielectric grease sparingly to connections, preventing moisture intrusion and corrosion.