
You’ll find your headlight relay in one of two main spots: the under-hood power distribution center near your battery, or the interior fuse panel on your driver’s side dashboard. It’s typically an ice cube-style or micro relay rated for at least 20 amps. Check your owner’s manual for the exact location, as placement varies by manufacturer and model year. Some modern vehicles integrate this function into the body control module instead. Understanding relay placement, wiring configurations, and failure symptoms will help you diagnose headlight issues more effectively.
Common Locations for Headlight Relays in Most Vehicles
Most vehicles house the headlight relay in the power distribution box located in the engine compartment. You’ll find this junction box near the battery, utilizing large gauge wire for the power feed. Common relay types include Bosch/DIN ice cube relays with integrated mounting brackets and micro relays rated at minimum 20 amps for tight spaces.
Alternative fuse block positioning includes the left instrument panel fuse block on your dashboard’s left side, accessible from the top or underneath. Modern vehicles may separate daytime running lights relays in the under-dash area. Your owner’s manual provides exact locations for both engine bay power distribution boxes and interior fuse blocks.
For diagnostic purposes, you can perform a swap test using similar relays like the A/C compressor relay from the same box to verify functionality. Replacing the relay involves simply unplugging the old relay and plugging in the new one.

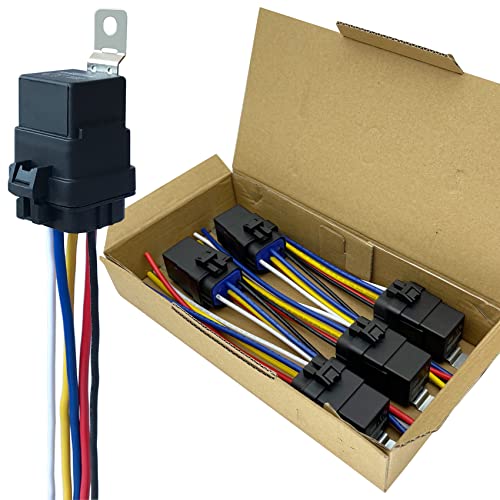
Micro Size: The 8T2T-CA 0101k relay is an ultra micro-sized ISO automotive relay, making it ideal for use in tight spaces.

Integrated Diode: Each relay includes a built-in diode that suppresses induced voltage during switching, safeguarding your electrical components from potential damage.
Why Headlight Relay Placement Differs Between Car Models
Understanding relay placement requires examining how electrical system architecture evolved across different automotive eras and manufacturers. Pre-computer vehicles from the 1960s typically omit headlight relay systems entirely, routing high-amperage current directly through switches—a design that causes premature corrosion in models like 1968 Chryslers. British sports cars like the MGA also lack relays, while later MGBs position relay panels on the inner fender near power sources to reduce wire length. Modern computer-controlled car models integrate relays into body control modules rather than standalone locations. Regional variations further complicate placement: US versus UK Porsche models differ in ground wiring configurations. Manufacturer engineering choices prioritize either proximity to the battery or headlamps, explaining why relay positions vary considerably across different car models and production years. Proper headlight beam alignment ensures optimal visibility regardless of where relays are positioned within the electrical system. When evaluating relay additions, it’s essential to recognize that increased connections can introduce more potential failure points, particularly with push-on terminals that prove less reliable than screw-type connections in automotive applications.
Step-by-Step Guide to Locating Your Headlight Relay
Before attempting to locate your headlight relay, gather your vehicle’s wiring diagram, a test light, and a multimeter—these tools enable systematic identification rather than guesswork. Start your inspection at the left instrument panel fuse block, examining the top side for relay sockets with mounting holes. Different headlight relay types require specific terminal testing: probe terminal 30 for battery power, while terminals 86 and 87 verify switch control functions. Check the under-hood fuse block near the battery for high-current relay connections, particularly inline fuse setups. Examine the fuse panel cover’s label descriptions to identify headlight circuit fuses rated 10-30A, which typically sit adjacent to relay positions. In the engine compartment fuse panel, look for head lamp fuses marked LH and RH at 15 A each, as these circuits often share the same panel location with their corresponding relays. Understanding headlight relay functions—switching high-current loads through low-current controls—helps you distinguish them from daytime running light or sensor relays during your search. If your headlights remain on unexpectedly, the issue may stem from perimeter lighting system settings that automatically activate lights when unlocking your vehicle. For headlight connector repairs or replacements that may arise from relay issues, professional repairs typically range from $100 to $300, making it important to properly diagnose relay problems before pursuing costly solutions.
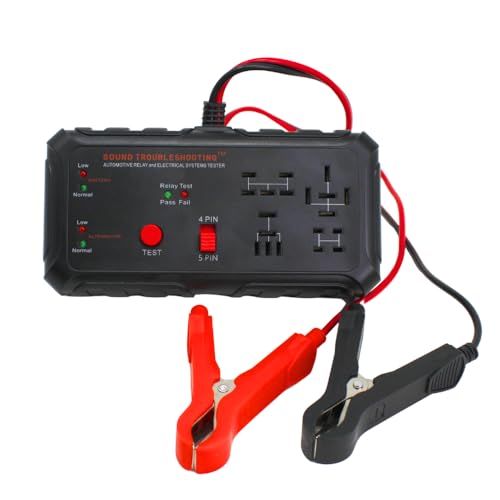
TESTS 4 & 5 PIN RELAYS: Quickly spot bad relays before they cause issues. This tool helps you confirm if your relays are firing correctly, removing the guesswork when diagnosing electrical issues. USA Patented.

EASY TO USE - The tester will automatically detect the pin position, the release time of the action, and the consistency of the relay in each test phase. If the tester lights up the green LED light, the relay is normal; if the red LED light is on, the relay is abnormal. The relay puller makes it easy to remove the relays to be tested. USA Patented.

Wide Compatibility & Effortless Control: This Relay tester kit is designed for seamless compatibility with a wide range of vehicles, including Audi, BMW, Volkswagen, GM, Chrysler, and more. Our relay bypass kit also replaces multiple relay models (9038, 9036, 9037) and provides direct control over fuel pumps, window motors, headlights, and other components
Understanding Headlight Relay Wiring and Connections
Once you’ve located the headlight relay, you’ll need to understand its wiring configuration to properly diagnose issues or complete an installation. Relay pin functions follow a standard pattern: Pin 30 receives constant battery power through a fuse, pin 87 outputs to your headlight bulbs, pin 86 connects to your headlight switch for control signals, and pin 85 grounds to the chassis. Power supply connections require 12-gauge wire from your battery or alternator post to pin 30, with a mandatory 20-30 amp inline fuse. Your trigger circuit uses the existing headlight switch wire, with the dimmer switch side connecting to pin 87 and the switch side to pin 86. Dual-beam systems typically employ separate relays for high and low beams, allowing your dimmer switch to route power accordingly. If you notice your headlights are not functioning properly, check that the replacement fuse matches the amperage rating of the original to avoid electrical issues. Before beginning any wiring work, always disconnect the negative battery terminal to prevent accidental short circuits.
Never go beyond its capabilities. Try to stay 10 to 15% below what the rate is for

Universal fit: Compatible with all automobiles, boats and devices equipped with a 12 volt power source

Efficient Cooling Performance: This electric fan relay kit ensures reliable cooling with a 60 amp relay and 4-pin waterproof relay. Compatible with 10", 12", 14", and 16" fans, it prevents engine overheating and is ideal for electric fan conversion kits or replacing old components. The electric radiator fan kit offers dependable performance in all driving conditions, boosting your vehicle's cooling efficiency
Signs Your Headlight Relay Has Failed and How to Test It
When your headlight relay begins to fail, you’ll notice several distinct symptoms that set it apart from bulb or wiring issues. Common relay symptoms include headlights flickering intermittently, complete failure of both beams, or lights remaining on after you’ve turned them off. You’ll often hear clicking, buzzing, or rattling sounds from the relay when activating your headlights, indicating worn internal contacts.
For relay testing, start by shaking the relay to check for internal rattling. Perform a voltage drop test by unplugging the relay, measuring input power, then reconnecting and testing output to the lights. Swap it with a known good relay to confirm the diagnosis. Inspect terminals for discoloration, which signals heat damage and confirms replacement necessity. Warning signs often appear before the relay fails completely, allowing you to address the problem proactively.


