To replace your Honda Jazz headlight bulb, first identify your model year’s bulb type—H4 halogen for 2002–2008 models or HB3/HB4 configurations for later generations. You’ll access the assembly through the wheel arch by turning your steering wheel fully right and removing the plastic protector. Disconnect the electrical connector, unhook the spring wire retainer, and pull out the old bulb. Install the new bulb by its metal base only, secure the spring clip, and reconnect the wiring. This guide covers generation-specific procedures and critical safety protocols.
Understanding Your Honda Jazz Headlight Bulb Types
Your Honda Jazz headlight bulb type depends critically on three factors: generation year, market region, and trim level. Early models (2002–2008) mostly use H4 dual-filament halogen bulbs rated 60/55 W at 12 V with P43t sockets. Mid-generation variants (2007–2016) may employ H4 or separate HB3/HB4 single-beam configurations alongside H11/H8 alternatives depending on market. Recent Jazz models feature factory LED low-beam assemblies paired with halogen HB3 high beams in select trims. Models equipped with LED type low beam headlights require authorized Honda dealer service for light assembly replacement and inspection. Bulb compatibility requires verifying socket type, wattage rating, and physical base shape against your vehicle-specific parts list. Incorrect bulb specifications—voltage, connector design, or thermal load—compromise beam pattern, cause electrical stress, and violate ECE/ADR homologation standards. Higher lumens output from aftermarket upgrades can improve visibility but may require ballast modifications on certain vehicle configurations. Always consult your owner’s manual before purchasing replacements.

Lights Dim Over Time, Replace In Pairs: Your lights are a pair, one is never turned on without the other. If one bulb burns out, the other isn't far behind. Replace your 9003 XtraVision Halogen bulbs in pairs for optimum performance.
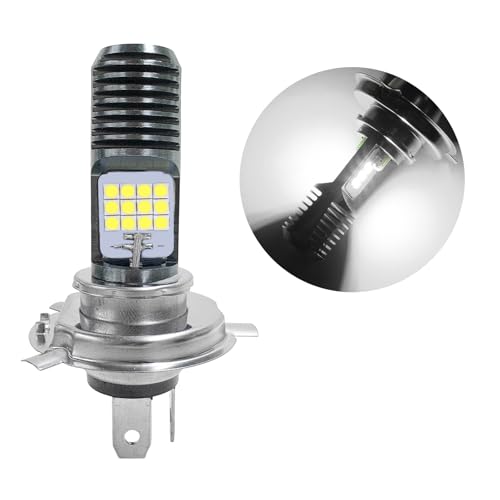
Product Specification: This product comes in three plug models: H4, PX15D, and BA20D. They all come in two colors to choose from: yellowish-white and all white. Its working voltage is 9-16V, and the current is 0.6A. Please check the product information before purchasing

【High-Brightness 6000K White Light】Our H4/9003/HB2 bulb emits a crisp 6000K cool white light, providing significantly improved visibility and a clearer view of the road for safer nighttime riding
Accessing the Headlight Assembly on Different Jazz Models
Once you’ve identified the correct bulb specification for your Honda Jazz, you’ll need to reach the headlight assembly—a process that varies considerably across model generations. For 2001–2008 models, access points are typically through the wheel arch inner liner rather than the engine bay. The 2009–2013 generation often requires partial bumper removal or accessing engine-bay trim panels. From 2014–2020, you’ll find fastener locations at the top and sides, reachable after removing grille trim. Before attempting removal, identify all securing points: top-mounted Phillips or hex bolts under engine-bay covers, side bolts near fender mounts, and lower bumper push-clips. Like the Hyundai Elantra, some Jazz models may require fuse box removal on the driver’s side to access headlight components. Regional differences between RHD and LHD configurations affect fastener locations, so confirm your specific layout before beginning work.
Removing the Old Headlight Bulb
Begin by turning the steering wheel fully to the right to access the driver’s-side headlight assembly through the wheel arch. Detach the front half of the plastic wheel arch protector using appropriate replacement tools—thin nose pliers, flat-headed screwdriver, or adapted fork to remove plastic retainers. Pull the arch protector away once all fasteners are removed.
Remove the rubber dust cover behind the bulb, allowing for slight sticking around connectors. Push the metal clip open and disconnect the electrical connector by squeezing the clip and pulling straight out. Unhook the spring wire retainer from the small metal hook on the lower right side using thin nose pliers, then swing it aside.
Pull the H4 bulb straight out, noting the three positioning pins. Handle different bulb types carefully to avoid touching the glass surface with bare fingers, as oil contamination can damage the bulb and reduce its lifespan. Most headlight bulb replacements can be completed in about 10-15 minutes with the right tools and preparation.

【900% Brightness Enhancement】Powered by upgraded automotive-grade chips, these H4/9003/HB2 bulbs deliver up to 900% more brightness than stock halogens, offering a clearer and wider 6500K view for safer night driving

【12X Brighter & 60000 Lumens】Upgrade your night vision with advanced AUXITO H4 LED bulbs. Utilizing the latest LED chips, each set delivers a staggering 60,000 lumens of brightness—12 times brighter than stock halogen bulbs. This powerful illumination floods the road ahead, eliminates dark spots, and ensures you can see pedestrians, road signs, and animals from a much greater distance for maximum driving safety.

1:1 Size & Easy Installation: Sealight H4 Fog Light bulbs feature a near-identical 1:1 mini design as original bulbs, requiring no external drivers or wires for a true plug-and-play experience
Installing the New Headlight Bulb
With the old bulb removed, prepare the replacement H4 bulb by handling it only by its metal base—oils from your fingers will create hot spots on the glass that shorten bulb life. Examine the bulb base to locate the three pins and identify the widest tab, which must point vertically during bulb positioning. Align these pins with the corresponding slots in the housing and insert the bulb without forcing it. Seat it fully to prevent misalignment issues.
For latch securing, push the metal clip down and under the bulb base until it engages completely. You’ll feel a firm click when properly locked. Reconnect the electrical connector by squeezing its clip and pushing firmly onto the bulb’s terminal. After securing the spring clip, ensure the rubber bung is properly reinstalled around the bulb base. Unlike full headlight assembly replacements that require removing multiple bolts and screws, bulb-only replacements use minimal-tool methods suitable for different Honda Fit model years. Before reinstalling components, verify that your vehicle’s lighting package matches the bulb specifications to avoid compatibility issues. Finally, reinstall the rubber cover, ensuring it seats tightly around the socket to maintain weatherproofing.

【800% Brighter - Newly Enhanced】SEALIGHT H4/9003/HB2 bulbs feature 24 high-performance chips, delivering up to 9 times the brightness of standard halogen bulbs. Enhance your nighttime driving experience by replacing dim, yellow stock bulbs with SEALIGHT H4/9003/HB2 Bulbs fog lights, offering superior illumination and enhanced visibility with a crisp 6500K cool white light for optimal light transmission

【900% Upgrade】 Equipped with top automotive-grade chips, autoone upgraded h4 bulbs deliver an impressive brightness per pair at a cool 6500K. The super-focused pattern ensures a wider and longer lighting range, making the 9003/hb2/h4 bulb 9 times brighter thanstock bulbs

1000% Super Brighter: Upgraded 24 PCS CSP 7535 LED chips, 60,000LM super brightness H4/9003 bulb per pair. Enhance your driving safety during low light or adverse weather conditions
Important Safety Tips and Precautions
Before you begin any headlight bulb replacement, prioritize personal safety by gathering appropriate protective equipment and preparing your workspace. Wear protective gloves and eye protection to prevent burns from hot bulbs and injury from broken glass. Verify your Honda Jazz’s engine is off, ignition key removed, and parking brake engaged. Allow components to cool for 10–15 minutes after recent use.
Proper bulb handling is critical for longevity and safety. Handle halogen bulbs only by the base—never touch the glass with bare hands, as skin oils cause overheating and premature failure. If accidental contact occurs, clean the glass with denatured alcohol and a lint-free cloth. Disconnect the battery’s negative terminal when working near wiring to prevent electrical shock and short circuits. Always use the correct bulb specification listed in your owner’s manual.
For the 2007 Honda Jazz specifically, be aware that the headlight bulb replacement process can be particularly complex for standard drivers and disabled individuals, so consider seeking professional assistance if the task proves too challenging.