
To replace an HID headlight ballast, first disconnect your battery to prevent electrical shock. Remove the headlight assembly by unbolting fasteners and disconnecting harnesses. Locate the ballast’s electrical connector, release the locking tabs, and remove mounting bolts. Install the new ballast, ensuring proper wiring routes away from heat sources, and apply dielectric grease to connections. Reconnect the battery and test for proper function, checking for flickering or error codes. Understanding compatibility requirements and diagnostic techniques will help you complete this repair successfully.
Identifying the Need for Replacement
When your HID headlight fails to illuminate, the ballast is often the culprit—but you’ll need to distinguish ballast failure from bulb or wiring issues before committing to a replacement. Start by swapping bulbs between sides; if the problem follows the bulb, it’s not the ballast. If the issue remains on one side, suspect ballast failure. Watch for telltale symptoms: flickering, delayed ignition, premature shutoff, color shifts, or audible buzzing. Inspect the ballast casing for burn marks, swelling, moisture ingress, or corrosion—all compromise electrical stability. Normal ballast lifespan degrades under heat, vibration, and humidity exposure. Before replacement, verify all wiring connections and fuses are intact. Use a multimeter to measure output voltage if available, confirming whether the ballast maintains proper electrical stability during operation. If accessible, swap the suspected faulty ballast with the working one to confirm component failure before purchasing a replacement. Understanding the color temperature and beam patterns of your HID system can also help diagnose whether performance degradation stems from ballast issues rather than normal wear. Consider replacing both ballasts simultaneously to maintain consistent lighting performance across your vehicle’s headlight system.
Tools and Safety Precautions
Replacing an HID ballast demands specific tools and strict adherence to safety protocols—high-voltage electrical components don’t forgive carelessness. Your tool selection must include Allen keys, tamper-proof Torx bits, Phillips screwdrivers, 10mm socket, vehicle jack, jack stands, and electrical connector tools. Before starting, disconnect your battery to eliminate shock risk. Safety gear is non-negotiable: wear insulated gloves when handling high-voltage ballast components. Work in a well-lit, dry environment to prevent moisture damage and accidents. When lifting the vehicle, increment 1-2 inches per side using secure jack stands to avoid frame twisting. Never touch HID bulbs with bare hands—oils compromise lifespan, and it’s important to verify LED and HID conversion compatibility with your vehicle’s electrical system before installation. Keep all fasteners organized, support headlight assemblies during removal, and inspect wiring for damage before reconnecting components. Ensure balanced lifting on both sides of the vehicle to prevent chassis stress and maintain proper working angles throughout the repair process.

Direct replacement - this high-intensity discharge lighting ballast is made to match the fit and performance of the original HID ballast on specific vehicle applications
100% Brand New 12V CANBUS HID ballasts with intelligent decoding, error light canceller, error free for most of cars with computer. fast start function,80% brightness in 2 seconds, full brightness in 3 secondes.
Compatible with the OEM Part# NZMNS111LBNA, 28474-89904-Z33, and 28474-8991A-Z33 ballast power unit, convert the OEM Matsushita Panasonic ballasts with the most popular 9006/HB4 adapters
Accessing and Removing the Headlight Assembly
Your headlight assembly sits anchored behind multiple access barriers that you’ll systematically dismantle to reach the ballast. Begin by releasing the hood latch and securing it open with the prop rod. Locate the headlight from the engine bay, removing dust covers and any obstructing components like air intake ducts or battery covers. Standard headlight removal techniques involve unbolting all mounting fasteners—some hidden beneath bumper brackets—then disconnecting electrical harnesses from the rear. Tight spaces may require removing the front bumper cover, fender liner, or wheel for adequate clearance. Assembly handling precautions are critical: support the housing firmly while extracting to prevent lens scratches or broken tabs. Once freed, carefully pull the assembly forward, maintaining awareness of remaining wire connections before complete removal. Before beginning work, disconnect the vehicle’s battery to ensure safe handling of electrical components. Wear gloves throughout the process to avoid touching the bulb glass and transferring oils that could damage components.
Removing the Ballast
Before touching the ballast, disconnect your vehicle’s battery to eliminate electrical shock risks and prevent damage to sensitive HID components. Locate the electrical connector—typically a large plug attached to the ballast box. Release locking tabs by pressing or gently prying with a flat-head screwdriver, then pull straight out to avoid bending pins. Different ballast types require specific connection techniques; some bulb connectors twist counterclockwise for removal.
Identify mounting bolts securing the ballast, usually Allen key or Torx fasteners. Use the correct tool size to prevent stripping bolt heads. Remove bolts carefully and keep them organized for reinstallation. If clipped into housing, gently pry the ballast loose without cracking plastic components. Snake wires through housing openings, noting routing paths for proper reconnection during installation. While HID technology has been widely used, many drivers are now exploring LED headlight upgrades for improved energy efficiency and longer lifespan. It’s important to note that DOT-approved replacements must meet federal safety standards for legal on-road use. You may need to position shop towels as supports beneath components to prevent sagging or stress on connected wiring during the removal process.
Installing the Replacement Ballast
Once you’ve removed the old ballast, position the replacement unit near its mounting location and perform a bench test before permanent installation. Connect the ballast to your vehicle’s battery and HID bulb to verify proper ignition and stable operation without flickering. After confirming functionality, select a clean metal surface close to the headlight assembly for ideal heat dissipation. Apply isopropyl alcohol to remove contaminants before mounting.
For mounting techniques, prioritize supplied brackets with self-tapping screws over adhesive methods. Secure the ballast firmly without overtightening to prevent housing damage. Avoid using double-sided tape as it can trap heat and lead to ballast overheating. Route wiring away from heat sources and moving components. Quality ballasts with digital versus analog technology offer superior performance in regulating electrical current and preventing flickering during operation. Using quality parts ensures safer, more reliable headlight performance over time.
Establish electrical connections by applying dielectric grease to all connectors, preventing corrosion. Plug the ballast output securely to the bulb igniter, seal wire entry points with grommets, and verify proper grounding to eliminate radio interference.

HID HEADLIGHT BALLAST REPLACEMENT - Also known as headlight control unit, a crucial part of hid lighting system, provides the voltage needed to start the lamp and regulates the electrical current of the light once it is lit. A failed ballast will cause your bulb to burn. When the voltage is input, the output power of the ballast can be kept constant at about 35W or 50W to protect the HID bulb from damage. The ballast fits either the left or right hid headlights.

FIT THE FOLLOWING VEHICLE - W3T19371 ballast replacement for 2006-2014 Acura TL TL-S | 2006-2014 Acura TSX | 2012-2014 Acura ILX | 2010-2013 Acura ZDX | 2013-2014 Acura RDX | 2010-2013 Acura MDX | 2009-2011 Acura CSX | 2011-2013 Honda CR-Z | 2004-2014 Honda Odyssey | 2012-2014 Mazda CX-5 | 2007-2012 Mazda CX-9 | 2007-2009 Mazda 3 | 2009-2012 Mazda 5 | 2007-2009 Mitsubishi Out lander | 2008-2012 Mitsubishi Lancer Evolution

【NEED ATTENTION】If your xenon HID headlight bulb is buzzing, dimming/losing brightness, flickering, randomly going out, changing colors, or not lighting at all, it could be that your ballast is bad.A failed ballast kit will cause your bulb to burn.If you notice any of the above symptoms, PLEASE NOTE that order ballast from the KERBIY to avoid further loss.
Testing and Reassembly
After securing all electrical connections and mounting hardware, you must systematically verify the ballast’s performance before completing reassembly. Reconnect the battery and activate the headlights to confirm both low and high beam function. Monitor for flickering, dimming, or overheating that indicates connection failures. Employ diagnostic tools to scan for error codes in the lighting system. Observe the beam pattern on a flat surface, making alignment adjustments via the headlight assembly screws to meet manufacturer specifications. These testing techniques guarantee proper bulb seating and prevent light scattering. Reattach protective covers while routing wiring away from heat sources and moving parts. Verify all connectors remain snug and watertight seals are intact. Conduct a final functional test, confirming even brightness and directional coverage before completing reassembly.
Troubleshooting Common Issues During Installation
Several installation challenges can compromise HID headlight performance even when you’ve followed proper procedures. Begin electrical diagnostics by checking all connector seals for proper seating—loose connections cause flickering or complete failure. Verify polarity to guarantee ballast functionality, and inspect wiring for fraying or damage that interrupts power supply. Use a multimeter to confirm voltage output from the ballast. For moisture protection, examine housing gaskets and seals carefully, as water intrusion leads to corrosion and short circuits. If you’re experiencing dim or uneven lighting, check for lens contamination or aging bulbs. Confirm component compatibility with manufacturer specifications—mismatched ballasts and bulbs trigger electrical overloads. When symptoms persist, swap the ballast with a functioning side to isolate the fault before replacing components. Always wear safety gloves and goggles during installation to protect against electrical shocks and maintain a clean workspace.

NEED ATTENTION - When your headlights are dim, buzzing, changing colors, or flickering rapidly, your ballast might have been toasted, then your bulb will follow.If you notice any of the above symptoms, PLEASE NOTE that order ballast from the Hiolpen to avoid further loss

【Superior Function】: The xenon headlight ballast utilizes electrons to excite the gas that illuminates the HID xenon bulbs, significantly prolonging their service time while maintaining brightness levels. This makes it an optimal solution for enhancing visibility.
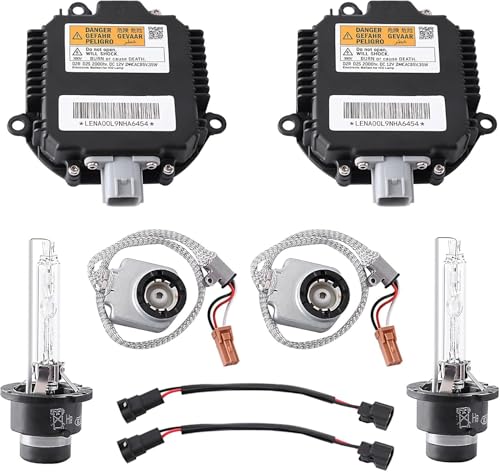
【REPLACE PART NUMBER】28474-89904 2847489904 28474-8991A 284748991A 28474-8991B 284748991B 28474-89907 2847489907,NZMNS111LANA NZMNS111LBNA NZMNS111LANH NZMNS111LANG.Come with D2S Bulbs and Igniter.
Choosing the Right Replacement Ballast
Selecting the correct replacement ballast requires verifying compatibility with your vehicle’s electrical architecture and headlight specifications before purchase. Cross-reference the original OEM part number—such as Toyota Prius #85967-24010—to ascertain precise fit and electrical matching. Key ballast compatibility factors include bulb type (D1S, D2S), voltage rating (typically 12V input), connector configuration, and igniter integration. Verify your vehicle’s CAN bus requirements to prevent error codes. Measure physical dimensions and mounting points against your headlight housing constraints. Choose OEM or certified aftermarket units with SAE/DOT compliance for reliability. Review warranty coverage and brand reputation through verified customer feedback. Essential ballast installation tips: confirm wiring harness length accommodates routing without strain, validate weatherproof housing construction, and ascertain mounting hardware compatibility. Avoid budget options lacking durability certifications—premature failures compromise safety and increase replacement costs. While OEM ballasts may cost several hundred dollars, non-OEM alternatives with matching part numbers can offer equivalent performance at significantly reduced prices.

【KDLT003 Ballast replacement】Also known as Headlight Control Unit, a crucial part of HID lighting system, provides the voltage needed to start the lamp and regulates the electrical current of the light once it is lit. A failed ballast will cause your bulb to burn. It is a perfect solution for 2004 2005 2006 2007 2008 2009 2010 2011 2012 2013 2014 Lexus SC430 ES350 ES350h LS460 LS460L LS600h RX350 RX450h GX460 GS300 GS350 GS430 GS450h Gs460 IS250 IS350 IS350F IS250C

Compatible With: 2008-2010 Toyota Avalon, 2006 2007 2008 2009 Toyota Prius, 2006-2008 Toyota Solara, 2009-2012 Toyota Venza, 2006-2010 Lexus SC430, 2007-2014 Lexus ES350 ES350h, 2007-2012 Lexus LS460 LS460L LS600h, 2009-2012 Lexus RX350 RX450h, 2010-2013 Lexus GX460, 2006-2011 Lexus GS300 GS350 GS430 GS450h Gs460, 2004-2011 Lexus IS250 IS350 IS350F IS250C IS350C

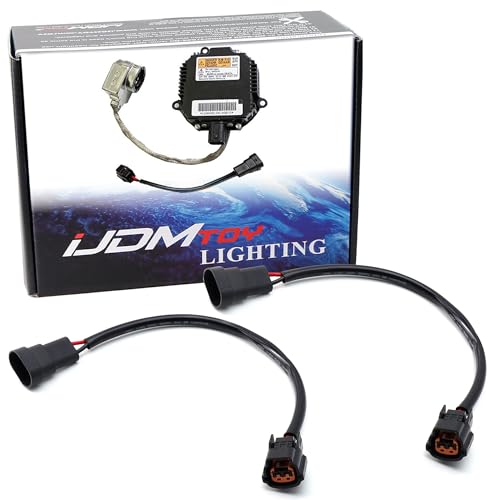
DIRECT REPLACEMENT — This aftermarket ballast is 100% compatible and a direct replacement for your existing part. Designed to meet or exceed OEM specifications. Plug-and-play installation with no need to program or code the car. Fits either the left or right headlight.
Maintenance Tips to Extend Ballast Life
While HID ballasts operate reliably under normal conditions, implementing systematic maintenance protocols substantially extends their operational lifespan and prevents premature failures. Enhance ballast longevity through regular inspection of electrical connectors for corrosion, ensuring tight connections prevent voltage fluctuations. Verify headlight assemblies remain properly sealed against moisture intrusion, as water ingress directly damages ballast circuitry. Replace bulbs in pairs to maintain balanced electrical loads across both ballasts, preventing asymmetric wear patterns. Secure all components against vibration-induced failures by checking mounting hardware quarterly. Clean bulbs with alcohol and lint-free cloths to eliminate contaminants that create hot spots. Store vehicles in covered areas during extended periods of non-use. Address any flickering lights immediately, as this symptom often indicates failing ballasts or poor electrical connections that will worsen over time. This preventive maintenance approach significantly reduces premature ballast degradation while ensuring consistent, reliable headlight performance throughout the system’s designed service life.
Cost Comparison: DIY Vs Professional Replacement
Understanding the financial implications of ballast replacement requires analyzing both immediate expenditures and long-term value considerations. DIY replacement eliminates $100–$250 labor costs but introduces installation challenges that can damage sensitive electrical components. You’ll spend $150–$450 on parts (ballast and bulbs), matching professional parts pricing. However, cost factors extend beyond initial savings—professional service includes diagnostic verification, proper calibration, and warranty protection worth $50–$300 in potential future expenses.
Professional replacement proves advantageous when installation challenges include bumper removal or complex disassembly requiring 1–2 hours. Electrical fault diagnosis adds 0.5–1.5 labor hours, critical for preventing repeat failures. DIY suits mechanically skilled individuals with proper tools and knowledge, but improper installation risks system damage exceeding initial savings. Aftermarket ballasts cost around $100, while dealership ballasts can exceed $300, creating significant price variation depending on your parts source. Evaluate your technical capability honestly before choosing.

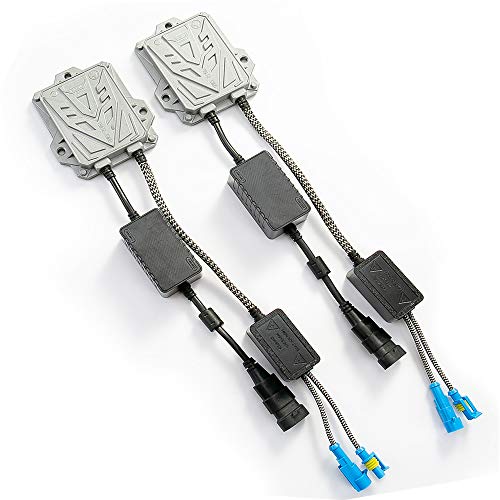
VEHICLE FITMENT - Engineered for seamless plug-and-play installation on a wide range of Infiniti and Nissan models (2003-2013), including Infiniti G35, G37, EX35, FX35/45/50, M35/45, QX56, and Nissan 350Z, Altima, Murano, Maxima, GT-R, Rogue. Always use the Amazon vehicle compatibility checker above to confirm fit before ordering

Each bundle contain 2 bulbs, 2 ballast, and installation accessories

Repalce Part Numebr: 8A5Z-13C170-A; DL3Z-13C170-A; 8A5Z13C170A; DL3Z13C170A; Bulb 7L7Z-13N021-A; 7L7Z13N021A


