To replace a xenon headlight bulb, first disconnect your vehicle’s battery and let the headlights cool completely. Access the headlight assembly by removing any obstructing components, then disconnect the electrical connector and safety clip from the bulb’s base. Carefully remove the old bulb without touching the glass, and install the new one using clean gloves to prevent oil contamination. Secure all clips, reconnect the electrical components, and test the headlight for proper illumination and beam alignment. Understanding common troubleshooting techniques will help you address any performance issues that may arise.
Gather Tools and Ensure Vehicle Safety
Before replacing a xenon headlight bulb, assemble the necessary safety equipment and prepare your workspace to prevent injury and guarantee proper installation. Your safety gear must include nitrile or latex gloves to prevent skin oils from contaminating the bulb surface, and safety glasses to protect against potential glass breakage. Your tool checklist should contain replacement HID bulbs matching your vehicle’s specifications, appropriate screwdrivers or socket wrenches, clean handling cloths, and electrical contact cleaner or dielectric grease for connections.
Park your vehicle on level ground and engage the parking brake. Open and secure the hood, then verify the engine and headlights are completely cool. Disconnect the negative battery terminal if extensive electrical work is required. Ensure you work in a well-ventilated space to maintain proper air circulation during the replacement process. Consult your owner’s manual for model-specific procedures and confirm the correct bulb type before proceeding.
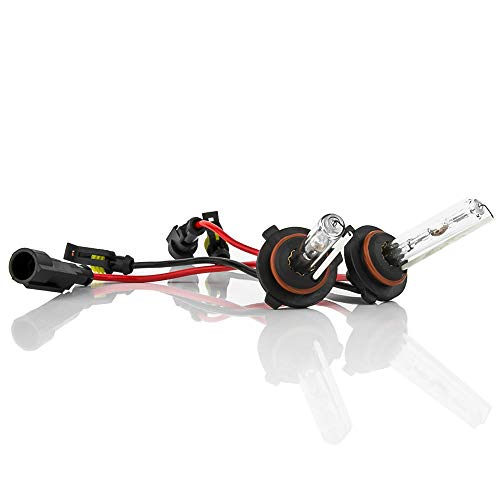
High Quality Material: This automobile bulb is made of high-quality quartz tube material, which has excellent high-temperature resistance and can maintain a stable structure during long periods of illumination. At the same time, the quartz tube has strong impact resistance and can withstand minor vibrations, providing reliable protection for the long-term use of the lamp bulb.

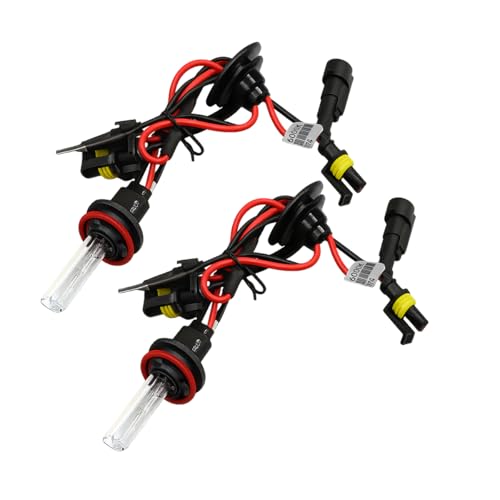
Each bundle contain 2 bulbs, 2 55W Platinum ballast, and accessories
<b>Output up to 3000lm, 3X of halogen bulb; Machine calibrated bulb ensure color precision
Locate and Access the Headlight Assembly
To access the xenon bulb housing, you’ll first need to expose the headlight assembly by removing obstructing exterior components. Remove any grill, bumper, or trim pieces following manufacturer specifications, carefully unscrewing fasteners to avoid damage. Track all fastener locations for proper reassembly.
Locate all mounting screws, bolts, and mounting clips securing the headlight assembly—typically Torx bolts, Phillips screws, or plastic clips around the perimeter. Some vehicles require wheel well liner removal for access. Use correct-size tools to prevent stripping fasteners.
After loosening all fasteners, gently wiggle the assembly free. Don’t force it—check for missed clips if resistance occurs. Once removed, disconnect electrical connectors at the rear, releasing any secondary locking tabs first. Remove dust caps or rubber seals protecting the bulb, avoiding contact with xenon glass. If you notice moisture inside the assembly during removal, refer to guidance on removing condensation from headlights before reinstalling. Have screwdrivers and trim removal tools ready for detaching any remaining clips that secure the headlight assembly.
Disconnect the Electrical Connector
With the headlight assembly exposed and dust covers removed, you’ll need to disconnect the electrical connector before removing the xenon bulb. Connector types vary by manufacturer, but most use tab-lock or clip-release mechanisms. Locate the locking tabs on the connector’s plastic housing and squeeze them simultaneously while pulling straight outward. Never grip the wires themselves—this guarantees electrical safety and prevents wire damage.
If the connector resists, gently use a flathead screwdriver to release stubborn clips without forcing. Inspect the connector pins and bulb contacts for corrosion before proceeding. Once separated, verify complete disconnection by lightly tugging the housing. Keep the disconnected connector away from contaminants and avoid touching the bulb’s glass surface, as oils from your skin can affect color temperature and performance. For some models, particularly newer xenon systems, you may need to remove bumper and fender liners with bolts and clips to access the headlight assembly properly. Before proceeding with bulb removal, disconnect the safety clip and igniter from the bulb assembly. This careful approach protects delicate components and maintains system integrity.

【Package Include】Offers single, double pin extractors and casting tool of different sizes to fit most terminals. 82 Pieces electrical pin removal tool kit includes 28Pcs Single Pin Extractor, 30Pcs Double Pin Extractor, 24Pcs Casing Tool and 1 Protective Case
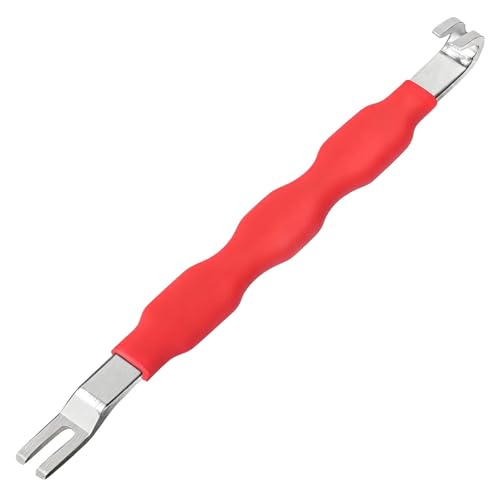
Automotive Electrical Terminal Connector Separator Removal Tool:Safely separating stubborn electrical connector removal tool without the need for a screwdriver to pry,helps protect lock plates, terminals, and wiring harnesses, reducing the risk of lock plate breakage, terminal bending, or wiring harness damage
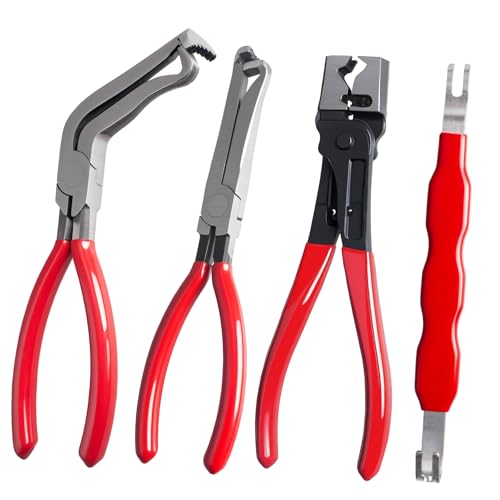
Our automotive electrical disconnect pliers are made from high-carbon steel that is sturdy durable and not easy to rust or damage. The robust build ensures that couplers can be disconnected without causing wear to the tool itself. And the handle is made by plastic coated that is anti slip, comfortable and labor-saving.
Remove the Old Xenon Bulb
Once the electrical connector is safely detached, the xenon bulb itself can be removed from the headlight assembly. First, locate and release the securing clips or retaining mechanism that holds the bulb in place. Press the clip gently or rotate the bulb counterclockwise approximately 90 degrees if a quarter-turn lock is used. Once released, carefully pull the bulb straight out by grasping only its base or holder. Never touch the glass surface, as bulb contamination from skin oils can cause premature failure or hot spots. Consider comparing HID and halogen options to understand the differences in bulb types for future replacements. If clearance is limited, pry the headlight assembly forward slightly to facilitate removal. Handle the bulb with care to prevent breakage, and set it aside for proper disposal according to local regulations. If the bulb or clip feels stuck, do not force it; instead, reverse your actions and attempt the removal again from a different angle.

💡 Compatible with- Replacement for all Xenon headlights accepting D2S/D2R bulbs. Come with 2x D2H xenon headlight bulbs +2x ballasts, 12V 35W, 6000K, 3200lm per bulb.

Reliable Quality: Crafted with high-quality quartz and enhanced filament, these halogen bulbs have excellent ability of light concentration and heat dissipation. Compared to ordinary halogen bulbs, they can withstand greater vibration and ensure longer lifespan.

FEATURES-Headlamp control unit, a crucial part of HID lighting system, provides the voltage needed to start the lamp and regulates the electrical current of the light once it is lit
Install the New Xenon Bulb
Begin the installation by handling the new xenon bulb with clean gloves or a lint-free cloth to prevent skin oils from contaminating the glass surface. Position the bulb with proper bulb alignment, making certain the notch or return wire faces the designated position—typically 6 o’clock or top, depending on your model. Insert the bulb straight into the socket without twisting until fully seated and flush with the housing.
Secure the retainer ring by aligning tabs correctly, avoiding excessive force on fragile plastic components. Attach the electrical connector after the bulb is firmly positioned, confirming the locking mechanism engages fully. These installation tips prevent loose connections and guarantee stable operation. Modern LED alternatives offer improved nighttime visibility compared to traditional xenon bulbs while consuming less power and lasting longer.
Replace protective covers immediately to prevent moisture ingress. Ensure the ballast is securely mounted in a suitable location to maintain stable operation. Turn on your headlights to verify proper illumination and beam alignment before completing reassembly. If the bulb fails to illuminate, check the ballast functionality by performing a swap test with the working headlight to determine if the ballast requires replacement.
Each bundle contain 2 bulbs, 2 55W Platinum ballast, and accessories

FIT THE FOLLOWING VEHICLE - W3T19371 ballast replacement for 2006-2014 Acura TL TL-S | 2006-2014 Acura TSX | 2012-2014 Acura ILX | 2010-2013 Acura ZDX | 2013-2014 Acura RDX | 2010-2013 Acura MDX | 2009-2011 Acura CSX | 2011-2013 Honda CR-Z | 2004-2014 Honda Odyssey | 2012-2014 Mazda CX-5 | 2007-2012 Mazda CX-9 | 2007-2009 Mazda 3 | 2009-2012 Mazda 5 | 2007-2009 Mitsubishi Out lander | 2008-2012 Mitsubishi Lancer Evolution

Each bundle contain 2 bulbs, 2 ballast, and installation accessories
Reconnect Electrical Components and Reassemble
The electrical connector must attach to the xenon bulb before inserting the assembly into the headlight housing to prevent unnecessary removal and reinstallation. Verify correct connector orientation—typically right-hand side—and push firmly until it clicks, ensuring full electrical contact. Rotate the bulb assembly 90 degrees clockwise to lock it mechanically into the housing.
Replace the dust cover over the bulb connector, pressing or twisting to seal against moisture ingress. Carefully position the headlight assembly, checking assembly alignment with mounting points and ensuring wiring harnesses aren’t pinched. Secure with original fasteners torqued to manufacturer specifications. A quality ballast regulates electrical current to your xenon system, preventing the flickering and inconsistent performance that can result from improper installation.
Reconnect the battery’s negative terminal with correct polarity. Activate the headlights to verify illumination, inspect all connections for tightness, and confirm the dust cover seals properly to prevent water intrusion. Since xenon bulbs have a shorter lifespan compared to LED alternatives, proper installation and care are essential to maximize their performance. Wear surgical gloves during bulb handling to prevent oil transfer from skin contact, which can damage the xenon bulb and reduce its lifespan.
Test the New Headlight Bulb
After completing the installation, verify proper operation of the new xenon bulb through systematic testing procedures. Turn on your headlights and confirm the bulb illuminates quickly, reaching full brightness within seconds. Let it warm up for one minute to assess stable light output and verify bulb compatibility with your vehicle’s electrical system. Compare the color temperature against manufacturer specifications—typically 4300K to 6000K for xenon bulbs. Listen for unusual buzzing sounds indicating ballast issues, and watch for flickering that signals poor connections. Use a multimeter to check electrical continuity across bulb contacts. If the bulb fails to light, test your ballast function separately. Once verified, allow the bulb to cool before final reassembly. For D1S and D1R systems, note that the igniter is integrated within the bulb itself rather than as a separate component. HID technology provides superior illumination compared to traditional halogen bulbs, making the testing phase critical to ensure optimal road visibility. Consider upgrading to LED alternatives if your vehicle supports them for improved brightness and longer lifespan. Document test results for warranty purposes.
Troubleshooting Tips and Best Practices
When xenon headlight bulb installation encounters problems, systematic troubleshooting identifies and resolves common issues before they compromise vehicle safety or component longevity. Flickering problems typically indicate poor bulb seating or damaged filament coating—reseat the bulb carefully and verify secure connections. If flickering persists, inspect ignition ballasts and wiring harnesses for faults. Dim, yellowish, or pinkish light output requires immediate bulb replacement.
Verify bulb compatibility with your vehicle’s headlamp assembly and electrical specifications before installation. Always disconnect the battery during replacement procedures to prevent electrical hazards. Use manufacturer-recommended tools and label component positions during disassembly to guarantee correct reassembly. Carefully position the retaining clip around the bulb housing to secure the headlight firmly in place. Adjusting beam angles with supplied tools may be necessary after installation to ensure optimal headlight performance. Monitor headlight performance after installation for color shifts or dimming. If problems continue after bulb replacement, consult professional technicians to diagnose ballast or electrical system failures. Check for loose connections in wiring or fuses, as these can lead to headlight problems.