
You’ll need Torx T20/T25 sockets, a calibrated torque wrench, and insulated gloves to replace your Tesla headlight safely. Start by disconnecting the 12V battery, then remove the front bumper and cabin intake duct for access. Detach electrical connectors by pulling red tabs, pressing black tabs, and releasing green tabs. After installing the new assembly with proper torque specifications, you must perform firmware recalibration through the touchscreen. Model-specific compatibility varies greatly between production years, and proper alignment techniques prevent dashboard alerts that signal installation errors.
Tools and Equipment Needed for Tesla Headlight Replacement
Before you begin replacing your Tesla’s headlight assembly, gather the essential hand tools that guarantee efficient and damage-free removal and installation. You’ll need a Torx T20 and T25 socket set, 10mm socket with magnetic deep socket, and a calibrated torque wrench for proper bolt tensioning. A cordless hex driver with 6-inch nutsetter enables access to confined spaces around the headlight housing.
For electrical safety, use insulated gloves when disconnecting connectors to prevent short circuits. Deploy plastic pry tools—not metal implements—to release electrical tabs without damaging locking mechanisms. Activate Service Mode before starting to disable vehicle electronics. Include plastic trim removal tools, eye protection, and a multimeter for voltage verification. When working with connectors that feature a red locking tab, you must pull the tab away to unlock the connection before disconnecting. Ensure any replacement headlights you install comply with federal safety standards to maintain legal road use. Organize your workspace with protective mats to prevent lens scratches during handling.

Our set of tools for disassembling and assembling automotive air filters is of very high quality, provides a great user experience, and can be used for a long time.

KIT INCLUDES: 1 - Disc Pad Holder, 3.25 in (8,2 cm) 6 - 3M Gold Sanding Discs 500 Grit, 3 in (7,6 cm) each 4 - 3M White Finishing Discs 800 Grit, 3 in (7,6 cm) each 1 - 3M Trizact Refining Disc 3000 Grit, 3 in (7,6 cm) 2 - 3M Quick Headlight Clear Co

Instructions for Use: The first yellow drill attachment installed on the drill, cushion pad white surface and drill attachment black surface paste, use the first in the lamps on the spray water and then use the cleaning pad to dry in a circle, and then according to the grain size from small to large in order to use the waterproof abrasive disc on the lamps for polishing, and finally use the sponge polishing pad for polishing
Step-by-Step Headlight Removal Process
Removing a Tesla headlight assembly requires systematic disassembly of five interconnected components in a specific sequence to prevent damage to the vehicle’s bodywork and electrical systems. First, disable Service Mode and remove the front bumper by extracting all Torx screws, clips, and wheel well fasteners. Second, detach underhood components blocking access, including the cabin intake duct and hood latch cover. Third, pull the red locking tabs and disconnect the electrical connectors from the headlight assembly. Before proceeding with bolt removal, disconnect the 12-volt battery to prevent electrical shorts during the disassembly process. Fourth, remove 2-4 mounting bolts using a 10mm socket, noting torque specifications for reinstallation. Fifth, carefully slide the assembly forward, avoiding headlight misalignment issues and water intrusion concerns by protecting alignment pins and seals during extraction.
Installing Your New Tesla Headlight Assembly
With the old headlight assembly removed, you can now install the replacement unit following precise positioning and connection procedures. Carefully align the assembly onto mounting points, guaranteeing no wiring is pinched. Use alignment techniques that verify proper fitment with adjacent body panels before securing fasteners. Apply manufacturer-recommended torque specifications of 4 to 4.7 Nm using appropriate 10 mm and Torx T20 sockets for base, top, and fender bracket bolts. Firmly attach electrical connectors, making sure locking tabs engage fully—pull red tabs away before reconnecting to prevent damage. Avoid using dielectric grease on connections. Connect the harness to the rear of the headlight assembly before proceeding with bolt installation. Reinstall the front fascia, underhood storage unit, and all removed components following reverse disassembly sequence. After installation is complete, ensure the motorcycle is positioned on a level surface and loaded to riding weight before performing final beam adjustments. Perform headlight adjustment using regional-specific methods to guarantee correct beam alignment and safe road illumination.

【COMPATIBLE WITH】 Replacement for Tesla Model Y 2020-2025; Replacement for Tesla Model 3 2021-2023

Fitment:This adapter is compatible with 2021+ Tesla Model S.ONLY for Fremont-built vehicles produced between 2021-02-08 and 2022-02-13

FITMENT: Compatible with Tesla Model S 2017, 2018, 2019, 2020, 2021, 2022, 2023, 2024, 2025, 2026. Precut pieces sized for factory headlights.
Electrical Connections and Software Recalibration
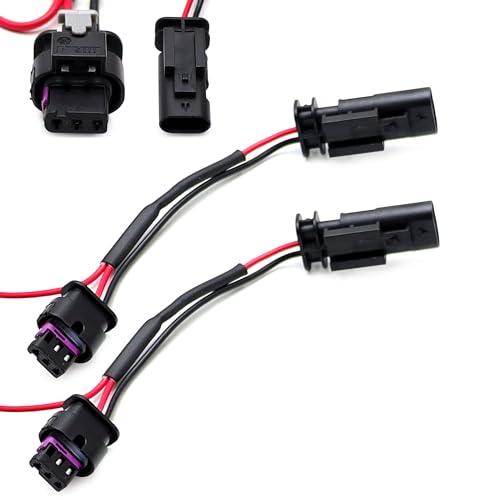
After securing the headlight assembly mechanically, you must restore electrical connections with precision to prevent malfunctions and system errors. Begin by aligning connectors with seals and anti-rotating guides, confirming they’re fully seated before closing locking tabs. Red tabs pull away to release, black tabs require pressing and pulling outward, while green tabs engage to lock connections. Connector integrity depends on proper seating and secure locking mechanisms.
Once electrical connections are complete, re-enable 12V power and perform firmware reinstallation through your Tesla’s touchscreen. This software recalibration guarantees the new headlight is recognized and integrated into vehicle systems, enabling adaptive control and automatic leveling. The headlight ECU attaches with four screws tightened to 2 Nm (1.5 lbs-ft) for proper securing to the assembly. Observe electrical safety protocols throughout: disconnect power, wait two minutes for circuit discharge, and use appropriate tools to avoid damaging harnesses or stripping fasteners.
Product material: the white automobile connector is made of high-quality insulating plastic, and the pin plug is tin-plated copper, which is wear-resistant and durable.
Compatible with Tesla 2017-2023 Model 3 and 2020-2024 Model Y

1. H4 Pigtail socket wiring harness connector: If PINs on your vehicle are not standard to guarantee your 4"x6" 7"x6" 5"x7" work normally like neither low beam nor high beam work on your vehicle, this H4 Wiring Harness is needed. It will make your HID/LED /Foglight retrofit easier a lot. More details kindly please check the main pictures
Model-Specific Differences and Considerations
Tesla’s headlight assemblies vary greatly across model lines and production generations, requiring careful identification before ordering replacement parts. Model 3 and Model Y share limited headlight interchangeability within corresponding production periods, but Model S and Model X use generation-specific designs that aren’t cross-compatible. You’ll encounter significant differences between pre-refresh and post-refresh headlights—reflector versus projector styles, mounting bracket configurations, and ballast unit variations all prevent direct swaps.
Pay close attention to trim variations within your specific model year. Base-level headlights often feature chrome trim, while up-level variants integrate LED strips differently. Matrix LED systems in 2021+ Model S/X and 2023+ Model 3 “Highland” require matching hardware. When accessing headlight components, you may need to remove fasteners like bumper clips and screws to reach the assembly safely. Always verify left-hand drive versus right-hand drive compatibility, as ordering incorrect versions results in costly returns and installation delays. Software compatibility is crucial for features in matrix headlights, as hardware alone doesn’t guarantee full functionality without proper vehicle integration.

Compatible with:2021-2024 Tesla Model Y,2021-2023 Tesla Model 3,only fits Full LED models

【Replacement Part Number】1918347, 1918347-00, 1918347-00-D, 1918347-00-E, 191834700, 191834700D, 191834700E

Product Type: Headlight Assembly
Common Challenges and Professional Tips
Replacing Tesla headlights presents distinct mechanical obstacles that you’ll need to anticipate before attempting the work. Strong adhesive seals complicate disassembly, often requiring cutting tools to access internal components. Design flaws in early models, particularly inadequate heat dissipation systems, contribute to increased repair frequency as LEDs overheat and fail prematurely. When handling fragile LED modules, use specialized tools and exercise extreme care during removal.
Electrical glitches may stem from corroded connectors or blown fuses—always inspect wiring harnesses thoroughly. Software-locked modules present significant challenges; aftermarket units won’t function without proper programming. Essential installation tips include performing system resets to clear minor faults and reapplying waterproof sealant during reassembly. Tesla-specific diagnostic tools enable access to error codes and facilitate software updates. Before beginning any repair work, conduct a basic visual inspection for moisture, dirt, or debris that could complicate the replacement process. If electrical issues persist beyond basic troubleshooting, professional intervention prevents costly mistakes.

【Repair LED Headlights】Our car LED headlight decoder, as a capacitive decoder that transmits pulse signals, can detect and solve the problem of LED headlight flickering, LED headlight malfunction, excessive flickering, no flickering or dashboard light bulbs burning.

Reliable Quality: Crafted with high-quality quartz and enhanced filament, these halogen bulbs have excellent ability of light concentration and heat dissipation. Compared to ordinary halogen bulbs, they can withstand greater vibration and ensure longer lifespan.

194 LED Bulbs: Voltage 12V, 6000K xenon white, power 2w/pc, dimensions: 1 by 0.47 inches, net weight: 2g/pc. Low power consumption for longer lifespan


