To replace your Volvo’s D5S headlight bulb, you’ll first disconnect the battery and allow components to cool completely. Wear nitrile gloves to prevent oil contamination on the bulb’s glass surface. Access the headlight assembly by removing securing bolts with a T25 Torx driver, then disconnect the electrical connector and release the retaining clip. Install the new OEM-spec D5S bulb without touching the glass, secure it properly, and test for proper illumination and beam pattern. This guide covers essential troubleshooting steps and maintenance practices to verify long-lasting headlight performance.
Tools and Materials Needed for D5S Bulb Replacement
Replacing a D5S headlight bulb in your Volvo requires specific tools and materials to guarantee safe installation and peak performance. You’ll need the correct D5S replacement bulb matching your owner’s manual specifications. Essential tool types include a Torx screwdriver (typically T23 bit), small flathead screwdriver for clips, and possibly pliers for retaining mechanisms. Latex or nitrile gloves are mandatory—proper handling techniques prevent oil contamination on the bulb glass, which causes premature failure. Keep a microfiber cloth, worklight, and compressed air available for cleaning debris. Electrical contact cleaner addresses corroded socket pins. Store screws in a container during disassembly. For Volvo V60 models, you’ll specifically need to remove four Torx bolts from the back panel to access the headlight assembly. Prefer OEM or quality aftermarket bulbs with aluminum bodies and integrated cooling systems for extended lifespan and durability.

Crystal Clear 6500K Daylight White: Experience exceptional visibility with 6500K pure white light that enhances overall performance. These D5S bulbs deliver outstanding clarity in all conditions, with precision engineering for consistent beam patterns and safer driving, especially when used as fog light upgrades
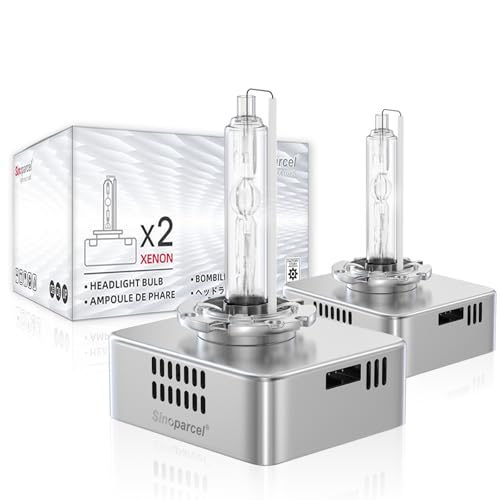
Life time support, 2pcs packaged; Direct replacement for D5S bulbs. No wiring modifications needed—install in minutes with factory connectors and built-in igniters. (If there is any problem in the product, please contact us via Account Center, we will reply you within 24 hours)
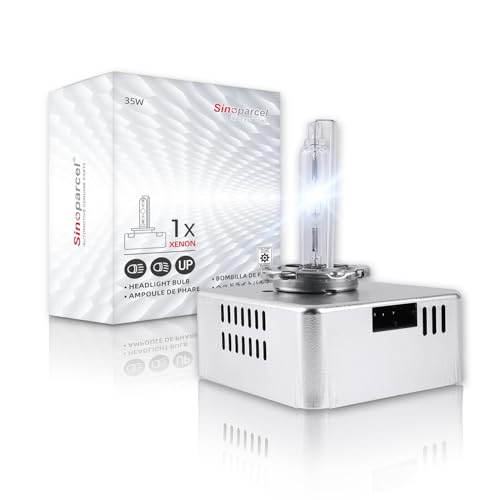
Life time support, 1pcs packaged; Sinoparcel D5S HID bulbs with an integrated ballast, DIRECT REPLACEMENT for your stock D5S/DS5 bulb, without any modification (If there is any problem in the product,please contact us via Account Center,we will reply you within 24 hours)
Safety Precautions Before Starting the Replacement
Before you begin the D5S headlight bulb replacement process, you must disconnect the vehicle’s battery to eliminate electrical shock risks and prevent short circuits in the headlight ignition system. Verify the headlight assembly and ballast have cooled completely, as D5S bulbs generate intense heat during operation. Wear appropriate safety gear including heat-resistant gloves and use insulated tools designed for automotive electrical work. Park your Volvo on a flat, stable surface with the parking brake engaged and ignition keys removed. Inspect all wiring and connectors for corrosion or damage before proceeding. Check the ballast for secure connections to ensure proper electrical flow during the replacement procedure. Never touch the glass portion of the bulb with bare hands, as skin oils cause premature failure. Work in a well-ventilated area free from flammable materials to minimize electrical hazards and fire risks. After restoration work is complete, consider applying a UV sealant to protect the headlight lens from future oxidation and yellowing.
Locating and Accessing the Headlight Assembly
To access the D5S headlight assembly in your Volvo, you’ll first need to open the hood and locate the headlight housing at the front corners of the vehicle, positioned between the radiator support and front wheel liners. Understanding proper headlight placement is critical before proceeding with assembly removal. The housing connects to the front bumper and frame via bolts and clips. You’ll need to detach electrical connectors by pressing the release clips—never pull directly on wires. Depending on your specific model, you may need to loosen the front bumper or remove wheel liner fasteners for adequate access. Use T25 Torx drivers and 10mm socket wrenches to remove the securing bolts. Confirm your vehicle’s electrical system is completely off before beginning work to prevent electrical hazards during assembly removal. Before removing the headlight housing, allow time for electronics to discharge to ensure all residual power is safely dissipated. Once the headlamp is removed, place it on a soft surface to prevent scratches to the lens.
Removing the Old D5S Headlight Bulb
Once you’ve accessed the headlight assembly, you’ll need to carefully disconnect the electrical connector from the D5S bulb before attempting any mechanical release. Press the locking tab and gently wiggle the connector free without pulling on wires. Next, locate the retaining clip—a small metal tab—and push it down or sideways to release. If your model uses a twist-lock mechanism, turn the bulb counterclockwise. Pull the bulb straight out, avoiding twisting motions that damage socket contacts. Perform socket inspection for corrosion or debris before proceeding. Wear nitrile gloves to prevent oil contamination on the replacement bulb’s glass surface. When removing the old bulb, inspect it for no filament present to confirm bulb failure. Upgrading to D2S xenon technology offers superior brightness output and color temperature options compared to standard halogen bulbs. For the brightest and most efficient lighting performance, consider LED technology which dominates the market in 2025 for providing superior brightness and safety advantages. When installing the new D5S bulb, conduct bulb alignment checks to verify proper seating and beam pattern accuracy.

【Important Notes】The packaging includes the replacement of D5S HID headlight bulb 8000k for GMC 2014-2018 Sierra 1500 2015-2018 Sierra 2500 3500 HD 2018-2021 Terrain. Please note that the same model may use xenon or halogen versions. If your GMC Sierra 1500 2500 3500 HD Terrain headlight bulbs are halogen bulbs, they are unsuitable for replacement. Before placing an order, please confirm if the model year is applicable

HIGH BRIGHTNESS: WinPower D5S xenon HID headlight bulb produces 3800 lumens of light, super bright to illuminate the dark spot on the horizon, right in the centre of the road, the light was even and symmetrical, clearer vision can greatly reduce the traffic accident rate.
800% Enhanced Visibility for Road Safety: Our advanced HID kits dramatically improve vision, enabling earlier detection of road obstacles and animals. This motorcycle hi/low beam upgrade delivers superior illumination for safer riding and driving in all conditions, thanks to the intense output of HID technology
Installing the New D5S Bulb Correctly
With the old bulb removed and socket inspected, you’re ready to install the replacement D5S bulb using proper handling techniques. Wear latex or nitrile gloves to prevent skin oils from contacting the glass envelope. Identify the offset alignment pins on the bulb base—these asymmetrical features prevent bulb alignment issues by matching specific socket slots. Insert the bulb straight into the socket with firm, even pressure until fully seated, avoiding any tilting or forcing that could damage components.
Engage the retaining clip or twist-lock securing mechanisms according to your Volvo’s OEM specifications. Rotate the bulb 45 degrees clockwise if required, ensuring the locking ring clicks into place. Reconnect the electrical connector firmly until the locking tab engages. Verify no gaps exist between bulb base and socket before reassembly. Position the new bulb ensuring the guiding pin is straight up for proper alignment in the socket.

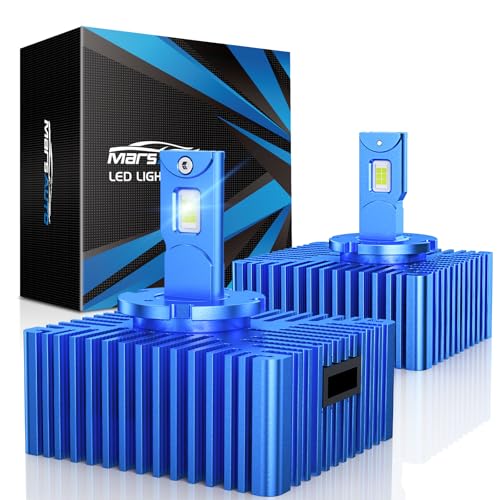
【Advanced Cooling for 70,000-Hour Life】Aviation-grade aluminum, 0.01mm ultra-thin copper sheets, and 22,000 RPM+ high-speed fan work together for fast heat dissipation. Keeps our d5s bulb performance stable for up to 70,000 hours, cutting down on replacements and costs.
1000% Brighter Illumination – AUXITO D5S bulbs deliver 30,000 lumens per pair with 60 high-intensity LED chips, casting a crisp 6000K white light. Experience exceptional nighttime visibility, even in rain, fog, or dark backroads.

12X Enhanced Night Visibility: This 12X brighter lighting system replaces standard D5S xenon output with 24 high-intensity chips, delivering pure 6500K white light that transforms weak yellow beams into crisp, all-night illumination for improved road safety, especially when used as a fog light upgrade
Testing the New Headlight After Installation
After securing the new D5S bulb and reassembling the headlight housing, you’ll need to confirm proper operation through systematic testing procedures before returning the vehicle to service. Activate the headlights and confirm immediate illumination without flickering or delay. Assess illumination quality by checking for even light distribution, proper color temperature matching OEM specifications, and stable beam output during warm-up. Use a multimeter to confirm voltage supply consistency at the bulb socket. Monitor for dashboard warning lights indicating electrical faults. Test in low-light conditions to evaluate brightness and beam pattern effectiveness. Check for condensation inside the housing and confirm proper beam alignment to prevent glare and ensure compliance with legal requirements for headlight modifications. Verify that the ballast regulates electrical current properly to ensure consistent bulb performance. Document all test results and note any anomalies requiring further troubleshooting to ascertain compliance with vehicle safety standards.
Troubleshooting Common D5S Bulb Issues
When D5S headlight bulbs fail prematurely or exhibit irregular performance, systematic troubleshooting identifies root causes and prevents recurring failures. Begin by inspecting bulb seating—poor installation causes shorting against the frame and misalignment. Check for moisture inside the headlight housing, as water condensation creates electrical shorts damaging wiring harnesses. Examine the bulb plug’s center pin for burn marks from voltage spikes. Perform wiring integrity checks by inspecting harnesses for exposed wires, corrosion, or loose connections. Test Fuse #18, which commonly blows during headlight faults. If flickering persists, evaluate ballast condition using a multimeter to measure voltage consistency at connectors. Understanding bulb lifespan factors—including voltage irregularities from alternator issues and poor grounding—helps you diagnose problems accurately before replacing components unnecessarily. Frequent bulb replacements could indicate electrical issues that require professional diagnosis rather than repeated part substitution. Always replace D5S bulbs in pairs to maintain balanced illumination across both headlights and ensure consistent light output.

Life time support, 1pcs packaged; Sinoparcel D5S HID bulbs with an integrated ballast, DIRECT REPLACEMENT for your stock D5S/DS5 bulb, without any modification (If there is any problem in the product,please contact us via Account Center,we will reply you within 24 hours)

Compatible with BMW 1 5 7 Series, 5GT X5 X6 Z4 etc
【10X Brighter & 1500FT Extended Visibility】 Marsauto 6000K cool white D5S HID bulbs provide 10 times the brightness of original halogen bulbs Experience 1500FT of extended visibility to spot hazards earlier, ideal for highway or suburban driving and enhancing your confidence during night trips
Maintenance Tips for Optimal Headlight Performance
Beyond diagnosing and fixing headlight failures, implementing a structured maintenance routine prevents D5S bulb degradation and maximizes your Volvo’s lighting system performance. Perform monthly headlight cleaning using pH-neutral vehicle wash soap and microfiber cloths to remove oxidation and road grime. Clean the lens with circular motions, rinse thoroughly, and apply UV sealant to prevent yellowing.
For moisture prevention, inspect headlight housings regularly for condensation, especially after rain or washing. Check seal integrity and reseal assemblies with fresh butyl rubber if cracks appear. Place silica gel packs inside the housing after drying to absorb residual moisture and prevent corrosion. Address sealing issues promptly to prevent moisture intrusion and potential electrical shorts.
Inspect wiring connectors for corrosion; clean with electrical contact cleaner and apply dielectric grease. Replace both D5S bulbs simultaneously when dimming occurs, wearing gloves during installation to prevent oil contamination. Understanding bulb lifespan factors will help you anticipate when replacement becomes necessary and maintain consistent lighting output.

🌀Quality Butyl Rubber Material - Our butyl tape is made of quality butyl rubber material, which is strong in adhesion, durable and flexible, and has reliable weather and shock resistance, not easy to aging and deformation, which can provide you with long-lasting performance. This sealant can be reused for a long time, which is convenient for you to modify your lights for many times.

Cleans and Seals: Instantly clear the cloudy, dull, and yellowed headlights of your vehicle with Formula 1 Headlight Restorer and Sealant. Our headlight renewal polish protects against oxidation, weathering, and UV rays all in one easy step.

【Butyl Sealant Tape】With a length of 4.5M/14.8FT and a diameter of 9mm, Kikerike Butyl Sealant Tape is suitable for sealing all vehicles' headlamps, taillights, doors, windows, windshields, and other parts