
Start by disconnecting your vehicle’s battery and gathering screwdrivers, socket wrenches, and trim tools. Remove the old headlight assembly by unfastening retaining bolts and carefully disconnecting electrical connectors. Transfer reusable bulbs to the new assembly without touching glass surfaces, then align mounting points and hand-tighten hardware before torquing to specifications. Reconnect all wiring harnesses, test low beams, high beams, and turn signals for proper function, then adjust beam alignment using adjustment screws. The following sections cover detailed troubleshooting and professional alignment techniques.
Gather Your Tools and Prepare the Work Area
Before you begin replacing your headlight assembly, gather the essential tools to complete the job efficiently and safely. Proper tool selection includes flathead and Phillips-head screwdrivers, socket wrenches (8mm–13mm), and plastic trim removal tools. You’ll also need work gloves, protective eyewear, and portable lighting to illuminate your workspace.
Park your vehicle on a flat surface and allow the engine and headlights to cool completely. Open the hood and secure it properly. Effective workspace organization requires clearing the area of clutter and preparing a magnetic tray for bolts and fasteners. Consider wearing protective gloves when handling bulbs to prevent skin oils from shortening their lifespan.
Consult your vehicle’s manual to identify mounting points and wiring layouts, particularly if your vehicle is equipped with adaptive headlight systems that may have additional sensor and electronic components. Disconnect the battery before starting to prevent electrical shorts. Keep clean cloths handy to avoid contaminating bulbs or lenses during installation. Having a new headlight assembly kit compatible with your vehicle ensures you have all necessary components ready before beginning the replacement process.

KIT INCLUDES: 1 - Disc Pad Holder, 3.25 in (8,2 cm) 6 - 3M Gold Sanding Discs 500 Grit, 3 in (7,6 cm) each 4 - 3M White Finishing Discs 800 Grit, 3 in (7,6 cm) each 1 - 3M Trizact Refining Disc 3000 Grit, 3 in (7,6 cm) 2 - 3M Quick Headlight Clear Co

KIT CONTENTS - Each headlight restoration kit includes (8) Step 1 Oxidation Removing Wipes, (1) Step 2 Sanding Kit, and (2) Step 3 Ceramic Coating Wipes.

Complete Set: Exquisite toolbox, 800g headlight repair fluid, atomizing cup + 2 lids set(contains 2 lid silicone rings), 6 sandpapers(180# – 280# – 320# – 600# – 800# – 1200#), emery board, funnel, guard tape, power supply set (110V power cord + car power cord), instruction manual. All the tools you need are included in one kit, no additional purchases are required.
Remove the Old Headlight Assembly
With the battery disconnected and your tools ready, locate the retaining hardware securing the headlight assembly to your vehicle’s frame. Use a wrench, socket, or Torx driver to remove all bolts or screws from the top and sides. Gently pull the assembly forward to expose electrical connectors. Press the release tabs and pull connectors straight out—never tug on wires directly. Following proper safety precautions, wear protective gloves to avoid cuts from sharp edges. Check for hidden clips or fasteners before applying force. Once freed, carefully remove the entire assembly and place it on a clean surface. Wearing gloves during this process helps avoid contamination of the bulb when handling components. Remove any reusable bulbs from the old housing by turning the retainer ring counter-clockwise. For many vehicles, you may be able to access and replace individual bulbs like H11 low beam bulbs without removing the entire headlight assembly. Finish by cleaning surface areas around mounting points to prepare for the new assembly installation.
Transfer Components to the New Assembly
After removing the old headlight assembly, you’ll need to transfer several components to guarantee your new assembly functions properly. Begin with bulb transfer—carefully remove bulbs from the old unit without touching new bulbs with bare hands, as oil deposits cause premature failure. Conduct thorough wiring inspection; disconnect the harness from the old assembly, check for wear or damage, then reattach to the new unit until connectors click securely. Address gasket maintenance by removing rubber seals, inspecting for cracks, and reinstalling or replacing them to prevent moisture ingress. Handle bracket attachment by detaching mounting hardware and matching it to the new assembly’s points—note thread type differences between plastic and steel. For plastic headlight assemblies, consider applying protective clear coat after installation to prevent oxidation and maintain clarity over time. Wear nitrile gloves when handling bulbs and other components to maintain cleanliness and prevent contamination. Use electrical connector tools to safely disconnect and reconnect all wiring harnesses without damaging the sensitive contact points. Complete component testing by verifying all transferred parts function correctly before final installation.
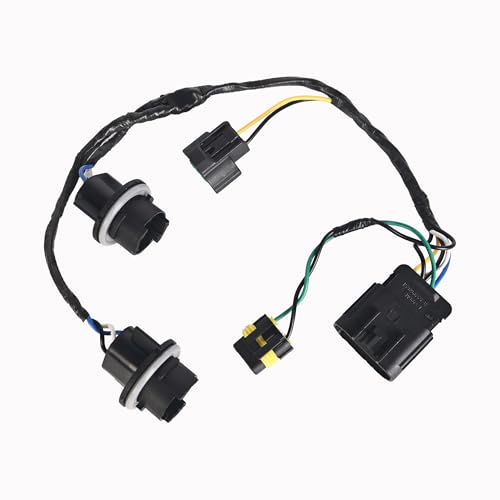
Direct Replacement - This headlights wiring harness assembly is direct-fit OE replacement for Headlight Wiring Harness, Easy plug-and-play connection to original wiring. With two lamp sockets and three connectors, it can solve the problems of poor contact, signal interruption and short-circuiting.

APPLICATION: 2008 Chevy Malibu, 2009 Chevy Malibu, 2010 Chevy Malibu, 2011 Chevy Malibu, 2012 Chevy Malibu

When your vehicle front lights do not work, this wire harness assembly may be your choice to well resolve the issue
Install the New Headlight Assembly
Insert all mounting bolts hand-tight initially, then torque to manufacturer specifications using appropriate tools. Replace washers and clips for structural integrity. Reconnect the main wiring harness and auxiliary connectors—parking lights, DRLs, turn signals—ensuring they click firmly into place. Check for pinched wiring.
Secure bulbs by rotating retainer rings clockwise, then install dust covers. Ensure the dust cover is securely reattached to prevent moisture and debris from entering the assembly. Verify that beam pattern quality meets safety standards before final assembly. Following these installation tips, adjust beam alignment using adjustment screws, test all functions, and verify fitment before closing the hood.

These screws and iron sheets which/that are here are made of metal.
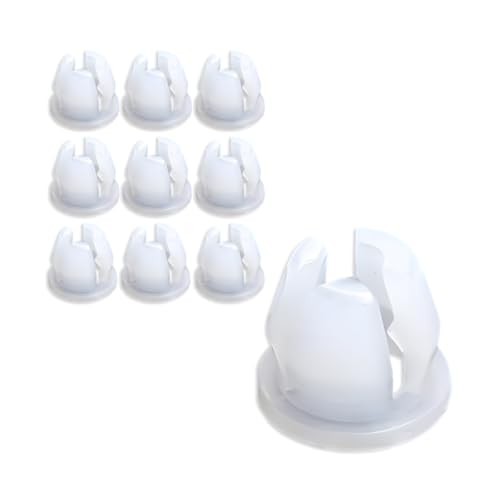
【Durable Material】: Our products are made of POM material, which is known for its high abrasion resistance and can withstand the weight of the headlamp assembly as well as the vibrations and shocks caused by driving, thus ensuring that the headlamps remain securely mounted on the vehicle. The POM material maintains a good stability, which means that our products retain their original shape and dimensions over a long period of time, thus ensuring the precise installation of the headlamp assembly.

【REPLACES PARTS】: The 2 pcs car headlamp mounting spacers replacement 42204,68222836AA,68222835AA
Test All Headlight Functions
Once you’ve secured the new headlight assembly, conduct an extensive functional test before finalizing the installation. Turn on low beam, high beam, and parking lights individually to verify proper operation. Inspect both headlight assemblies for consistent brightness and uniform beam output. Check dashboard indicator lights for malfunction warnings during this headlight troubleshooting process. Use a multimeter to verify adequate voltage supply at the bulb socket, ensuring stable electrical connection. Project beams onto a flat surface approximately 25 feet away to assess cutoff line alignment and light intensity compliance with FMVSS 108 standards. For optimal testing accuracy, ensure all measurements are performed in a pitch-black environment to eliminate ambient light interference. Test headlight switch functionality, including automatic systems if equipped. Verify relay and fuse operation within the lighting circuit. Confirm headlights remain fully operational under various electrical load conditions before completing installation.
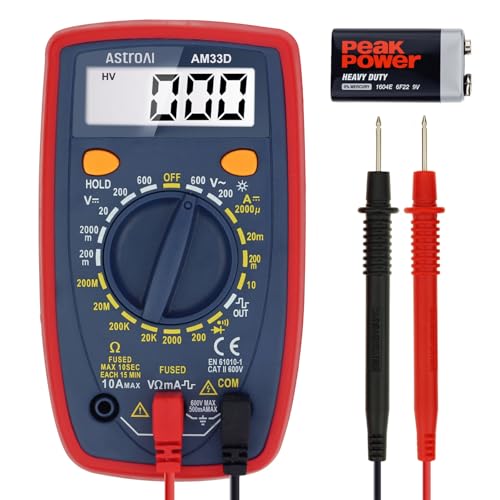
Additional Tips - The following incorrect operations may cause the multimeter not to show results: Firstly, the plugs of test leads are not fully inserted or not inserted into the correct sockets. Secondly, the manual rotary switch is not placed in the correct position. In addition, this meter can not test all AC Current and below 100mV AC Voltage. Please check the user manual carefully before measurement.

【Even higher Copper Core requirements】Contains 42 pure copper-core wires;Easily dealing with currents of 10A and preventing leakage issues from occurring.The nylon wire inside will make it withstand bending thousands of times without breaking or fraying.

Adjust Beam Alignment for Optimal Performance
Proper headlight alignment guarantees ideal road illumination while preventing glare that endangers oncoming drivers. Park your vehicle on level ground 25 feet from a wall, guaranteeing tires are properly inflated. Clean the lenses and turn on low beams. Use tape to mark horizontal and vertical centerlines corresponding to each headlight’s position on the wall.
Locate the horizontal adjustment screws and turn them in quarter-turn increments until beam patterns align slightly right of the vertical centerline. Find the vertical adjustment screws and lower the beams approximately 2 inches below the horizontal reference line. Performing the horizontal adjustment first ensures the most effective beam positioning before making vertical corrections.
Make adjustments using a screwdriver, level, and measuring tape. This guarantees headlight brightness projects downward, illuminating the road without blinding other drivers, maximizing safety and visibility during nighttime operation. Worn or stripped adjustment screws can compromise your alignment efforts and may require replacement with quality components. After completing the alignment, perform a test drive to assess whether the headlights provide adequate visibility under real driving conditions.

Headlight adjust kit for 78-81. Complete kit with all push-in nuts, screws and correct springs.

New correct style headlight adjuster set for your classics. Kit includes; 4 plastic nut retainers, 4 long adjuster screws, and 2 tension springs. Premium quality design and construction. Compatible with: -1967-1973 Camaros -1970-1972 Monte Carlos

Allows For Headlight Vertival, Horizontal, & Pivot Adjustments


