

To replace a headlight fuse, first turn off your ignition and engage the parking brake for safety. Locate your vehicle’s fuse box using the owner’s manual, then consult the diagram to identify the headlight fuse. Use a fuse puller or needle-nose pliers to extract the faulty fuse, checking for a broken filament. Install a replacement fuse matching the exact amperage rating, ensuring it’s seated securely. Test your headlights immediately. If fuses continue blowing, you’ll uncover what deeper electrical issues might require professional diagnosis.
Gather Your Tools and Safety Equipment
Before replacing a headlight fuse, you must assemble the correct tools and safety equipment to guarantee a safe and efficient repair. Proper tool selection begins with obtaining a replacement fuse matching the exact amperage rating, a fuse puller or needle-nose pliers, and a flashlight for adequate visibility. Safety precautions require wearing gloves and safety glasses to protect against electrical contact and debris. Keep your vehicle manual accessible to identify correct fuse locations and specifications. Ascertain insulated tools are available to minimize electric shock risk near live circuits. Position your vehicle on level ground with the ignition off and keys removed. Organize a fuse kit containing various amperages, a small container for removed components, and cleaning supplies for oxidized contacts. Most headlight fuses are rectangular blade fuses with color-coded plastic casings for easy identification. If a fuse repeatedly blows, you may need to budget for diagnosing the cause of the problem, as additional electrical issues could require professional attention.

Designed to Remove Corrosion in Blade Fuse Applications on Both Mini and ATO Sizes
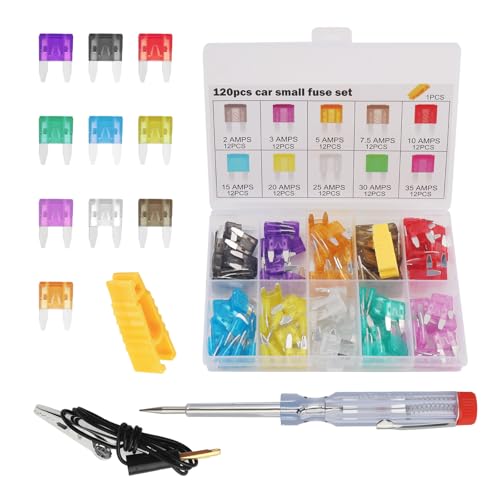
All-in-One Fuse Solution: You will receive a comprehensive set of 120 car fuses across 10 different amperage ratings (ranging from 2A to 35A), with 12 of each type. The kit also includes 1 fuse tester and 1 fuse puller, providing everything you need for complete electrical system maintenance and replacements

Package Content: You will receive 5 high-quality fuse puller tool for car in different sizes, ensuring you can effortlessly remove or replace fuses with ease and efficiency. The quantity is sufficient for various usage needs.
Turn Off Your Vehicle and Locate the Fuse Box
With your tools and safety equipment assembled, you’re ready to prepare the vehicle for fuse replacement. First, confirm the ignition switch is in the LOCK position and remove the key to guarantee vehicle safety. Turn off all electrical accessories, including headlights and interior lights, to prevent current flow. Engage the parking brake and wait a few minutes for complete system shutdown.
Next, locate the fuse box using your owner’s manual. Most vehicles have two boxes: one beneath the dashboard near the driver’s seat containing smaller fuse types for interior components, and another under the hood near the battery housing larger fuses for major circuits. Remove the fuse box cover carefully by releasing tabs or latches. Review the diagram to identify the headlight fuse position. The diagram displays specific fuse ratings that indicate the amperage capacity for each circuit, helping you select the correct replacement fuse.
Identify the Blown Headlight Fuse
How can you determine which fuse controls your headlights and whether it’s failed? Start by consulting your fuse box diagram, which identifies each fuse’s function and location. This diagram is typically found on the fuse box cover or in your owner’s manual. Once you’ve located the headlight fuse, remove it using a fuse puller or needle-nose pliers. These fuse identification methods require visual inspection: hold the fuse against a light source and examine the internal metal strip. A continuous wire indicates proper function, while a broken or melted strip confirms failure. For more precise electrical system checks, use a multimeter in continuity mode—zero resistance means the fuse is intact; infinite resistance indicates it’s blown. Each fuse has a specific amperage rating that must match the original to protect your headlight circuit properly. This methodical approach guarantees accurate diagnosis.

Easy Identification: The fuse assortment kit is made of high-quality zinc alloy, featuring a transparent cover and color-coded labels for quick recognition.

【Meet all your needed size】-- The fuse kit includes micro size 50pcs, mini size 160pcs and standard size 90pcs. Three styles of auto fuses have 11 current specifications (2A /3A / 5A/ 7.5A/ 10A/ 15A/ 20A/ 25A / 30A/ 35A/40A), equipped with a fuse puller.(Not including micro2 fuse.)
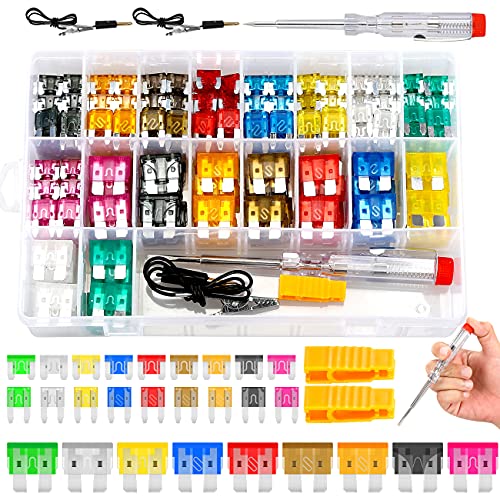
306PCS FUSES KIT: A full fuse set of 3 different sizes : Standard & Mini & Low Profile Mini,9 model: 2A/ 5A/ 7.5A/10A/ 15A/ 20A/ 25A/ 30A/ 35A,covers 27 commonly used blade fuses: 3 different sizes*9 models.Well organized in a plastic container,included: 90pcs Standard Fuses(10PCS of each model );108pcs Mini Fuses(12PCS of each model );108pcs Low Profile Mini Fuses(12 PCS of each model ).
Remove the Faulty Fuse Safely
Once you’ve confirmed the headlight fuse has failed, you must disconnect all power sources before attempting removal. Turn off the ignition, remove the key, and disconnect the negative battery cable to eliminate electrical current. This prevents short circuits regardless of fuse types you’re handling.
Use a dedicated fuse puller or needle-nose pliers to extract the fuse straight out without twisting. Grip the plastic body only, avoiding metal contacts to prevent contamination or electrical shock. Never apply excessive force, as this damages the fuse holder. Using improper tools can cause damage to fuse box contacts and lead to costly repairs.
Critical safety precautions include wearing safety glasses, ensuring dry hands, and working in moisture-free conditions. Never use makeshift tools or bypass blown fuses with substitutes. Inspect the extracted fuse for burns or corrosion before proceeding with replacement.

[Easy to Use]: Thin tips and offset handles allow for easier use than traditional pliers. The clamp head is convenient for entering and leaving a small space Where human hands and other tools cannot reach, And is not easy to damage the relays and Fuses.𝐏𝐥𝐞𝐚𝐬𝐞 𝐛𝐮𝐲 𝐛𝐲 𝐋𝐙𝐋𝐈𝐍𝐘𝐉𝐋𝐎𝐍𝐆 𝐬𝐭𝐨𝐫𝐞.
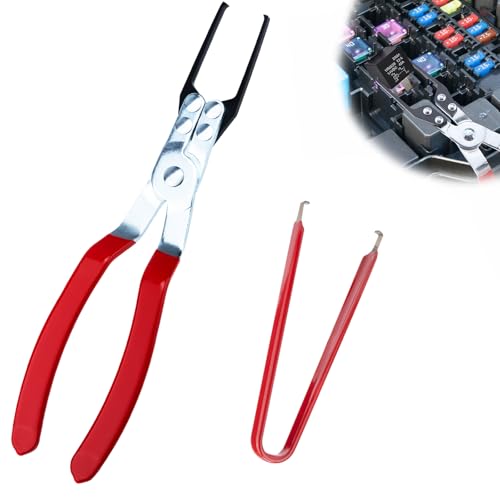
High Strength Carbon Steel and 304 Stainless Steel: The large relay pulling tool is forged from high strength carbon steel, durable and impact resistant. The small fuse pulling tool is made of 304 stainless steel, which is corrosion-resistant and ensures long-term sharpness

Products: 6.5” Length automotive fuse puller tool, relay puller tool, with serrated teeth and notch, rounded grooves, thin flat-nose duckbill wide pliers. To be used for the narrow spaces in Car Boat Truck SUV or other devices. VANTRONIK Fuse and Relay Puller/Extractor is a specialized tool that simplifies the tricky task of removing relay fuses. With its universal compatibility, ease of use, and robust construction, it's valuable to any mechanic's or electrician's toolkit. This tool saves time, reduces the risk of damage, and is designed to last, making it an excellent choice for professionals and DIY enthusiasts.
Install the Replacement Fuse
Proper installation of the replacement fuse requires methodical execution to confirm electrical safety and system functionality. Begin with fuse compatibility verification by confirming the amperage rating matches the original specification through color codes and numerical markings. Execute proper fuse insertion by aligning the new fuse straight into the designated slot, applying gentle pressure until it seats flush or clicks into position. Avoid excessive force that could damage socket connectors. Ascertain the fuse sits securely without looseness or visible metal exposure that could cause shorts. Verify no resistance or abnormal movement exists post-installation. Finally, secure the fuse box cover to prevent contamination. Installing a mismatched amperage fuse compromises the circuit’s ability to prevent excessive power draw and may damage electrical components. If you encounter repeated fuse failures after replacement, discontinue use and seek professional electrical diagnosis to identify underlying circuit faults.

ALL SIZES YOU NEED - The fuses automotive kit covers 182pcs commonly used blade fuses and a fuse puller - 63pcs Standard: 5A/ 7.5A/ 10A/ 15A/ 20A/ 30A/ 40A (9PCS of each model ), 56pcs mini: 5A/ 7.5A/ 10A/ 15A/ 20A/ 30A/ 40A (8PCS of each model ), 63pcs Low Profile Mini: 5A/ 7.5A/ 10A/ 15A/ 20A/ 30A/ 40A (9PCS of each model )

Package: Fuse kit includes 2 circuit testers, 1 pair of fuse pullers, 306 fuses, specifications are 2A/5A/7.5A/10A/15A/20A/25A/30A/35A, 90 standard fuses(10 of each models), 108 mini fuses(12 of each models), 108 low profile mini fuses(12 of each models)

✔ Package Includes: The car fuse assortment kit includes 4 types of fuses, 570Pcs standard blade fuse(2A 5A 7.5A 10A 15A 20A 25A 30A 35A 40A), 636Pcs mini blade fuse(2A 5A 7.5A 10A 15A 20A 25A 30A 35A 40A), 12Pcs low and tall/stand profile fuses(20A, 30A, 40A, 50A, 60A, 80A), 1Pcs fuse puller and 1Pcs Circuit tester, Total 1221pcs
Test Your Headlights After Replacement
After installing the replacement fuse, you must validate complete restoration of headlight functionality through systematic testing procedures. Turn the headlight switch on and confirm both left and right headlights illuminate with consistent headlight brightness. Observe for flickering or dimming that signals electrical issues. Test high and low beams separately to validate complete circuit functionality. Using a multimeter, measure voltage at bulb socket contacts—expect approximately 12 volts with headlights activated. Check dashboard indicator lights for warnings or errors. Inspect fuse socket terminals for corrosion or loose connections that could compromise operation. Cycle headlights on and off multiple times to confirm stable performance. Verify the replacement fuse matches the amperage rating specified in your owner’s manual to prevent future electrical problems. Ensure the rubber boot seals properly to prevent moisture ingress into the electrical connections. Consider upgrading to LED headlight options for improved brightness and durability compared to traditional halogen bulbs. Conduct a brief test drive in darkness to validate headlights maintain consistent illumination during vehicle movement, confirming safe nighttime operation.
Preventive Maintenance and When to Seek Professional Help
While replacing a headlight fuse is straightforward, maintaining your vehicle’s electrical system prevents recurring failures and extends component lifespan. Conduct preventive inspections by examining fuses for discoloration, cracks, or broken metal strips. Clean fuse sockets and headlight connectors regularly to prevent corrosion. Always replace blown fuses with identical amperage ratings and keep spare fuses in your vehicle. Different bulb types like halogen, LED, or HID require specific fuse ratings to operate safely. When replacing bulbs, avoid touching the glass of halogen bulbs to prevent shortened bulb life.
Seek professional help when fuses blow repeatedly after replacement, indicating circuit defects or wiring shorts. If headlights remain non-functional despite correct fuse installation, electrical diagnostics are necessary to identify deeper system faults. Use a voltmeter to test for power at the headlight socket to confirm whether the issue lies with the fuse, wiring, or headlight switch. Professionals should address moisture inside headlight assemblies, multiple component failures, or control module issues. Flickering dashboard lights or power absence at headlight sockets warrants expert intervention to prevent electrical system damage and guarantee safe operation.


