To replace your Toyota headlight, you’ll need a 10mm socket wrench, screwdriver, and protective gloves. First, disconnect the battery and remove any obstructing components like the fender liner or air intake. Locate and remove the mounting bolts securing the headlight assembly, then carefully disconnect all electrical connectors. Pull the assembly outward and replace the bulbs if needed. Install the new assembly, reconnect the wiring harness, and torque bolts to manufacturer specifications. Finally, test functionality and adjust beam alignment using the vertical and horizontal adjustment screws for ideal visibility and safety compliance.
Gather Your Tools and Prepare Your Vehicle
Before beginning any headlight replacement on your Toyota, you’ll need five essential tools: a flat blade screwdriver for removing clips and covers, a 10mm socket with ratchet for headlight assembly bolts, pliers or a dedicated clip remover tool for push fasteners, protective gloves to prevent oil contamination on halogen bulb glass, and safety glasses for eye protection.
Proper tool organization guarantees efficient workflow during the procedure. Arrange all implements within easy reach on a clean, flat workspace near the vehicle. Verify the correct bulb type for your specific Toyota model before proceeding. Ensure the work environment is free of distractions for focus on the task.
Essential safety measures include parking on level ground with the parking brake engaged, turning off the ignition and headlights, and securing the hood in its open position. Position wheel chocks if necessary to prevent vehicle movement during the replacement process.

Instructions for Use: The first yellow drill attachment installed on the drill, cushion pad white surface and drill attachment black surface paste, use the first in the lamps on the spray water and then use the cleaning pad to dry in a circle, and then according to the grain size from small to large in order to use the waterproof abrasive disc on the lamps for polishing, and finally use the sponge polishing pad for polishing

Complete LED Interior Light Replacement Package for 2007 2008 2009 2010 2011 2012 2013 2014 2015 2016 2017 2018 2019 2020 2021 Toyota Tundra (all configurations).

【Direct OEM Fitment】Headlight Assembly Replacement for 2012 2013 2014 Toyota Camry L /Se /Le /Xle /Hybrid Headlights (DO NOT FIT Solara Models).Low/High Beam:H11/HB3,Turn Signal Light:7444NA(Bulbs not included)
Remove Components for Headlight Access
Accessing the headlight assembly requires removing several components that obstruct direct access to mounting hardware. Begin by unscrewing plastic fasteners securing the fender liner to expose hidden bolts. Use plastic trim tools to carefully pull back the liner without damaging clips. Next, locate and disconnect electrical connectors at the bulb socket by pinching the clip and pulling firmly. Remove the parking lamp assembly by releasing its fasteners and disconnecting its wiring harness. On certain Toyota models, you’ll need to loosen the front bumper cover or remove air intake components for adequate clearance. If the battery blocks access, disconnect terminals and tilt it back. You may need to pull the bumper cover slightly away from the fender to access all mounting points, though full bumper removal is typically unnecessary. For headlight bulb replacement on Toyota Sienna models from 2011 to 2020, consider temporarily removing the fuse-box housing on the driver’s side for easier access. Safety precautions such as using gloves when handling components help prevent damage to sensitive electrical parts. Finally, identify all mounting bolts—typically requiring 10mm or 17mm sockets—and release any remaining plastic retention clips before extracting the assembly.

COMPATIBILITY: Universal socket removal tool designed for H8, H9, H10, H11, H12, H13, 9005, 9006, and 9012 headlight and fog light bulbs

【PREMIUM QUALITY】These 2PCS Car Radio Removal Pry Tools are made of durable steel which will not bend or break during using.

2-in-1 Multifunctional: This panel clip removal tool delivers "2-in-1" functionality. It not only professionally takes off headlight covers but also effortlessly pulls out various plastic fasteners and plastic rivets from interior panels, and even safely grips and moves wiring harnesses
Detach the Old Headlight Assembly
With all obstructing components removed, you’ll now disconnect the electrical connections to free the headlight assembly from the vehicle. Unplug connectors for high beam, low beam, and parking lights, carefully unclipping any harness clips. Use plastic trim removers to prevent damage while disconnecting connectors. Label them if needed for reassembly.
Next, remove the securing bolts—typically 10 mm—located on top, bottom, and sides of the assembly using a socket wrench. Check under plastic covers for hidden fasteners. Keep bolts organized by position.
Release plastic brackets and tabs holding the assembly using flathead screwdrivers or trim tools. Work carefully around brittle clips. Once free, gently pull the assembly outward, maneuvering around fender and bumper components. Place it on a clean surface. Selecting the right bulb type and brightness level during reassembly will enhance your vehicle’s visibility and driving safety. For optimal results, consider replacing headlight bulbs in pairs to ensure balanced illumination across both sides of your vehicle.

KIT INCLUDES: 1 - Disc Pad Holder, 3.25 in (8,2 cm) 6 - 3M Gold Sanding Discs 500 Grit, 3 in (7,6 cm) each 4 - 3M White Finishing Discs 800 Grit, 3 in (7,6 cm) each 1 - 3M Trizact Refining Disc 3000 Grit, 3 in (7,6 cm) 2 - 3M Quick Headlight Clear Co

RLB-HILON Headlamp Adjuster Kits including 4pcs screws and 4pcs nuts and 2pcs springs

KIT INCLUDES: 1 - 3M Trizact Refining Disc 1000 grit, 3 in/7.6 cm 1 - 3M Trizact Refining Disc 3000 grit, 3 in/7.6 cm 2 - 3M Quick Headlight Clear Coat Wipes 1 - Foam Pad with 3M Hookit Attachment, 3 in/7.6 cm 1- Disposable Glove
Replace the Headlight Bulbs
Once the headlight assembly sits accessible on your work surface, you can service the bulbs directly without interference from mounting hardware or electrical harnesses. Rotate the bulb cover counterclockwise to expose the socket, then disconnect the wiring harness by pressing the release tab. Remove the old bulb by unclipping the retaining spring or twisting counterclockwise, depending on your specific bulb types—H11, 9005, or 9006 are common Toyota configurations. Handle the replacement bulb only by its base; skin oils cause premature failure. Follow these installation tips: align the tabs with housing slots, seat the bulb firmly, secure the retaining mechanism, and reconnect the harness until it clicks. Different bulb types such as halogen, LED, and HID options offer varying brightness levels and longevity for your replacement needs. Replace the weather seal, ensuring a moisture-tight fit to protect bulb longevity and electrical integrity. You may need circlip pliers to work with certain retaining mechanisms during the bulb removal process. Wearing work gloves during this procedure prevents skin oils from transferring to the bulb glass and extends the lifespan of your new headlight bulb.
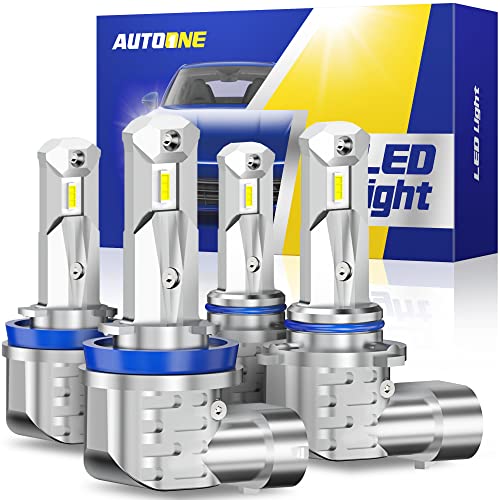
Huge Improvement in Visibility: AUTOONE H11 9005 led bulbs combo are equipped with high luminous efficacy csp chips. And 1:1 halogen bulbs’ beam pattern, spread out the light more to help in the side and front vision but no endangering others
High Quality Material: This automobile bulb is made of high-quality quartz tube material, which has excellent high-temperature resistance and can maintain a stable structure during long periods of illumination. At the same time, the quartz tube has strong impact resistance and can withstand minor vibrations, providing reliable protection for the long-term use of the lamp bulb.

Compatible With: 2008-2010 Toyota Avalon, 2006 2007 2008 2009 Toyota Prius, 2006-2008 Toyota Solara, 2009-2012 Toyota Venza, 2006-2010 Lexus SC430, 2007-2014 Lexus ES350 ES350h, 2007-2012 Lexus LS460 LS460L LS600h, 2009-2012 Lexus RX350 RX450h, 2010-2013 Lexus GX460, 2006-2011 Lexus GS300 GS350 GS430 GS450h Gs460, 2004-2011 Lexus IS250 IS350 IS350F IS250C IS350C
Install the New Headlight Assembly
Position the new headlight assembly into the mounting cavity after confirming all electrical connectors are accessible and the mating surfaces are free of debris. Align all bolt holes and clip slots precisely before securing. Reconnect electrical connectors to the assembly, guaranteeing positive engagement. Insert mounting bolts by hand first, then torque to manufacturer specifications using a 10mm socket—avoid overtightening that could crack mounting tabs. Install body clips by pressing firmly into their designated slots. Use the guide pin for alignment when sliding the new headlight into position to ensure proper placement. Perform assembly verification by checking fitment against adjacent panels; there shouldn’t be gaps or misalignment. Confirm proper headlight alignment by examining the lens position relative to fender and bumper lines. When selecting replacement assemblies, consider factors such as brightness levels and beam pattern quality to ensure optimal nighttime visibility and safety. Test all electrical functions before final reassembly. For best results, handle the new bulb carefully and avoid touching the glass surface to prevent oil residue that could affect performance. This systematic approach guarantees secure installation and maximum performance.

Kit Includes: 1 Driver Side Headlight Assembly; 1 Passenger Side Headlight Assembly

【100% OE Fitment】Perfect fitment for OE Type 2015 2016 2017 Toyota Camry (Compatible w/ Factory Halogen Headlight ) (Does not fit w/ Factory LED Headlight models, DO NOT FIT Solara Models),𝐎𝐄𝐌:𝟖𝟏𝟏𝟓𝟎-𝟎𝟔𝐄𝟏𝟎/𝟖𝟏𝟏𝟏𝟎-𝟎𝟔𝐄𝟏𝟎

【Fitment】Left Headlight Assembly is compatible with 2018-2022 Toyota Camry L LE SE.18-22 Camry headlights only fit Models with Halogen Turn Signal and Side Marker,not Models with full LED headlights.
Test and Adjust Your New Headlights
Proper headlight testing and adjustment guarantee ideal visibility and prevent glare that endangers oncoming traffic. Park your Toyota on level ground 25 feet from a flat wall with properly inflated tires and half-tank fuel load. Bounce the vehicle to settle suspension, then mark each headlight’s vertical and horizontal center on the wall using masking tape. Turn on low beams with engine at 1,500 RPM. Cover one headlight and inspect the other’s beam alignment—the brightest portion should sit slightly below the horizontal line and centered vertically. Locate adjustment screws at the headlight housing’s rear. Turn the vertical screw clockwise to lower the beam, counterclockwise to raise it. If available, use the horizontal adjustment screws to shift the beam left or right for proper centering. Make incremental adjustments, rechecking against tape marks. Achieving the correct beam pattern ensures optimal nighttime visibility and prevents safety hazards. While professional alignment equipment provides the most accurate results, these temporary adjustments are suitable for correcting critically misaligned headlights. Conduct night testing to verify even distribution and proper cutoff alignment.