To replace your Subaru Legacy headlights, you’ll first disconnect the battery and gather a 10mm socket wrench, screwdrivers, and clean microfiber towels. Open the hood and locate the electrical connectors behind the headlight assembly, pressing the center tab to disconnect them. Twist the bulb counterclockwise to remove it, then insert the new bulb without touching the glass surface and twist clockwise to secure. Reconnect the electrical connector until it clicks, then test both low and high beams for proper function and alignment against a wall.
Gathering the Right Tools and Safety Equipment
Before beginning any headlight replacement on your Subaru Legacy, assemble the necessary tools to guarantee efficient work and prevent mid-project delays. You’ll need a 10mm socket wrench, flathead and Phillips screwdrivers, clip removal tool, and socket extensions for recessed bolts. Establish proper tool organization by arranging equipment in order of use on a clean surface near your vehicle.
Safety protocols require protective gloves and safety glasses to prevent injuries from sharp brackets and debris. Wear long sleeves when reaching into the engine bay. Confirm adequate workspace lighting with a mechanic’s flashlight for visibility in tight areas. Disconnect your battery before starting to prevent electrical shorts. Keep clean microfiber towels available for handling bulbs without transferring skin oils, especially since bulb glass should not be touched directly during installation. Consider upgrading to LED bulbs for improved brightness and efficiency once your replacement is complete. Store removed fasteners in labeled containers to maintain component organization throughout reassembly. For comprehensive headlight replacement projects, consider a complete tool kit that includes metric sized sockets ranging from 7mm to 12mm along with Torx bits and trim removal tools.

Durable CR-V with Reinforced Walls:Our CR-V sockets deliver unparalleled reliability and safety by fundamentally eliminating the bursting risk common in thin-walled carbon steel models. This is achieved through the powerful synergy of superior chrome-vanadium steel and a robust, thickened inner wall design.

【Package Include】:You will receive 21pcs bit sockets, 13pcs 1/4" dr metric sockets, 1pc 1/4" dr universal joint, 1pc 1/4" dr ×2"extension bar, 1pc1/4" dr × 4"extension bar, 1pc 1/4" dr × 6"flexible extension, 1pc 1/4" dr sliding t-bar, 1pc 1/4" dr sliding t-bar, 1pc 6" spinner handle and 1pc-bit adapter.
COMPLETE SET: Complete 40-piece set includes a ratchet, 3 in. extension bar, 1/4-inch driver handle, 3/8 to 1/4 in. reducing adapter, and more.
Accessing the Headlight Assembly on Your Legacy
Once you’ve gathered your tools, begin by opening the hood and securing it with the prop rod to establish safe access to the headlight assembly. Locate 6-7 bolts securing the assembly using your 10mm socket. Check behind brackets and trim pieces for hidden fasteners. Remove fender trim or wheel well liners if needed to reach recessed bolts. For headlight maintenance tips, disconnect electrical connectors at the assembly’s rear by pressing release tabs. Note connector positions to aid troubleshooting lighting issues during reinstallation. Certain model years, particularly 2015 Legacy models, require front bumper removal for complete access. Use a trim tool to carefully detach bumper clips without breaking tabs. Once all fasteners are removed, gently pull the assembly forward, checking for any remaining clips before full extraction. When replacing your headlight bulbs, remember to avoid touching the glass on the new bulb to prevent premature failure and ensure optimal performance.
Removing the Old Headlight Bulbs or Complete Assembly
After securing access to the headlight assembly, begin the removal process by disconnecting all electrical connectors from the bulb housings and any attached components. Press the middle tab on each connector and pull downward to disengage. For LED-equipped models, unplug the ballast connector as well.
To remove individual bulbs, twist counterclockwise to release from the socket, then extract carefully. Avoid touching the glass surface with bare fingers, as oil contamination reduces bulb lifespan. Release any retaining clips before extraction. Verify the old bulb is faulty before proceeding with replacement.
For complete assembly removal, use a 10mm socket to remove all mounting bolts and brackets. Pop out plastic clips with a flathead screwdriver. When working with the assembly, consult genuine Subaru parts specifications to ensure proper fit and function. When reassembling, ensure all electrical connectors are securely reconnected to restore headlight performance. Verify assembly compatibility before installation. Handle the assembly gently once all fasteners and connectors are detached to prevent damage.

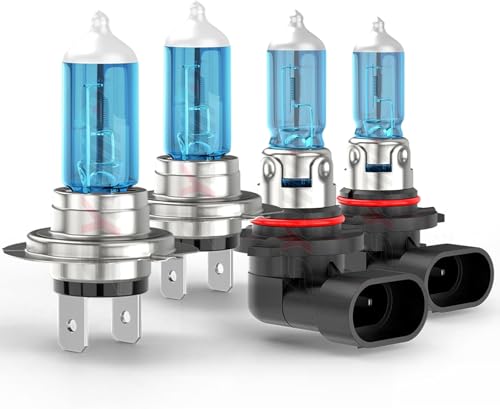
【Package Include】: This product includes a pair of 9005/HB3 High halogen light bulbs and a pair of H7 low halogen light bulbs. If you have any questions? TXBILMOO customer support team is at your service

Lights Dim Over Time, Replace In Pairs: Your lights are a pair, one is never turned on without the other. If one bulb burns out, the other isn't far behind. Replace your H7 XtraVision Halogen bulbs in pairs for optimum performance.
Fit for 99% of vehicles - SYJIIP Halogen headlamp are close to the wattage of the stock halogen headlamp bulb, which can reduce the occurrence of CANBUS problems, avoid erroneous and flickering. As long as your stock light bulb model is the same as ours, then SYJIIP's light bulb will be suitable for your car.
Installing Your New Headlight Bulbs or Assembly
Installing new headlight bulbs or assemblies requires careful handling and attention to detail to guarantee proper function and longevity. Avoid touching the glass with bare hands, as oil deposits reduce bulb brightness and headlight longevity. Align the bulb’s key slots precisely before inserting into the socket, then twist clockwise until locked securely. Connect the electrical connector firmly until you hear a click, affirming correct polarity and orientation. Verify retaining clips engage properly over the bulb base. Be aware that different bulb types, such as H11 and 9005 bulbs, have different base designs and cannot be interchanged, so ensure you’re installing the correct bulb type for your Subaru Legacy.
When installing complete assemblies, position the unit carefully, aligning mounting tabs with vehicle body brackets. Secure all wiring harnesses and connectors before reinstalling fasteners. Replace dust covers to prevent moisture ingress. Test bulb functionality before finalizing assembly. Confirm the headlight sits flush with bodywork, then reinstall fender liners and surrounding panels removed during disassembly. Tighten bolts by hand to secure the headlight assembly in place. Ensure your replacement bulbs meet DOT standards to maintain legal compliance and safety on the road.

Lights Dim Over Time, Replace In Pairs: Be sure to replace both H11 headlights at the same time for optimum performance. If one bulb burns out, the other isn't far behind. Replacing in pairs allows for premium visibility

Lights Dim Over Time, Replace In Pairs: Your lights are a pair, one is never turned on without the other. If one bulb burns out, the other isn't far behind. Replace your H11 XtraVision Halogen bulbs in pairs for optimum performance.

【Huge Improvement in Visibility】-AUTOONE H11 led bulbs are equipped with high luminous efficacy CSP chips. And 1:1 halogen h11 bulbs’ beam pattern, spread out the light more to help in the side and front vision but no endangering other drivers. Safer and bright upgrade for fog lights or drl
Testing Headlight Function and Beam Alignment
Proper headlight installation requires verification of both electrical function and optical alignment to assure safe nighttime visibility. Park your Legacy on level ground facing a wall 25 feet away. Confirm tires are properly inflated and remove excess cargo affecting suspension height. Measure the distance from ground to each headlight’s center, marking corresponding horizontal lines on the wall with masking tape.
Turn on headlights to full brightness. The beam’s brightest point should fall at or slightly below the marked height to prevent headlight glare. Locate the vertical adjustment screw—typically an 8mm hex—and turn clockwise to raise or counterclockwise to lower beam visibility. For horizontal adjustment, turn the side screw to center beams slightly right. Professional technicians often use laser-optical equipment to detect even minor deviations that may not be visible during manual wall testing. After alignment is complete, applying a UV-resistant clear coat to your headlight lenses will protect them from oxidation and yellowing over time. Test low and high beams, confirming proper cutoff lines and uniform patterns before road testing. Selecting quality LED or HID bulbs can also enhance beam consistency and visibility during nighttime driving conditions.
Model Year Differences and Common Challenges
Subaru Legacy headlight replacement procedures vary greatly across model years, requiring different approaches and tools depending on your vehicle’s generation. Early models (2003-2009) demand bumper removal using 10mm sockets and clip removal tools to access assembly complexity points. You’ll navigate multiple bolts around the grill and bumper area, risking damage to fragile plastic components if forced.
The 2010-2014 generation increases difficulty through fender lining access, requiring trim tools and potentially jack stands for wheel well liner removal. Model variations introduce tight working spaces that complicate bulb handling. Most headlight replacements require turning the bulb socket counterclockwise to release it from the assembly before bulb removal.
Later models (2015-2019) simplify replacement with direct bulb access through twist-lock covers, eliminating bumper disassembly. However, LED upgrades require polarity verification and proper connector orientation. All generations present wiring harness challenges, where aged plastic clips break easily during disconnection. Before beginning any headlight replacement, gather replacement bulbs and gloves to ensure proper handling and prevent oil contamination from your fingers. Careful handling of electrical connectors throughout the process will help avoid damage to sensitive components.