
To replace your Jeep Wrangler’s headlight connector, you’ll need to identify the correct H13 connector type for your model year (2007-2017 JK or 2018-2025 JL). Start by disconnecting your battery to prevent electrical shorts. Remove the old connector by releasing its locking tab, then inspect for corrosion or damage. Install the new connector using proper crimping or soldering techniques, apply dielectric grease to prevent corrosion, and make certain you’re following the correct pin configuration. The sections below cover detailed troubleshooting steps and LED upgrade considerations.
Identifying Your Wrangler’s Headlight Connector Type
Identifying the correct headlight connector type for your Jeep Wrangler requires examining three key factors: your vehicle’s model year, the headlight system installed, and the physical connector characteristics.
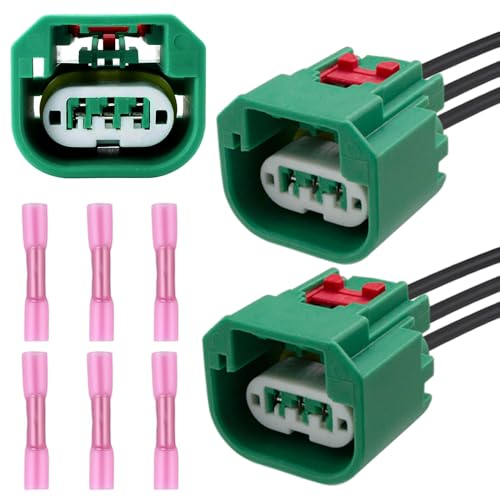
For 2007-2017 JK models, you’ll mainly find H13 connectors with 16-gauge wiring. The 2018-2025 JL generation continues using H13 types but also incorporates specific 3-pin connectors in certain harness configurations. Verify connector compatibility by inspecting the terminal count—halogen systems typically feature 3-pin arrangements with distinct spacing for low beam, high beam, and ground connections.
Check your connector’s physical attributes: oval blade-style housings with locking tabs indicate standard OEM design. Replacement connectors feature an 8-inch long 16-gauge terminated wire that connects directly to the factory headlight wiring harness. For a secure connection, ensure the bare copper wire is inserted into the connector until it meets the middle, then use a ratcheting crimping tool to firmly secure the wire in place. Cross-reference model specifications using OEM part numbers like 7283-8852-30 for 3-pin variants. This verification prevents mismatching and guarantees proper electrical contact during replacement.

COMPATIBILITY: Compatible with Jeep Wrangler 2007-2022 3.6L/3.8L,Compatible with Jeep Liberty 2008-2012.Compatible with Dodge RAM 1500 2500 3500 2009-2010,Caliber 2007-2012
Precise Fitment: Engineered for a direct plug-and-play replacement of OEM part #68064997AA. Specifically compatible with Jeep Wrangler (2007-2022), Liberty (2008-2012), Patriot (2009-2017); Dodge Ram 1500/2500/3500 (2009-2010 Pickup), Caliber (2007-2012); Ram 1500/2500/3500 (2011-2014). Also replaces OE numbers: 68064997AA. Always double-check your vehicle model and OEM number before ordering.
Gathering the Right Tools and Replacement Parts
Once you’ve confirmed your connector type, proper preparation requires acquiring specific tools and parts before beginning the replacement process. You’ll need headlight pin removal tools or paperclips to release terminal pins, wire cutters and strippers for wire preparation, and crimping tools compatible with Packard 56 or Mopar terminals. A soldering iron with heat shrink tubing guarantees waterproof connections.
For replacement parts, source H13 connectors or Mopar repair kits designed for Jeep applications. Duralast Electrical Pigtail Set 843-2 or Dorman 84790 terminals provide reliable alternatives. Always select waterproof connectors to resist corrosion in harsh conditions. New H13 connectors are available from Amazon for approximately $12 and include the necessary wiring. Ensure your replacement connector matches the electrical requirements specified in your vehicle’s documentation to prevent damage to the headlight assembly.
Before starting, disconnect your battery to prevent electrical shorts. Understanding wiring configurations helps ensure proper terminal alignment during installation. Gather dielectric grease and body panel removal tools to safely access the headlight assembly without damaging clips or panels.

Fit for: Waterproof female socket electric connector Compatible with Jeep Wrangler 2007-2024 2.0L/3.0L/3.6L/3.8L/6.4L high/low beam lamps bulb (Headlights-Upper/Lower beam. Front) 3-PIN. Includes copper insulated wires measuring 11.8 inches (30 cm) in length.

1. H4 Pigtail socket wiring harness connector: If PINs on your vehicle are not standard to guarantee your 4"x6" 7"x6" 5"x7" work normally like neither low beam nor high beam work on your vehicle, this H4 Wiring Harness is needed. It will make your HID/LED /Foglight retrofit easier a lot. More details kindly please check the main pictures
Safely Removing the Old Headlight Connector
Begin by locating the headlight assembly behind your Jeep Wrangler’s grille or bezel. Remove necessary clips or screws using appropriate tools like nylon panel removers to prevent trim damage. Identify the connector attached to the bulb socket and examine it for a red or colored locking tab. Push this tab away from the headlight to disengage the lock mechanism. If resistance occurs, use a small pick tool to carefully depress the locking tab without forcing it. Once released, pull the connector straight away using both hands for stability. Inspect the removed connector for corrosion, damaged pins, or frayed wiring—essential steps in proper connector maintenance. Clean terminals gently if oxidation is present. For models from 2006 onward, ensure you have proper lighting for visibility during the entire removal process to avoid mistakes. This methodical approach guarantees securing connections remain intact while preventing damage to plastic clips and wiring harnesses during removal.
Installing Your New Headlight Connector
Proper installation of your new headlight connector requires careful attention to pin alignment and wire routing to guarantee reliable electrical function. First, verify connector orientation using the manufacturer’s wiring diagram to match color-coded wires accurately. Insert wires into terminals following the correct pinout—ground, turn signals, low and high beams—then crimp or solder connections securely. Slide the connector firmly into the headlight socket until you hear a click, confirming proper seating. Check that rubber seals provide waterproof sealing against moisture intrusion. Apply dielectric grease to pins before assembly to prevent corrosion and extend headlight longevity and performance. Route wires away from heat sources and sharp edges, securing them with heat shrink tubing. When installing LED headlights, connect the anti-flicker LED CAN-bus driver module box to prevent premature bulb failure and ensure stable operation. Finally, test all functions—low beam, high beam, and turn signals—before completing assembly to ensure proper function and alignment.

Compatible Models: Car headlight wiring harness compatible with Dodge 2009-2010 RAM 1500 Pickup, 2009-2010 RAM 2500 Pickup, 2009-2010 RAM 3500 Pickup, 2007-2012 Caliber, compatible with RAM 2011-2014 3500, 2011-2014 2500, 2011-2014 1500, etc

Compatible Models: This headlight connector is suitable for Ford, Chevrolet, Dodge, GMC, Jeep, Hummer, and other models. Features an OEM-spec H13 male-to-H4 female connector, perfectly compatible with headlight sockets and H4-spec halogen/LED headlight assemblies. Please verify vehicle compatibility before purchasing.
Wiring Modifications for LED and Aftermarket Headlights
After completing the installation of a standard headlight connector, you’ll find that LED and aftermarket headlights often demand significant wiring modifications beyond simple plug-in replacement. LED units require different wiring schemes than halogen bulbs, particularly for halo or DRL functions. You’ll typically connect the yellow wire to your turn signal power for halo activation, while the white wire taps into the fuse block using an add-a-fuse adapter.
Verify connector fitment carefully, as polarity and pin configuration adjustments prevent damage to LED assemblies. Install a relay harness to improve voltage delivery directly from the battery, incorporating fuses on hot legs for circuit protection. Ascertain ground connections attach securely to clean chassis points near the headlights, using ring terminals at factory bolt locations for peak conductivity. Clean paint off the factory grounding spot to ensure direct body contact for optimal electrical performance.
![True Mods H6054 H4 LED Headlight Wiring Harness [Negative Switched Conversion] [Fused] Universal H4 Head Light Relay Harness Kit for 9003 H6024 5x7 7x6 4x6 Subaru Toyota Jeep Sealed Beam Headlamp](https://m.media-amazon.com/images/I/51+wV9S2Q4L._SL500_.jpg)
YOUR VEHICLE NEEDS THIS - Swapping out old headlights for LED conversions on negative switched vehicles like Toyota, Subaru, Mitsubishi, or Suzuki, is not a simple job. But with our plug-and-play universal dual H4 headlight relay harness kit for high/low beam it can be! The compatible sockets include: 7x6 5x7 H6024 (2D1 H6054 H5054 H6054LL 6014 6052 6053)|H6024 (2D1)|4x6 6x4 (H4651, H4652, H4656, H4666, H6545)|H5006 (2C1) sealed beam headlights and more!

【YOUR VEHICLE NEEDS THIS】Perfectly match old led headlight H6054 H5054 H6054LL 6014 6052 6053 [Fused] [negative switched conversion] vehicles like Toyota, Jeep Pickup, Tacoma, Subaru, Mitsubishi, or Suzuki 7x6 5x7 led headlight harness.

Universal fit: Compatible with all automobiles, boats and devices equipped with a 12 volt power source
Testing Your Headlights and Completing the Job
Success in headlight connector replacement hinges on thorough testing that validates both immediate function and long-term reliability. After securing the new connector, apply dielectric grease to prevent moisture intrusion and corrosion. Use a multimeter to confirm electrical continuity through the circuit, checking for 12 volts at the connector. Test all modes—low beam, high beam, and parking lights—to validate complete functionality. Verify ground connections are solid, as poor grounding causes intermittent failures. Perform a wiggle test on connectors and wiring to detect loose connections. If you’ve installed LED upgrades, confirm no flickering occurs; add anti-flicker harnesses if needed. Cycle the headlight switch repeatedly while observing for dimming or failure. Inspect the headlight switch itself for looseness or damage that could compromise the connection. A electrical short in the wiring harness can also prevent headlights from turning off completely, so examine the entire circuit path for any signs of damaged insulation or exposed wires. This systematic headlight troubleshooting approach guarantees your repair delivers reliable, safe illumination for night driving.


