To replace your Hyundai Elantra’s headlights, you’ll first disconnect the battery for safety, then access the bulbs by either removing the entire headlight assembly using 10mm/12mm sockets or reaching behind from the engine bay. Release the dust cover counterclockwise, disconnect the electrical connector, and rotate the old bulb a quarter-turn to remove it. Install the new bulb without touching the glass, using gloves to prevent oil contamination. Reconnect everything and test both beams before exploring proper alignment techniques and maintenance procedures below.
Tools and Materials Required
Before you begin replacing your Hyundai Elantra’s headlights, gather the necessary tools and materials to complete the job efficiently and safely. You’ll need a 10mm and 12mm socket wrench set with extensions, plus Phillips and flathead screwdrivers for assembly removal. Essential protective gear includes gloves to prevent skin oils from contaminating the bulb glass, which reduces bulb life, and safety glasses for eye protection.
Ensure you’ve purchased the correct replacement bulb for your specific model year, as headlight types vary between Elantra generations. Stock replacement clips and fasteners, since plastic components often break during removal. Keep dielectric grease, microfiber cloths, and a multimeter handy for testing connections. A panel removal set prevents paint damage when accessing recessed bolts and housing components. For low beam and high beam bulbs, you’ll also want to have a dust cap remover available since accessing the bulb sockets requires removing dust caps first. For the most straightforward approach, turn off your headlights and wear gloves during installation to avoid transferring oils to the bulb. For simple bulb replacement, no tools are necessary, making it one of the most straightforward maintenance tasks you can perform.

Fit Hyundai Elantra 2019 2020 2021 2022,High Beam and Low Beam 9005 Lights 6000k White Plug and play:Halogen headlight bulbs, 2 pcs 9005/hb3 12v 60w for both high beam and...
Preparing Your Vehicle for Headlight Work
With your tools and materials assembled, you’re ready to prepare your Hyundai Elantra for safe headlight work. Begin by parking on level ground in a well-lit, dry workspace setup. Turn off the engine, headlights, and interior lights, then disconnect the battery to eliminate electrical hazards—critical safety precautions before proceeding.
Open the hood and secure it properly using the support rod. Allow bulbs to cool for at least fifteen minutes to prevent burns. Remove any under-hood covers blocking headlight access and clear obstructions like washer fluid reservoirs if necessary. If your headlights are not functioning, the issue may stem from a faulty headlight relay located in your fuse box rather than the bulbs themselves.
Cover adjacent surfaces with protective cloth to prevent scratches. Organize fasteners in magnetic trays and verify replacement part compatibility by checking your vehicle’s specific bulb types such as 9005 or H7 depending on your model year. Arrange tools within easy reach, ensuring adequate portable lighting illuminates the engine bay for precision work. Wear rubber gloves to avoid transferring oils from your skin onto the new bulb surface, which can reduce bulb lifespan.

Easy Installation: The 4-pin configuration of the relay 95230-2P030 makes it easy to install and connect to your vehicle's wiring harness. The 12V 35A rating of the relay makes it suitable for a wide range of automotive applications.

Easy Installation: The 4-pin configuration of the relay 95230-2P020 makes it easy to install and connect to your vehicle's wiring harness. The 12V 20A rating of the relay makes it suitable for a wide range of automotive applications.
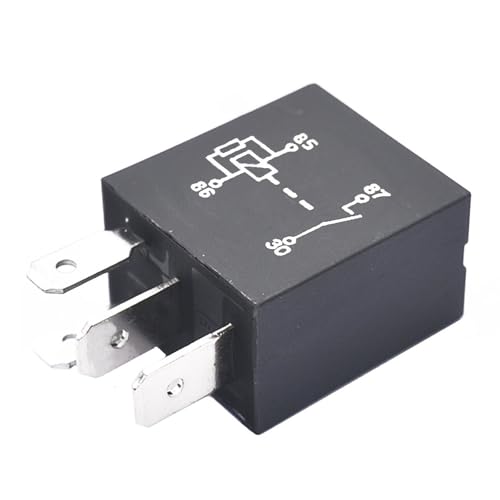
【Replacement OE Part Number & Year & Liter 】Our Headlight Relay Replaces RY-710, 1R1849, 1R1367, 95224-29700, 95224-29750, 203-0148, 203-0167, AR6215, 36156, R6215, 19997, 20501, 9522429700, 9522429750, 1R1849, 25-0375, R6215, 56-2174, 5071867AA, 1R1367, 2001 2002 2003 2004 2005 2006 2007 2008 2009 2010 2011 2012 2013 2015 2016, 01 02 03 04 05 06 07 08 09 10 11 12 13 15 16, 2.0L 2.7L 3.8L
Removing the Headlight Assembly
Removing the headlight assembly requires systematic access to multiple mounting points distributed across the front end. Begin by opening your hood and releasing the interior latch lever. Disconnect all electrical connectors by pressing their release tabs—this protects vehicle safety by preventing wiring damage. Locate and remove all retaining bolts using 10mm or 12mm sockets; check the top, sides, and wheel well areas. Some models require bumper clip removal by disengaging center pins first. On newer Elantras, you’ll need partial bumper detachment for full access. After removing fasteners, gently wiggle the headlight assembly outward from the grille side. Maneuver carefully past obstructions like fuse boxes or shields. On the driver’s side, you may need to remove the shield by twisting the clip with a Phillips screwdriver and removing the top shield bolt. When handling the assembly, avoid touching the glass on any halogen or LED bulbs to prevent contamination and premature failure. Confirm complete electrical disconnection before final removal to maintain vehicle safety standards.

Easy Headlight Restoration Kit: The Sylvania Headlight Restoration Kit is easy to use and includes everything needed to repair two headlight lenses and restore light output with no tools needed

Precision Computer Pre-Cut Vinyl Film

PACKAGE CONTAINS- 1PCS Connector Plug Harness
Replacing Individual Headlight Bulbs
Replacing individual headlight bulbs eliminates the need for full assembly removal in most situations, saving time and effort. Start by ensuring the engine’s off and headlights have cooled. Release the dust cover by rotating it counterclockwise, then disconnect the electrical connector by pressing the release tab. Remove the old bulb by pressing down and rotating it 1/4 turn counterclockwise, pulling it straight out.
Before installation, verify bulb types—typically H11 for low beam and 9005 for high beam—to avoid compatibility issues. Handle new bulbs with rubber gloves to prevent skin oils from reducing lifespan. Insert the bulb, aligning tabs properly, then rotate 1/4 turn clockwise to lock. Reconnect the electrical connector and replace the dust cover. Test the headlight to confirm proper function. For LED bulb installations, check connections if the bulbs do not illuminate, as you may need to reverse the connectors to ensure proper polarity.

Fit Hyundai Elantra without Projector 2014 2015 2016, High Beam H7, Low Beam H11 Lights 6000k White

【Visual Enhancement】: The OKOENIEO H11 headlight bulb are 200% brighter than other halogen bulbs, providing drivers with a wider and farther field of vision. Offering a greater visibility, they allow drivers to spot deer, wildlife, falling rocks, or obstacles ahead of time, ensuring safer nighttime driving.

【Huge Improvement in Visibility】-AUTOONE H11 led bulbs are equipped with high luminous efficacy CSP chips. And 1:1 halogen h11 bulbs’ beam pattern, spread out the light more to help in the side and front vision but no endangering other drivers. Safer and bright upgrade for fog lights or drl
Installing the New Headlight Assembly
Installing the new headlight assembly requires careful alignment and secure fastening to guarantee proper function and road safety. Begin by positioning the assembly, ensuring assembly alignment with the vehicle’s mounting points and clips. Push the unit firmly forward until it seats flush with the body, confirming all tabs lock into place. Next, reconnect the electrical connectors by pressing them together until the locking clips engage audibly. Don’t pull wires directly—handle connector housings instead. Reinstall all bolts using appropriate socket sizes (typically 10 mm or 12 mm), tightening securely without overtightening to prevent thread damage. Consider the beam pattern alignment to ensure proper light distribution on the road after installation. Avoid applying dielectric grease on connectors as this can compromise electrical connections and may void your vehicle’s warranty. Finally, verify the assembly sits properly aligned and flush before testing headlight operation and performing necessary aiming adjustments.

PRECISION FITMENT: Designed specifically for the 2017-2018 Hyundai Elantra (Not fit for Sport, Limited, GT, HID, LED or adaptive headlight models), this package includes 1 pair of headlights that guarantee a seamless installation without modifications. This version includes the integrated parking lamp. OEM Part Numbers: 92101-F3000, 92102-F3000. Partslink Numbers: HY2502206, HY2503206. Note: The Bulbs are included.
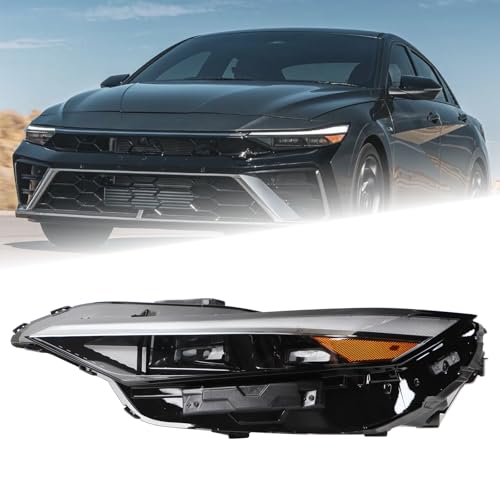
Fitment: Compatible with 2024 2025 Hyundai Elantra W/Module Double Lentille, Replacement for part numbers: 92101AA740 92101-AA740

ELANTRA EXACT FITMENT: Custom-fit and compatible with 2019-2020 Hyundai Elantra sedan models. Designed as a direct structural replacement for the distinctive sharp triangle front headlamps.
Testing and Final Checks
Once you’ve secured the new headlight assembly, verify its functionality before declaring the job complete. Switch on your vehicle’s lights and confirm both low beam and high beam operations illuminate properly. Check integrated signal indicators and daytime running lights respond correctly. Watch for flickering or inconsistent lighting indicating electrical issues requiring troubleshooting methods like checking fuse status and testing wiring continuity with a multimeter.
Perform headlight brightness adjustment using the assembly’s adjustment screws. Test beam patterns against a wall at 25 feet, confirming proper vertical and horizontal aim. Verify left and right headlights align consistently to prevent blinding oncoming drivers while maximizing road visibility. Consider the color temperature preferences of your replacement bulbs to ensure optimal visibility conditions. Ensure you’ve identified your vehicle’s lighting package to confirm compatibility with your replacement assembly.
Conduct a night-time drive test validating sufficient illumination without dimming. Confirm the housing remains moisture-free and no dashboard warning lights persist. The entire replacement process typically takes about 15 minutes to complete from start to finish.