To replace a headlight retaining clip, first identify your bulb type (H1, H3, H4, or H7) and inspect the clip mechanism. You’ll need pliers, a flathead screwdriver, and the correct replacement clip from an OEM parts catalog. Open your hood, disconnect the wiring harness, and carefully remove the damaged clip using your screwdriver. Install the new clip by hooking the smaller tab first, then apply downward pressure until it clicks. Test stability with a shake test and verify beam alignment. The sections below cover model-specific variations and thorough troubleshooting techniques.
Identifying Your Headlight Retaining Clip Type
Before you can replace a headlight retaining clip, you must accurately identify which type secures your vehicle’s bulb assembly. Start by determining your headlight bulb type—H1, H3, H4, or H7—since clips are often bulb-specific. Visually inspect the clip mechanism: spring clips use stainless steel tension, push-in retainers snap into position, screw-on types require fasteners, and slip-on retainers slide over flanges. Check your vehicle’s OEM parts catalog using make, model, and year to confirm vehicle compatibility. Measure the clip’s inside diameter and length for precise fitment verification. Note clip materials—stainless steel offers superior corrosion resistance while zinc-plated steel balances durability and cost. Understanding the differences between bulb size equivalents like H11 versus H11B ensures your retaining clip is compatible with your specific headlight configuration. Cross-reference these specifications with automotive parts databases or supplier catalogs to guarantee you’re ordering the correct replacement clip. Consult your vehicle’s owner’s manual or an online bulb finder tool to verify that your replacement clip matches your vehicle’s original electrical requirements and specifications. Many retaining clips are available in pack sizes ranging from 25 to 50 units, which is ideal for technicians and service shops performing multiple headlight repairs.
Gathering the Right Tools and Replacement Parts
Successful headlight retaining clip replacement starts with assembling the correct tools and verified-compatible parts. Begin tool selection by gathering pliers for gripping corroded clips, though some designs allow hand-only manipulation. Include a flathead screwdriver or trim removal tool for prying stuck components. Wear protective gloves when handling small parts in your clean workspace.
Prioritize clip compatibility by cross-referencing your vehicle’s make, model, and year against replacement part numbers. OEM clips deliver superior fit and durability compared to generic aftermarket alternatives. Source parts from specialty retailers like 1AAuto.com or local auto parts stores. Purchase clips before starting work, as used headlights often arrive with damaged retainers. Consider contacting retrofit shops for spare clips, which may not be publicly listed but are often available. Verify compatibility through vehicle repair manuals or dealer specifications to prevent installation failures. After successful installation, protect your headlights with a UV-resistant clear coat to prevent oxidation and yellowing over time. Modern LED and Xenon headlights require precise clip alignment due to their directional light output and higher brightness levels, making proper retaining hardware essential for optimal beam positioning.

It is very suitable for replacing damaged or missing pivot front headlight fixing clips on cars. They fit well and have a great effect
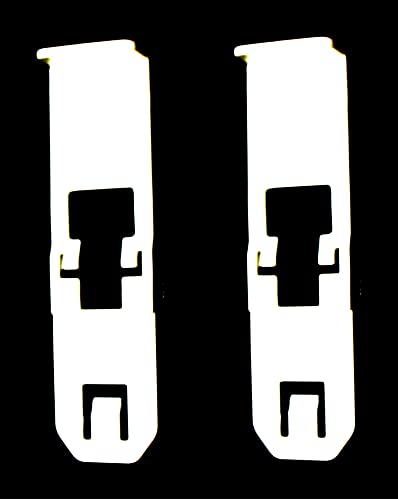
Aftermarket Headlamp Headlight Retaining Mounting Bezel Clip

Compatible with Chevrolet Models, for Blazer 1998 to 2005 Year, for Impala 2000 to 20005 Year, for Monte Carlo 2000 to 2005 Year, for S10 Pickup 1998 to 2004 Year
Accessing the Headlight Assembly
With your compatible clips and tools ready, locate the headlight assembly by opening your vehicle’s hood and identifying the mounting hardware at the assembly’s perimeter. You’ll find screws or bolts securing the housing to the radiator support or fender. Check for locking tabs requiring gentle prying with trim removal tools. Some vehicles demand partial bumper cover removal to expose all fasteners.
Before disconnecting anything, verify ignition is off to maintain assembly safety. Unplug the wiring harness at the rear of the housing by pressing the release tab. Remove any upper covers blocking access, using painter’s tape to protect surrounding surfaces. Pull back inner fender liners if necessary to reach hidden bolts. Note the current headlight alignment before removal—this reference will streamline reinstallation and prevent misalignment issues. Older designs were simpler, typically requiring only basic tools and minimal disassembly to access the retaining clips.
Removing the Damaged Retaining Clip
Inspect the retaining clip’s location and condition once you’ve exposed the headlight assembly. Use a flathead screwdriver or panel removal tool to disengage the clip from its mounting slots. Apply controlled force to avoid damaging adjacent components. For clips secured with 10-millimeter bolts, use the appropriate socket wrench to remove fasteners completely before extracting the clip. Pull the clip upwards or outwards following its natural disengagement path.
When troubleshooting stuck clips, apply penetrating lubricant sparingly to loosen corrosion. Gently wiggle the clip back and forth to break it free from tight fittings. These clip removal techniques prevent breaking surrounding headlight assembly parts. Before beginning removal, ensure you have trim tools for clips on hand to safely disengage fasteners without causing damage. If excessive force becomes necessary, consider professional assistance to avoid costly damage. Keep replacement clips available from reputable retailers to prevent installation delays. Proper handling during installation ensures both safety and prevents damage to the headlight assembly components.

Specification Details: Our headlight retaining clips come in a set of 24 pieces, containing a total of 12 sizes (2 pieces of each). The variety of sizes provides greater flexibility and allows you to find the right retaining clips for your vehicle

EXACT REPLACEMENT FORD E9DB-13N020AA - As exact replacements, these retaining clips will snap in snug and perfect. Their dimensions are approximately 1-inch x 1 1/8 inches by 3/8 inch. Alternative part numbers for this replacement part include E9DB13N020AA, E9DZ-13N129A, and E9DZ13N129A.

Retainer, Capsule/headlamp/fog Lamp Mounting,Headlamp Assembly Retainer
Installing the New Retaining Clip
Position the new retaining clip by first identifying its alignment features—typically a smaller tab and a larger nub that correspond to specific slots or holes on the headlight housing. Hook the smaller tab into its designated slot first, then apply downward pressure to seat the clip fully. Use pliers for grip and precision in tight spaces, avoiding excessive force that could break the clip. Confirm the headlight assembly is correctly positioned before installation to prevent misalignment. Clip alignment techniques include using the housing’s natural contours as leverage while guiding the clip into place. When handling the new clip, wear protective gloves to prevent potential damage from oils on your skin. Clip installation tips: verify the clip engages all locking tabs and perform a gentle shake test to confirm secure engagement without wobble or movement. Once installed, ensure the clip is fully seated and bottomed out for proper headlight security.

Direct replacement - this headlight retaining ring designed to match the fit and function of the original ring on specified vehicles

Compatible with Dodge Ram 1500 2009 2010 2011 2012 2013 2014 2015 2016 2017 2018 2019 2020 2021 Year

Direct replacement - this headlight retainer matches the fit and function of the factory part on specified years, makes and models
Model-Specific Considerations and Alternative Solutions
Because retaining clips differ substantially across vehicle makes and models, you’ll need to identify your specific clip design before attempting replacement. Certain models like the ’03 Mazda Protege5 feature fragile plastic clips with hinge points prone to failure, while others incorporate integrated designs requiring full headlight assembly replacement. Check your vehicle’s service manual and model-specific forums to determine clip material—plastic or stainless steel spring metal—and confirm vehicle compatibility with available parts.
For aftermarket options, universal clip kits covering H1, H3, H4, and H7 bulb types offer cost-effective solutions, though OEM clips guarantee precise fitment. If original clips are unavailable, stainless steel sets designed for your bulb socket type provide durability. Verify exact compatibility with your headlight assembly before purchasing to prevent installation issues or bulb instability. Before finalizing your choice, consider using appropriate sealants when reassembling to ensure a durable bond that allows for future maintenance. Some owners have successfully fabricated custom metal clips from salvaged materials when replacement parts prove difficult to source.

Complete Sizes: This headlight retaining clip set includes 12 pieces covering 12 different sizes. The wide range of size options allows you to flexibly match the installation requirements of various vehicle models without worrying about missing the right clip.

Headlamp retaining spring clips are made of high-quality Stainless steel, durable and not easy to break
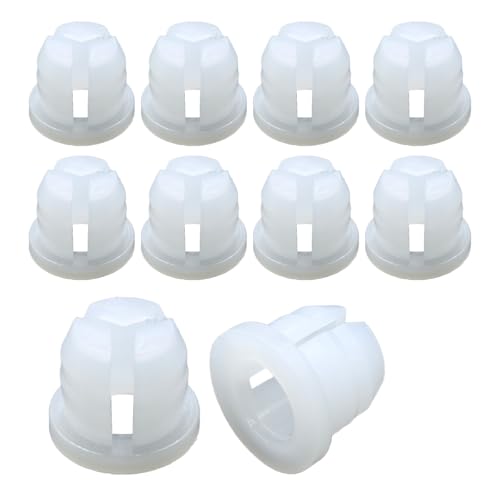
【High Quality】:This car headlight retaining clip is made of high-quality PP, PA, and POM materials, which have strong toughness, and scratch resistance, are not easy to break, and can be used for a long time.
Testing Headlight Stability and Function
After securing the retaining clip, you’ll need to verify both mechanical stability and electrical function to confirm proper headlight operation. First, check beam alignment by observing the pattern on a flat surface 10-25 feet away. The beam shouldn’t flicker or shift during small vehicle movements. Inspect the assembly for vibrations or looseness that could destabilize the beam position.
Next, test bulb continuity using a multimeter set to resistance mode. An open circuit indicates filament failure. With headlights activated, measure voltage at the socket—it should read approximately 12V. Examine connections for corrosion or damage. For optimal results, consider replacing bulbs in pairs to ensure consistent light output across both headlights.
Finally, measure illuminance levels on a white surface to verify brightness meets manufacturer specifications. If testing under foggy conditions, note that halogen headlights demonstrate superior target detection performance compared to LED or xenon alternatives. Conduct these tests systematically to isolate mechanical from electrical issues.
Maintaining Your Headlight Retaining Clips
Once you’ve confirmed your headlight operates correctly, regular upkeep of the retaining clips extends their service life and prevents unexpected failures. Implement clip maintenance by inspecting clips every six months for brittleness, cracks, or deformation caused by heat exposure. Clean mounting points with a dry cloth to remove debris that compromises clip tension. Store spare replacement packs in your vehicle to minimize downtime during servicing.
Monitor clip longevity by tracking installation dates and environmental conditions. Plastic clips degrade faster in high-temperature engine bays, requiring more frequent replacement in older vehicles. If your vehicle uses sealed beam headlights, ensure compatibility with your retaining clip design before replacement. Periodically check the rubber casing around the headlight assembly, as seal deterioration affects clip stability. If you notice headlight movement or misalignment, inspect clips immediately rather than masking issues with temporary fixes. A visual inspection for broken filaments or burn marks can help identify if the headlight itself requires replacement alongside clip maintenance. Consult your owner’s manual for specific diagrams showing proper clip seating positions and maintenance intervals.

[High Quality] Headlight retaining clip of high-quality nylon material, with long service life and delicate and compact.

Package Included: You will receive 10PCS Headlight Clips, enough to allow you to replace damaged or lost Car Trim Panel Clips