
To replace your Toyota RAV4’s headlight cover, you’ll first disconnect the battery and remove the front bumper by extracting 10mm bolts, wheel well clips, and splash shield fasteners. Next, you’ll disconnect the wiring harness and unbolt the headlight assembly using two 10mm bolts. Clean the mounting surfaces, trial-fit the new polycarbonate cover with anti-abrasive tape, then secure it to specified torque. Reinstall the bumper, reconnect electrical connections, and test low/high beam functionality with a voltmeter to verify proper voltage and illumination patterns before final assembly.
Tools and Materials Needed
Preparation determines success when replacing Toyota RAV4 headlight covers. Proper tool organization streamlines this multi-step procedure. You’ll need 10mm sockets for outer screws, splash shield bolts, undercarriage center bolts, and 6mm bolt reassembly. A 10-inch socket extension accesses hidden fasteners behind the bumper assembly.
Flathead screwdrivers release wheel liner clips, hood clips, and push pins throughout the removal process. Plastic trim tools prevent surface damage when prying bumper covers and extracting retainers. Socket extensions reach deep headlight area bolts, while an extendable magnet retrieves dropped fasteners.
Material selection includes polycarbonate headlight lens covers, replacement bumper clips, push pins for hood and center positions, 10mm fasteners, and splash shield hardware. Safety glasses protect against debris, and gloves guarantee secure handling during bumper manipulation. When selecting replacement covers, consider beam pattern quality to ensure optimal light distribution after installation. Inspect the replacement headlamp for breakage during shipping before beginning installation to avoid complications mid-project. LED and HID upgrade options offer improved brightness and longevity compared to standard halogen bulb alternatives if you’re considering performance enhancements during your replacement.

FITMENT: Compatible with Toyota Rav4 2019, 2020, 2021, 2022, 2023, 2024, 2025. Precut pieces sized for factory headlights and taillights.

【Compatibility】Headlight Bulb Cover Cap fit for Toyota RAV4 2013 2014 2015 2016

FITMENT - Cut To Fit The Toyota RAV4 2026-2027. Change the feel and appearance of your vehicle
Safety and Preparation
Before removing any headlight components, guarantee your RAV4’s engine is completely shut down and the ignition key is removed from the switch. Engage the parking brake fully and position the vehicle on level ground. These safety measures prevent accidental starts and movement during service.
Preparation techniques include powering down all electrical accessories and setting the headlight switch to off. Wear protective gloves and safety glasses to shield against oils and debris. If accessing wiring harnesses, disconnect the battery to prevent electrical shorts. Handle connectors gently to avoid damage. Gather the necessary tools and components for the replacement job before beginning work.
Work in a well-lit environment for ideal visibility. Chock wheels if working on inclines, and shift automatic transmissions to park. Understanding the base types of your headlight connectors will help ensure proper reassembly after component removal. To prevent future headlight degradation, note that UV sealant protection can extend the lifespan of your replacement headlight covers. Consult your owner’s manual for model-specific warnings before beginning component removal.
Removing the Front Bumper Cover
Accessing the headlight assembly requires complete removal of the front bumper cover on most RAV4 models. Begin by turning the wheel for best fender removal access. Extract wheel well rivets by prying the center, then the base. Remove the 8mm bolt securing the fender to bumper, then pry fender molding push-pins with a flat-head screwdriver. At the top, remove push clips and two Phillips screws along the grille. Extract two 10mm mounting bolts per side. From underneath, remove four 10mm splash shield bolts and 6mm undercarriage bolts. Grasp the bumper’s bottom edge and pull outward, working from one side to center, then repeat symmetrically. Lift and slide the bumper forward off top pins while maintaining proper bumper alignment throughout the process.

Other Names: Closing Plate Mount Bolt,Side Support Screw, Rocker Molding Bolt, Wheel Opening Molding Screw, Lower Molding Screw, Tail Lamp Assembly Screw, Bumper Cover Bolt, Lens & Housing Screw, Protect Plate Bolt, Housing Bolt, Screw W Washer Tapp
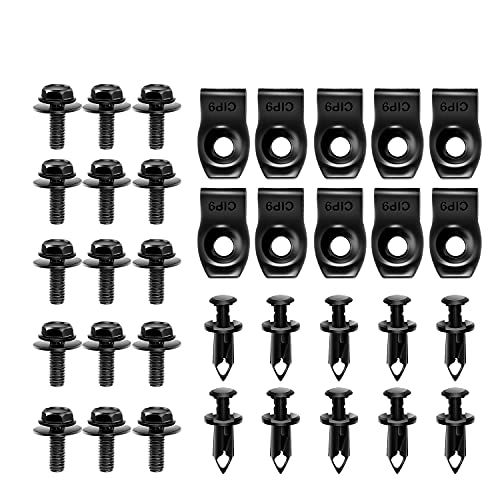
Brand New Engine Splash Shield Bolts Hardware Kit Fender Bumper Clips Rivets direct replacement and perfect fitment.Fit Type: Universal
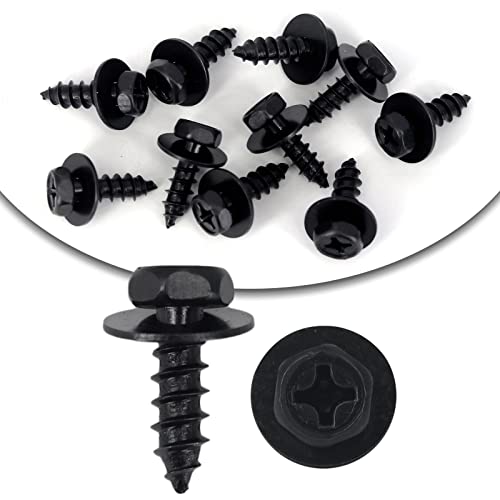
Replacement Part Number: # 90159-60498, 9015960498
Accessing the Headlight Assembly
Once the front bumper cover is removed, pull the hood latch located under the steering column, then press the secondary lever on the hood emblem and lift the hood. Insert the support bar into its designated hole to secure the hood safely. You’ll now access the rear of the headlight assembly directly behind the grille area.
Locate the wiring harness clips behind the assembly. Squeeze the two ears on each connector to release them from the headlight, ensuring wiring safety by inspecting for damage before disconnection. Identify the two 10mm bolts securing the headlight to the chassis—use a 10-inch socket extension for the inner bolt. Check upper and lower tabs for proper headlight alignment with the fender and radiator support points before proceeding with removal. Before touching any halogen bulbs, ensure the ignition is off to prevent accidental activation. Disconnect all bulb connectors before fully extracting the headlight assembly from its mounting position. Verify that your RAV4 uses the correct dual-beam bulb type specified in your vehicle manual to ensure proper fitment and safety.
Removing the Old Headlight Cover
With the headlight assembly freed from its mounting points, you’ll now separate the cover from the housing unit. Locate the plastic retaining tabs around the assembly’s perimeter. Use your flathead screwdriver to carefully release each tab by applying gentle pressure while sliding the cover outward. Common issues include brittle clips that may break during removal, so work methodically to avoid damage. Once all tabs disengage, pull the cover straight off the housing. Inspect the seal for deterioration—a frequent source of moisture intrusion. These headlight maintenance tips help prevent condensation buildup and lens clouding. If the cover resists, verify all fasteners are fully released before applying additional force. Before proceeding, disconnect all connectors associated with the headlight to ensure safe handling during removal. Proper beam alignment after reassembly will ensure optimal visibility and safety on the road. Modern LED technology solutions like aftermarket upgrades can improve both performance and clarity once your maintenance is complete. Set the old cover aside and examine the housing for cracks or damage requiring attention.

【Fitment】Headlight Bulb Cover Cap Compatible with Toyota RAV4 2013 2014 2015 2016

【Fit For Toyota RAV4 Light Bulbs】ZPXGIZT headlight bulbs and license plate lights are perfectly fit for Toyota RAV4 2013 2014 2015.No additional modifications required.The halogen headlights and license plate lights combo includes 2pcs high beam,2pcs low beam,2pcs fog lights and 2pcs license plate lights,totaling 8 bulbs in the package.

⭐Toyota Lexus Fender Liner Bumper Screws & Grommets Multipurpose Kit
Installing the New Headlight Cover
Proper preparation guarantees a secure, long-lasting installation of your replacement headlight cover. Clean and dry all headlamp surfaces thoroughly, then trial-fit the cover centrally and mark top slot locations. Apply an alcohol wipe to remove residue, followed by anti-abrasive tape strips at all slot and hole positions. Install metal clips after unpeeling the top seal, making sure they locate on tape—not directly on the lens—for headlight alignment. Connect electrical clips for LED components and attach the wiring harness before mounting. Slide the assembly into position, aligning the lip tab over the white plastic retainer. Secure with four 10mm bolts, then tighten metal clip screws to 0.5-0.8 Nm torque. The black bolts feature coarse thread designed specifically for threading into plastic grommets, while the gray bolt uses fine thread for more secure fitting. These maintenance tips guarantee ideal performance and longevity.

Fit for:for Toyota RAV4 2013-2015

Kit Includes: 1 Driver Side Headlight Assembly; 1 Passenger Side Headlight Assembly

Fit for:for Toyota RAV4 2013-2015
Reinstalling the Bumper and Components
Gather your 10 mm socket, ratchet, trim removal tool, Phillips and flathead screwdrivers, and panel clip pliers before beginning bumper reinstallation. Position the bumper so grille upper tabs engage first, then slide flanges under fender liners on both sides—critical bumper alignment tips for preventing gaps. Press each corner inward simultaneously to seat side clips, verifying even panel gaps at headlights. Hand-start top 6 mm retainers, then secure 10 mm wheel-arch bolts and lower splash shield fasteners in a cross pattern. For electrical connections best practices, reconnect fog-light and headlight harnesses with locking tabs fully engaged, route wiring into factory clips to prevent pinching, then reconnect the negative battery terminal. Reinstall components starting from corners to edges to ensure structural integrity, using the 10 mm socket to secure bolts. Cycle fog lights and turn signals immediately to detect loose connections before final torqueing.

【MADE Of DURABLE NYLON】- Our plastic fastener auto clips perfect fit your parts very tightly,which is strong, robust and vibration resistant, would not break or crack easily.

12 Most Popular Sizes : There are 12 most common sizes of clips which will meet your needs, sturdy and reusable, compatible for GM, Chrysler, Ford, Toyota, Nissan, Mazda. Hyundai, Kia, AMC, Jeep, etc…
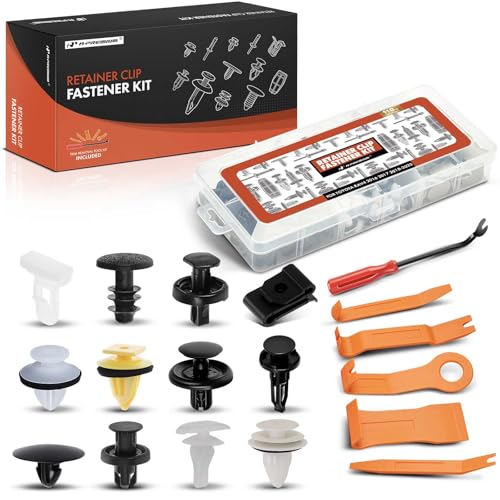
[Vehicle Fitment]: Compatible with Toyota RAV4 2016-2023, complete vehicle-specific fastener replacement kits for multiple parts of the vehicle.
Testing Your New Headlight
Before reconnecting the battery, verify all wiring harnesses seat firmly in their connectors and no tools remain in the engine bay. Reconnect the negative terminal and activate the headlight switch to test low beam operation. Confirm both assemblies illuminate with proper headlight brightness, reaching 350-400 ft. Switch to high beams for output verification. Use a voltmeter to check fuse functionality in the headlight circuit with the switch activated. Measure voltage at each headlight connector while disconnected to verify 12V supply. If one side fails, inspect the relay in the fuse block and test for continuity. Swap the suspect relay with a known working relay from another circuit to confirm whether the original relay is faulty. Observe both sides for even illumination patterns and consider the color temperature options that affect how your headlights perform in various driving conditions. Most modern headlights have a lifespan expectation of 15,000 to 50,000 hours depending on the type and quality of the bulbs installed. Address any dimness or failure immediately by rechecking bulb seating and electrical connections.


