To turn off your car’s headlights, locate the headlight control switch on your turn signal stalk, dashboard panel, or steering column. Rotate or slide the switch to the “off” position to deactivate the lights. If your vehicle has automatic headlights, you’ll need to switch the control from “Auto” to “Off” mode—the dashboard “A” icon will disappear when disengaged. Always verify all lights are off before exiting to prevent battery drain. The sections below cover troubleshooting procedures and vehicle-specific variations.
Understanding Your Headlight Switch Location and Controls
The headlight switch controls your vehicle’s primary lighting system and typically resides in one of three locations: on the dashboard panel near the steering wheel, integrated into the steering column’s multifunction stalk, or in older models, mounted on the floor near the driver’s left foot. Understanding headlight switch types is essential for proper operation. You’ll encounter rotary dials, push-pull mechanisms, or slide-type controls, each marked with icons indicating off, parking lights, and headlights positions. Modern combination switches often integrate fog light and dashboard dimmer functions. Switch wiring configurations vary by manufacturer, with terminals connecting to battery input, parking lights, tail lights, and dimmer circuits. Some systems use relays to reduce electrical load on the switch itself. In contrast to early designs, modern headlamp circuits route heavy current through relays rather than through the switch itself, improving safety and reliability. Proper headlight beam alignment ensures that when your lights are on, they provide optimal visibility without creating glare for oncoming traffic. Older vehicles typically feature a simple pull or twist switch positioned on the left side of the dashboard or stalk for straightforward operation. Consult your vehicle’s manual to identify your specific switch type and location before attempting adjustments.
Using the Turn Signal Stalk to Deactivate Headlights
Many modern vehicles integrate headlight controls directly into the turn signal stalk rather than using a separate dashboard switch. You’ll rotate the stalk‘s collar to cycle through off, parking lights, and headlights positions. The mechanism works by changing electrical continuity in the headlight wiring between specific circuits.
To deactivate headlights, simply rotate the stalk switch to the “off” position. If you’re experiencing issues where turn signals affect headlight operation, inspect the stalk assembly for faulty connections. Advanced users performing stalk modifications can interrupt specific wires after removing steering column covers, though this requires careful attention to airbag systems and proper electrical testing with a multimeter. Older vehicle models may require manual headlight operation without automatic shutoff features. Any modifications must maintain safety system integrity while preventing unintended battery drain from lights left on.
Turning Off Automatic Headlight Mode
When your vehicle’s headlights activate automatically based on ambient light sensors or other conditions, you’ll need to locate the headlight control dial or lever—typically positioned on the turn signal stalk or dashboard panel behind the steering wheel. Switch the dial from “Auto” to manual control positions such as “Off,” “Parking Lights,” or “Headlights On” to disable automatic mode. Some newer models require accessing touchscreen menus or pressing dedicated buttons to deactivate the system. When automatic mode is disengaged, the dashboard “A” icon will disappear. Note that automatic headlights may reactivate when shifting from Park or releasing the parking brake. Certain vehicles prevent complete deactivation to maintain daytime running light compliance and safety regulations. If your vehicle has IntelliBeam, the engine must be running for the automated headlight system to function. For vehicles where you need to replace components to access headlight controls, you may need to remove parts like the inner fender liner for better access to dashboard panels. Consult your owner’s manual for manufacturer-specific procedures.

【Fitment】Headlight Control Switch Knob Compatible with BMW 1 Series E81 E82 E87 E88, 3 Series E90 E91, X1 E84.

Compatibility -1: This headlight switch replacement for 1999 2000 2001 2002 Chevy Silverado 1500 2500; 2001-2002 Chevy Silverado 1500HD 2500HD 3500; 2002 Chevy Avalanche 1500 2500; 2000-2002 Chevy Tahoe Suburban 1500 2500
Disabling Daytime Running Lights With the Parking Brake
On certain vehicle models, engaging your parking brake will disable daytime running lights (DRLs) through an integrated electrical signal that cuts power to the lighting circuit. This parking brake mechanics feature varies markedly across manufacturers and model years—some vehicles require only partial engagement, while others need full activation. You’ll confirm successful DRL deactivation when the dashboard’s red brake indicator illuminates simultaneously with exterior light shutdown.
However, DRL functionality differs greatly between systems. LED-equipped vehicles may not respond to this method, and European variants often require VCDS software adjustments or additional wiring modifications. Some vehicle models, particularly the 2011 Jetta model, do not support parking brake DRL deactivation despite this feature being present in earlier generations. DRLs can reduce daytime collisions by 5–10% or more, making them an important safety consideration before attempting to disable them. This technique applies exclusively to stationary situations like drive-in theaters or extended idling periods. Never drive with your parking brake engaged, as this creates serious safety hazards and violates standard operating protocols regardless of lighting preferences.

[Part Number] 118.65015; 118.66007; 7311; F139869; H139869; H7231; H7311; H7334; H7425; H7432; H921645

Direct replacement - this parking brake hardware kit is designed to match the original hardware required to repair the parking brake on specified vehicles

Direct replacement - this parking brake hardware kit is designed to match the original hardware required to repair the parking brake on specified vehicles
Removing Headlight Fuses to Cut Power
Removing a headlight fuse provides complete electrical disconnection of the lighting circuit, making it the most definitive method for disabling headlights when stationary vehicle storage or specific maintenance procedures require it. Before beginning, disconnect your battery and consult your owner’s manual to identify the correct fuse location—typically under the hood or dashboard. Use a proper fuse puller tool for safe extraction, gripping the fuse edges and pulling straight upward without excessive force. This troubleshooting step cuts power to headlights regardless of switch position while remaining fully reversible upon reinsertion. Always replace with identical amperage-rated fuses to maintain fuse safety standards. If replacement fuses blow immediately, professional diagnostics are necessary to identify underlying electrical faults before further troubleshooting steps. Keep common replacement fuses in your glove box for convenient access when you need to reinstall the headlight fuse.

Made in United States

[Easy to Use]: Thin tips and offset handles allow for easier use than traditional pliers. The clamp head is convenient for entering and leaving a small space Where human hands and other tools cannot reach, And is not easy to damage the relays and Fuses.𝐏𝐥𝐞𝐚𝐬𝐞 𝐛𝐮𝐲 𝐛𝐲 𝐋𝐙𝐋𝐈𝐍𝐘𝐉𝐋𝐎𝐍𝐆 𝐬𝐭𝐨𝐫𝐞.
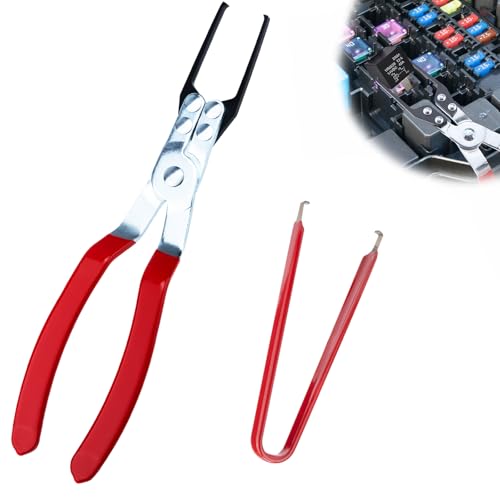
High Strength Carbon Steel and 304 Stainless Steel: The large relay pulling tool is forged from high strength carbon steel, durable and impact resistant. The small fuse pulling tool is made of 304 stainless steel, which is corrosion-resistant and ensures long-term sharpness
Manual Override Methods for Automatic Systems
Modern vehicles with automatic headlight systems often lock out the traditional off position, but you can regain manual control through several factory-installed override methods that bypass sensor-driven operation. Rotate your headlight control dial from “Auto” to “Off” to disable sensor activation entirely. Push the turn signal stalk forward to lock high beams on while simultaneously disabling automatic switching. Pull and hold the headlight stalk for 30-40 seconds to toggle auto high-beam functionality in certain models. For advanced headlight sensor adjustments, consult your owner’s manual for sensitivity settings. If factory methods prove insufficient, aftermarket relay installation offers permanent manual control by interrupting power flow between the automatic system and headlight circuits, though this requires cutting factory wiring and connecting relay switches to accessory power sources. When replacing or installing a headlight relay, locate it in your vehicle’s fuse box using the owner’s manual and ensure the new relay is firmly inserted into place. Proper beam alignment ensures that your headlights illuminate the road safely without creating glare for oncoming drivers. On winding or hilly roads with poor visibility, switching the headlight control to the on position disables the auto on/off feature while still allowing you to manually toggle between high and low beams as needed.
![True Mods H6054 H4 LED Headlight Wiring Harness [Negative Switched Conversion] [Fused] Universal H4 Head Light Relay Harness Kit for 9003 H6024 5x7 7x6 4x6 Subaru Toyota Jeep Sealed Beam Headlamp](https://m.media-amazon.com/images/I/51+wV9S2Q4L._SL500_.jpg)
YOUR VEHICLE NEEDS THIS - Swapping out old headlights for LED conversions on negative switched vehicles like Toyota, Subaru, Mitsubishi, or Suzuki, is not a simple job. But with our plug-and-play universal dual H4 headlight relay harness kit for high/low beam it can be! The compatible sockets include: 7x6 5x7 H6024 (2D1 H6054 H5054 H6054LL 6014 6052 6053)|H6024 (2D1)|4x6 6x4 (H4651, H4652, H4656, H4666, H6545)|H5006 (2C1) sealed beam headlights and more!

【YOUR VEHICLE NEEDS THIS】Perfectly match old led headlight H6054 H5054 H6054LL 6014 6052 6053 [Fused] [negative switched conversion] vehicles like Toyota, Jeep Pickup, Tacoma, Subaru, Mitsubishi, or Suzuki 7x6 5x7 led headlight harness.

【High Quality Material】: The automotive LED resistor kit shell is made of high quality aluminum as the raw material. Compared with plastic, the aluminum shell is more robust and wear-resistant, not easy to break, and can better resist external impact and vibration, suitable for all kinds of environmental conditions in the vehicle driving process. Moreover, it has good heat dissipation ability, which can protect the internal electronic components from high temperature damage.
Preventing Battery Drain When Parking
When you park your vehicle for extended periods, headlights inadvertently left on will drain your battery within 4-8 hours, rendering the starter motor inoperative. Implement proper battery maintenance protocols by verifying all lighting systems deactivate before leaving the vehicle. Check trunk, glove box, and interior lights to confirm complete shutdown when compartments close. If your vehicle sits unused regularly, disconnect non-essential electronic devices and consider installing a battery cutoff switch to eliminate parasitic drain. For Ford F150 owners, verify that perimeter lighting system settings are properly disabled to prevent automatic headlight activation. Perform periodic multimeter testing; current draw exceeding 50 mA indicates excessive parasitic drain requiring circuit identification through sequential fuse removal. Park in shaded locations to prevent heat-accelerated battery fluid evaporation. Drive your vehicle at least 15 minutes weekly, allowing the alternator sufficient operating time to restore full battery charge and prevent discharge-related failures. Inspect battery terminals regularly for corrosion buildup, which can accelerate battery drain and compromise electrical connections. If headlights remain on despite the switch being off, electrical shorts or faulty switches may be preventing proper deactivation and should be diagnosed immediately.
Legal and Safety Considerations for Headlight Use
Operating your vehicle’s headlights within legal parameters isn’t merely a matter of compliance—it’s a critical safety obligation that directly impacts crash prevention and liability exposure. You must activate headlights 30 minutes after sunset through 30 minutes before sunrise in most jurisdictions. Federal regulations cap brightness at approximately 3,000 lumens, permitting only white or yellow illumination. Dim high beams when approaching or following vehicles to prevent temporary blindness—violations result in fines up to $238 and license points. Headlight safety data demonstrates that vehicles equipped with “good”-rated systems experience 19% fewer nighttime single-vehicle crashes and 23% fewer pedestrian collisions. Conversely, improper headlight use contributing to accidents increases your liability exposure, including potential personal injury lawsuits. Legal compliance directly correlates with crash reduction in low-light conditions, where half of all traffic fatalities occur. Aftermarket LED headlights must be installed in DOT-approved assemblies to ensure they meet California’s strict color temperature and brightness requirements. Newer adaptive headlight technology combines LED sensors with automatic brightness adjustment to maintain visibility while minimizing glare for oncoming traffic. Current federal headlight regulations have remained unchanged for decades, leaving safety standards insufficient for modern driving conditions and emerging headlight technologies.
Troubleshooting Headlights That Won’t Turn Off
Understanding headlight regulations and proper operation proves meaningless if your headlights refuse to turn off, draining your battery and creating potential hazards. Begin troubleshooting by examining the headlight switch—test continuity across terminals using a multimeter to identify internal short circuits or worn contacts. Next, perform headlight relay testing by swapping the suspect relay with a known good unit or tapping it to check for mechanical sticking in the closed position. Conduct thorough wiring inspection, focusing on areas where insulation may have deteriorated near metal edges, creating unintended grounds. A failing voltage regulator or other alternator components can also prevent proper headlight shutoff by causing unstable electrical output. Check DRL module function if equipped, as failures can prevent proper shutoff. Use a multimeter to verify proper voltage levels and continuity throughout the circuit. If wiring damage is discovered during inspection, professional repair costs for damaged wires typically range from 150 to 500 dollars, though basic connector repairs may be more affordable for those with proper tools. After making repairs, reload the system by disconnecting the battery for several minutes to reset the electrical circuit and clear any residual power that may keep headlights illuminated. Replace defective components with vehicle-specific parts matching exact specifications to restore proper headlight control and prevent battery drain.
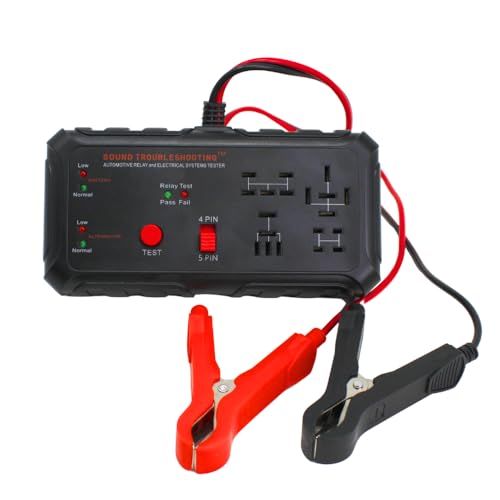
TESTS 4 & 5 PIN RELAYS: Quickly spot bad relays before they cause issues. This tool helps you confirm if your relays are firing correctly, removing the guesswork when diagnosing electrical issues. USA Patented.

QUICKLY TEST RELAYS OUTSIDE OF THE VEHICLE to check coil and switch contact function

EASY TO USE - The tester will automatically detect the pin position, the release time of the action, and the consistency of the relay in each test phase. If the tester lights up the green LED light, the relay is normal; if the red LED light is on, the relay is abnormal. The relay puller makes it easy to remove the relays to be tested. USA Patented.
Consulting Your Owner’s Manual for Vehicle-Specific Instructions
Every vehicle manufacturer designs headlight systems with unique configurations, making your owner’s manual the definitive source for accurate shutoff procedures. Locate the lighting controls section to identify your vehicle’s specific switch type—dial, lever, or rocker—and its exact dashboard or steering column position. The manual provides illustrated diagrams showing symbol meanings for OFF, parking lights, low beam, high beam, and AUTO modes.
For automatic headlight systems, follow the manual’s instructions to move the switch from AUTO to OFF position, preventing sensor-activated illumination. Review the fuse box location and headlight fuse identification if troubleshooting electrical issues, though removing fuses should only occur during emergencies. The manual’s step-by-step procedures guarantee proper mechanical operation while maintaining compliance with safety requirements for your vehicle specifics. Understanding the parking light symbol helps distinguish between complete headlight shutoff and partial lighting modes that remain active when parked. Over time, headlight performance can degrade due to oxidation and yellowing, which may make it more difficult to assess whether lights are functioning properly.