To remove your car’s headlight assembly, first disconnect the battery‘s negative terminal to prevent electrical hazards. Open the hood and locate the 3-5 retaining bolts securing the assembly, typically requiring an 8mm or 10mm socket. Remove these fasteners using your ratchet, then carefully detach the electrical connector by releasing its locking tab. Grasp the assembly firmly and pull it straight outward with steady pressure, avoiding twisting motions. The following sections provide detailed guidance on vehicle-specific variations and reinstallation procedures.
Gather Your Tools and Prepare the Work Area
Before you begin headlight assembly removal, gather your essential tools: a ratchet with 8mm and 10mm sockets for accessing grille and retaining bolts, a T30 Torx bit for assembly screws, and both flathead and Phillips head screwdrivers for clips and alignment adjustments. Don’t forget plastic pry tools to prevent housing damage during disassembly.
For workspace safety, wear protective gloves to prevent burns from residual heat and cuts from sharp edges. Safety goggles shield your eyes from falling debris during fastener removal.
Park your vehicle on a level surface with wheels straight and open the hood. Disconnect the battery’s negative terminal to prevent electrical shorts. Clear the area around your front bumper and lay down a protective mat. Confirm adequate lighting for visibility. Tool organization matters—arrange sockets, bits, and fasteners in a parts tray to prevent loss during reassembly. Remember to turn off the ignition before beginning work to ensure your safety. Check your vehicle’s service manual to identify the correct headlight assembly, as procedures may vary by vehicle.

KIT CONTENTS - Each headlight restoration kit includes (8) Step 1 Oxidation Removing Wipes, (1) Step 2 Sanding Kit, and (2) Step 3 Ceramic Coating Wipes.

Improve Visibility: The Atomizing Cup car headlight repair kit with 100 ml of repair fluid. It can effectively solve the yellowing, blurring, slight scratches, and dim areas of the headlights, ensure that the headlight lenses are clear, and improve the visibility of the headlights. If you have any questions, We will reply within 24 hours and strive to achieve your satisfaction

KIT INCLUDES: 1 - Disc Pad Holder, 3.25 in (8,2 cm) 6 - 3M Gold Sanding Discs 500 Grit, 3 in (7,6 cm) each 4 - 3M White Finishing Discs 800 Grit, 3 in (7,6 cm) each 1 - 3M Trizact Refining Disc 3000 Grit, 3 in (7,6 cm) 2 - 3M Quick Headlight Clear Co
Locate and Remove the Retaining Hardware
Most headlight assemblies utilize three to five retaining points that you’ll access from either the engine bay or wheel well area. Consult your service manual to identify specific hardware locations for your make and model.
You’ll typically encounter three types: adjusting screws (hex or Phillips head), retaining clips (plastic or nylon), and mounting bolts. Turn twist-on bulb retainers counterclockwise to release them. Use the appropriate driver—14mm socket, Phillips screwdriver, or hex key—to remove adjusting screws that control headlight alignment.
Pry retaining clips gently with a plastic trim tool to prevent housing damage. Remove screws sequentially, starting from the top mounting points. Support the assembly throughout removal to prevent dropping components. Check hardware condition; replace cracked clips or corroded screws before reinstallation. Common thread sizes for adjusting screws include 1/4-28 and #12-28, depending on your vehicle manufacturer.

It is very suitable for replacing damaged or missing pivot front headlight fixing clips on cars. They fit well and have a great effect

Specification Details: Our headlight retaining clips come in a set of 24 pieces, containing a total of 12 sizes (2 pieces of each). The variety of sizes provides greater flexibility and allows you to find the right retaining clips for your vehicle

Compatible with Chevrolet Models, for Blazer 1998 to 2005 Year, for Impala 2000 to 20005 Year, for Monte Carlo 2000 to 2005 Year, for S10 Pickup 1998 to 2004 Year
Detach the Headlight Assembly From the Vehicle
With the retaining hardware removed, grasp the headlight assembly firmly with both hands and pull it straight outward from the vehicle body. Apply steady, even pressure along the removal path—typically forward—while avoiding lateral twisting that can crack the lens or housing. If resistance occurs, stop and verify all fasteners and clips have been released; forcing removal risks damage. Some assemblies require tilting or rotating to clear lower tabs or body apertures. Support the unit with one hand while disconnecting final guide pins to prevent dropping. Once free, place the assembly on a padded surface to protect the lens. Inspect mounting points, gaskets, and alignment tabs for wear—proper headlight maintenance includes replacing deteriorated seals to guarantee correct assembly fitting and moisture protection during reinstallation. Over time, headlights can develop cloudiness from oxidation, which may require wet sanding and polishing to restore clarity before reinstalling the assembly. For models with aftermarket assemblies, consult your vehicle manual or instructional videos to ensure compatibility with your specific model year and configuration.
Disconnect the Electrical Connectors and Bulbs
Electrical power must cease flowing through the headlight circuit before disconnecting any connectors or bulbs. Verify connector safety by switching off headlights and disconnecting the battery to eliminate voltage. Use a multimeter to confirm zero power flow through wires. Wear protective gloves during the process.
Locate D-type connectors on the headlight assembly. Push the plug fully inward to release internal tabs, then pull outward on the release mechanism while easing the connector off. For locking tabs, insert a thin screwdriver or bobby pin to disengage secondary releases. Pull connectors straight out without forcing.
After disconnection, practice proper bulb handling by twisting and pulling the bulb base carefully from its socket. Inspect connectors and wires for damage before proceeding with assembly removal. Broken clips on connectors can cause headlights to flicker and should be replaced if found. Ensure you use the correct bulb type for your specific vehicle model to maintain proper headlight function. Attention to the type of headlight bulb such as halogen, LED, or HID will ensure proper replacement during future maintenance.
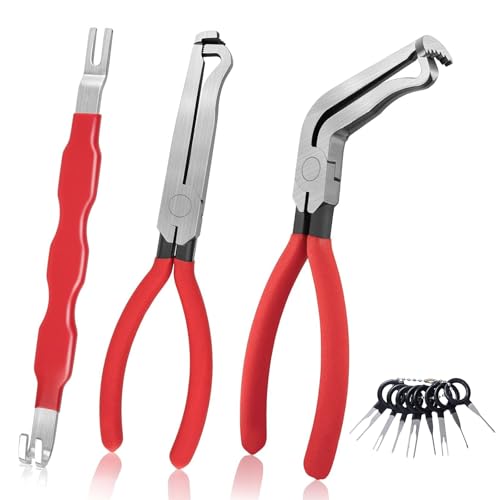
Designed for Automotive Electrical Connector Separation: This professional car connector removal tool functions as an effective electrical disconnect tool for safely unlocking and separating snap-on connectors on sensors, headlights, and wiring harnesses without breaking clips or damaging terminals

【Package Include】Offers single, double pin extractors and casting tool of different sizes to fit most terminals. 82 Pieces electrical pin removal tool kit includes 28Pcs Single Pin Extractor, 30Pcs Double Pin Extractor, 24Pcs Casing Tool and 1 Protective Case

For the removal for VAG / Porsche connectors
Handle Vehicle-Specific Requirements
After removing connectors and bulbs from the headlight circuit, consult your vehicle’s service manual to identify the specific fastener locations and types securing your assembly. Model compatibility dictates whether you’ll encounter T30 Torx screws, as found on 2000 Chrysler Cirrus/Stratus models, or standard bolts accessible via wrench or socket. Assembly differences vary considerably across manufacturers—newer vehicles feature fixed molded headlights requiring different approaches than older designs.
Locate all retaining hardware before attempting removal. For Chrysler models, you’ll find two T30 Torx screws per side with threaded guide sections requiring careful extraction. Widebody Mazdaspeed Protege5 Turbo configurations demand specific screw removal sequences. Check top, side, and cross-assembly mounting points depending on your vehicle’s design. Retain all fasteners to prevent loss in the engine bay during the procedure. Many vehicles use 9003 headlight bulbs that are interchangeable across different manufacturers and model years. Before beginning work, consider upgrading to LED or HID styles if your vehicle’s design permits alternative bulb options during reassembly.
Reinstall the Headlight Assembly
Begin installation by positioning the new headlight assembly near its mounting location on the vehicle frame. Inspect the assembly for defects and verify bulb compatibility before proceeding. Insert bulbs into their sockets, rotating the retainer ring clockwise until secure. Reconnect electrical connectors to headlamp and parking light sockets, ensuring firm attachment of the wiring harness.
Align bracket tabs with corresponding slots on the vehicle frame, maintaining hand pressure as you slide the assembly inward. Confirm proper headlight alignment by checking that all tabs seat correctly. Replace the two top retaining bolts using a wrench or socket, tightening evenly to specified torque. Reinstall additional clips, screws, and the dust cover. Follow removal steps in reverse order, reconnecting the main electrical connector last. Ensure the dust cover is securely reattached to prevent moisture and debris from entering the assembly. Perform a visual inspection before closing the hood.

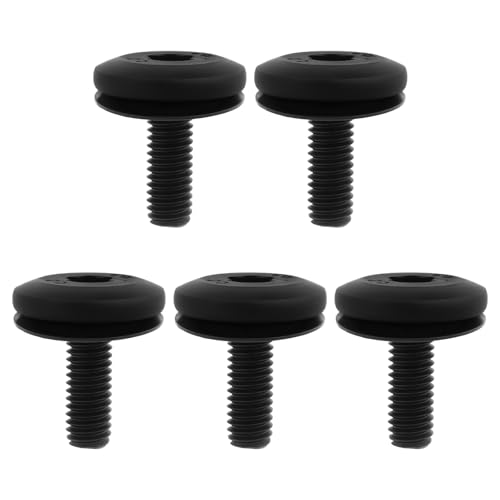
[High Quality] Headlight retaining clip of high-quality nylon material, with long service life and delicate and compact.

Direct replacement - this headlight retaining ring designed to match the fit and function of the original ring on specified vehicles

Stainless Steel 5" X 7" Headlight Retaining Ring
Test the Headlights and Final Checks
Proper headlight verification requires systematic testing before you close the hood and return the vehicle to service. Confirm the engine’s off and parking brake’s engaged. Have an assistant operate the light switch while you observe both high and low beam headlight functionality from the vehicle’s front. Check beam alignment against a flat surface to guarantee proper road illumination—misalignment requires immediate adjustment. Verify all three T30 Torx screws and the 10mm hex bolt are properly torqued, confirming the headlamp flange profile matches the body panel contours. Inspect electrical connectors for security and examine headlight vents for damage or blockages. Clean the headlight lenses to prevent cloudiness that could reduce visibility and compromise beam patterns. Conduct a brief night test drive to confirm brightness meets expectations. Re-check all fasteners and wiring before returning the vehicle to regular operation.

Mutipurpose Audi VW Torx Bolts. Usually Used asHeadlight Mounting Bolt,Radiator Mount Bolt,Radiator Support Tie Bar Bolt,Bumper Cover Support Rail Bolt,Bumper Guide Bolt,Bumper Cover Reinforcement Bolt,Bumper Impact Bar Bolt,Bumper Impact Bar Screw,Engine Coolant Reservoir Screw,Horn Mount Bolt,Radiator Support Air Deflector Bolt,Engine Air Intake Hose Screw,Engine Coolant Reservoir Bolt,Radiator Support Panel Bolt,Engine Air Intake Hose Bolt,Hood Latch Support Bolt,Radiator Support Access Cover Bolt,A/C Accumulator Bolt,Radiator Support Air Duct Bolt,Radiator Shutter Assembly Bolt,Hood Safety Catch Bolt
OEM Compatibility: This T30 Torx head bolt is compatible with BMW models, including 1 Series (2004-2020), 2 Series (2012-2020), 3 Series (2004-2019), and 4 Series (2013-2020). OEM number: 07146959923, 6959923.

Meet or Exceed OEM Specification, Made of High Quality Durable Nylon not Plastic. Usually Used Together In Air Deflectors, Splash and Heat Shields..etc