To turn on your car’s headlights, locate the control switch—typically a rotating knob on the dashboard or a lever on the left side of the steering column. Turn the knob clockwise or slide the lever to the “ON” position to activate your low beams. You’ll see an illuminated indicator on your instrument panel confirming activation. If your vehicle has an “AUTO” setting, the headlights will engage automatically based on ambient light conditions. Understanding the different beam settings and proper usage timing will help you maximize visibility and stay compliant with safety regulations.
Locating Your Vehicle’s Headlight Controls
Before you can turn on your headlights, you’ll need to identify where your vehicle’s lighting controls are located. The headlight location varies by manufacturer origin. European vehicles, including Volkswagen and Chrysler 300, position controls on the dashboard left of the steering wheel. You’ll find rotating knobs on the instrument panel for light selection. Japanese and Korean cars typically use a stalk on the left side of the steering column. Some vehicles feature button controls located left and behind the steering wheel. Examine your dashboard layout carefully—controls may be rotating knobs, stalks with rotary switches, or combined button systems. Many modern vehicles include an auto position that enables automatic headlight adjustment based on ambient light levels. Once you’ve located your controls, you may need to replace a bulb socket if your headlights aren’t functioning properly. Different vehicles require specific headlight bulb sizes such as H1, H4, H7, or H11 to ensure proper fit and function. Check your owner’s manual if you can’t locate the controls, as placement varies greatly between manufacturers and models.
Understanding the Different Headlight Positions and Settings
Modern vehicles offer multiple headlight settings designed for specific driving conditions and visibility requirements. Understanding headlight types guarantees you’ll select the appropriate setting for safe driving. Sidelights provide minimal illumination for low-light parking situations but aren’t sufficient for active driving. Dipped beams serve as your default nighttime setting, angled downward to illuminate up to 200 feet without blinding others. Full beams deliver maximum brightness, extending visibility to 350 feet on dark rural roads—switch them off when traffic approaches within 150 meters. Daytime running lights activate automatically but don’t replace proper headlights in poor conditions. Fog lights mount lower to cut through mist and heavy rain. These various headlight systems typically utilize different technologies such as halogen, HID, or LED bulbs, each offering distinct brightness levels and energy efficiency. For optimal nighttime driving safety, 6000K color temperature bulbs produce a brighter, whiter light that enhances visibility compared to higher Kelvin ratings. Proper beam adjustments between these settings prevent dazzling other drivers while maintaining your road visibility, making mastery of these positions essential for safe operation. Your headlights can be adjusted using either a dashboard dial or indicator stalk depending on your vehicle’s configuration.
Step-by-Step Instructions for Manual Headlight Operation
Now that you understand the various headlight settings available in your vehicle, you’ll need to locate and operate the actual controls. First, identify the headlight switch on your dashboard, steering column, or multifunction lever—look for symbols showing a bulb with radiating lines. To activate, rotate the knob clockwise or slide the lever to the “ON” position, cycling through parking lights to low beams. Manual control techniques require aligning the switch line with the headlight symbol for constant operation. Verify activation by checking the illuminated indicator on your instrument panel and observing the beams in low light. When troubleshooting lights, consult your owner’s manual for vehicle-specific symbols. To deactivate, rotate the switch counterclockwise to the “OFF” position. After turning on your headlights, ensure the vehicle is on level ground to confirm proper beam direction and avoid glare for other drivers.
Activating and Using High Beam Headlights
When should you activate your vehicle’s high beam headlights? You’ll use them in low-light conditions when no vehicles are present ahead or approaching. For proper high beam usage, guarantee your low beams are already active, then push or pull the control stalk to engage. Your vehicle’s ECU will assess conditions through camera and sensor data before delivering power to the beams via relay.
Most automatic systems activate above 30 km/h outside urban areas, providing effective visibility when detecting clear roads ahead. The system switches to low beam when identifying oncoming or leading vehicles within close range. You can manually override automatic functions by rotating the headlight control from AUTO to ON position. Remember that high beams prove ineffective on winding, hilly roads or during poor visibility conditions. Frequent high beam usage supports earlier detection of pedestrians, enhancing overall driving safety.

Easy Installation: 1:1 design, no external driver or connector required, plug and play

【Perfect Beam Focus】FORENNER H1 Light Bulbs or Headlight Covers feature an ultra-thin 0.03-inch chip pitch, significantly enhancing beam focusing performance. They project a concentrated, precise beam that forms a super-focused light pattern with no dark zones or shadows, effectively eliminating glare for oncoming vehicles. This ensures a wider and longer nighttime field of vision, enhancing driving safety.

【10X Brighter - Newly Enhanced】The Termitor H11/H9 exterior light bulbs feature 24 high-performance chips, delivering up to 10 times the brightness of standard halogen bulbs. Upgrade your nighttime driving experience by replacing dim, yellow stock bulbs with Termitor H11/H9 fog lights, offering superior illumination and enhanced visibility with a crisp 6500K cool white light for optimal light transmission.
How Automatic Headlight Systems Work
As you turn your vehicle’s headlight control to the AUTO position, light sensors mounted on your dashboard or windshield immediately begin measuring ambient light levels to determine when activation is necessary. These photoresistors utilize sensor technology that changes resistance from 20 ohms to 20K ohms based on light intensity, creating voltage variations that feed into an operational amplifier. When brightness falls below the preset threshold—during dusk, tunnel entry, or heavy cloud cover—automatic activation occurs. The control system filters sensor data through a 47uF capacitor and 100K resistor combination, ignoring brief dark pulses under 2-3 seconds to prevent false triggers. Your low beams then illuminate at reduced intensity during daylight or full brightness in darkness, ensuring ideal visibility while complying with safety regulations. For drivers seeking enhanced nighttime performance, bi-LED headlight upgrades provide superior brightness and beam pattern quality compared to standard halogen systems. Quality ballasts prevent flickering and ensure consistent light output across varying electrical conditions. Modern systems may also incorporate adaptive headlights that adjust beam position based on steering wheel movement and vehicle speed for enhanced visibility on curved roads.
Operating Fog Lights and Auxiliary Lighting
Understanding which auxiliary lights your vehicle carries will determine how you activate them safely and legally. Front fog lights mount low in your bumper to illuminate beneath fog layers without backscatter, while rear fogs—brighter and amber or red—increase your visibility from behind. Locate the dedicated fog switch on your headlight stalk or dashboard; most systems require low-beams active before engagement. Indicator lamps confirm status: typically green for front, amber for rear.
Activate fog lights only when visibility drops below 100 metres during dense fog, rain, or snow. Proper fog light usage means turning them off immediately when conditions improve—leaving them on illegally dazzles other drivers. Fog lights produce a wide, bar-shaped beam that stays close to the road surface to help you see lane markings and obstacles. Auxiliary light placement for spot or flood lamps must meet local height and aiming regulations. Over time, fog lights and headlights can become cloudy from oxidation, which may require wet sanding and polishing to restore clarity and proper light output. Never combine high beams with fogs in poor visibility.
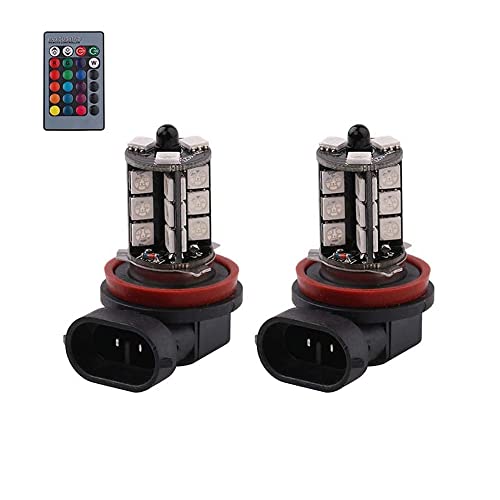
Specifications: Only fit for H11/H8/H9/H16(JP) fog light, if you are unsure about the bulb size, please ask us for product questions before purchasing. We have other size light bulbs.

Material : This fog light wiring harness is made of high-quality plastic and metal materials. It is sturdy, wear-resistant and durable, with excellent anti-melting property, heat resistance and electrical conductivity. It is safe and reliable and can maintain good performance even after long-term use
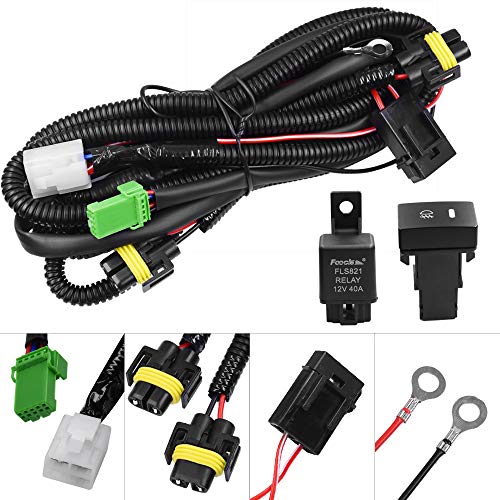
Good For Replacement fog lamps, Add-on fog lights, HID lights, LED daytime running lights, Driving lights, LED work lights, Off-road lighting kit
Different Types of Headlight Technologies Explained
Modern vehicles employ five distinct headlight technologies, each offering different performance characteristics, costs, and maintenance requirements.
Halogen advantages include affordability, wide availability, and easy replacement, though they consume more energy than alternatives. LED benefits encompass energy efficiency, 25,000-hour lifespan, instant brightness, and compact design that enables adaptive lighting systems. LEDs reduce power consumption by approximately 50-80% compared to halogen bulbs, making them ideal for modern vehicles. HID features deliver brighter bluish-white light, triple the longevity of halogen, and excellent visibility, but require professional installation. HID headlights emit light through an electrical arc between electrodes in xenon gas. Laser efficiency provides superior range and low power consumption, ideal for high-speed driving in luxury vehicles. Adaptive technology like Matrix LED selectively dims beam sections to prevent dazzling oncoming drivers while maintaining maximum visibility. These systems automatically adjust based on road conditions, speed, and surrounding traffic, enhancing safety through intelligent illumination management.
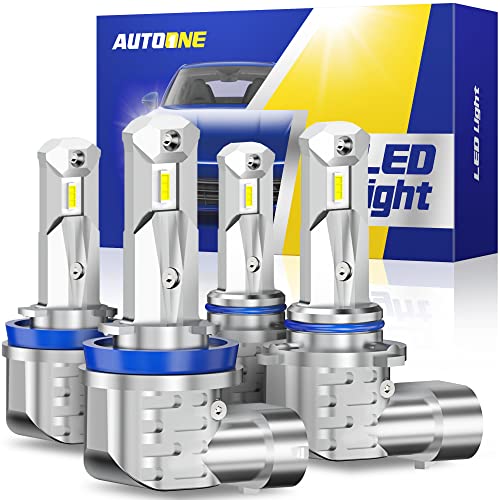
Huge Improvement in Visibility: AUTOONE H11 9005 led bulbs combo are equipped with high luminous efficacy csp chips. And 1:1 halogen bulbs’ beam pattern, spread out the light more to help in the side and front vision but no endangering others

【Huge Improvement in Visibility】-AUTOONE H11 led bulbs are equipped with high luminous efficacy CSP chips. And 1:1 halogen h11 bulbs’ beam pattern, spread out the light more to help in the side and front vision but no endangering other drivers. Safer and bright upgrade for fog lights or drl

【900% Brighter - S1 Pro Bulbs】The SEALIGHT 9005 H11 bulbs combo feature 16pcs high-performance chips, delivering up to 8 times the brightness than stock bulbs. Upgrade your nighttime driving experience by replacing dim, narrow stock bulbs with SEALIGHT 9005/HB3 H11/H9/H8/H16 LED Bulbs Combo. Enjoy crystal-clear 6500K cool white light that cuts through the dark, giving you way better visibility for safer night drives
Safety Guidelines and Legal Requirements for Headlight Use
While headlight technology continues to advance, drivers must navigate a complex framework of federal and state regulations governing when and how to use vehicle lighting systems. Federal FMVSS 108 establishes baseline performance standards, but many states impose stricter headlight regulations regarding color (typically white or yellow), mounting height, and lumen output—California caps headlights at approximately 2,513 lumens.
You’re legally required to activate headlights from sunset to sunrise and whenever visibility conditions prevent you from seeing vehicles or pedestrians at 500 feet. Most jurisdictions mandate headlight use during precipitation or when windshield wipers operate. Modern vehicles with automatic headlight systems use ambient light sensors to detect when conditions require headlights, ensuring compliance with these visibility requirements. Switch to low beams when approaching oncoming traffic to minimize glare.
Non-compliance results in citations and potential inspection failures. Properly functioning, correctly aimed headlights reduce nighttime crashes by up to 23%, making adherence to these regulations essential for road safety. All automotive headlight bulbs must have DOT approval for road use to ensure they meet federal safety standards.
Common Headlight Problems and Quick Fixes
Even the most reliable headlight systems develop issues that compromise visibility and safety. Common headlight malfunctions include flickering caused by faulty ballasts or loose wiring, dim output from weak batteries or oxidized lenses, and delayed starts indicating struggling HID ignition. When you notice these problems, follow quick troubleshooting steps: check battery voltage and alternator performance, inspect connections for corrosion, and examine bulbs nearing their lifespan’s end. If one headlight’s out, verify the bulb first before inspecting ballasts or wiring. Electrical component failures—like blown fuses, faulty relays, or bad switches—require immediate attention. For optimal safety, ensure your headlight beams are properly aligned and aimed to avoid blinding other drivers while maximizing your visibility on the road. Watch for warning signs such as buzzing noises or dimming during idling that improves with acceleration. HID headlights utilize electric arc technology to produce exceptionally bright illumination that enhances nighttime visibility. Address these issues promptly to prevent complete failure and maintain safe driving conditions.

35W HID Ballast: This HID ballast adopts New DC Chip sest. It has over-voltage protection, low-voltage protection, no-load protection, short-circuit protection, etc. IP68 waterproof grade, which can work in any weather conditions

FIT THE FOLLOWING VEHICLE - W3T19371 ballast replacement for 2006-2014 Acura TL TL-S | 2006-2014 Acura TSX | 2012-2014 Acura ILX | 2010-2013 Acura ZDX | 2013-2014 Acura RDX | 2010-2013 Acura MDX | 2009-2011 Acura CSX | 2011-2013 Honda CR-Z | 2004-2014 Honda Odyssey | 2012-2014 Mazda CX-5 | 2007-2012 Mazda CX-9 | 2007-2009 Mazda 3 | 2009-2012 Mazda 5 | 2007-2009 Mitsubishi Out lander | 2008-2012 Mitsubishi Lancer Evolution

DIRECT OEM REPLACEMENT: Manufactured to factory specifications as a direct plug-and-play headlight control unit module replacement for Mitsubishi/Audi/VW ballast part numbers 8K0941597E, 8K0941597, 8K0941597C, W003T22071, and N10721805.
Maintaining Proper Headlight Alignment and Performance
Proper headlight alignment directly affects your visibility and prevents blinding oncoming drivers, making it essential for safe night driving. Begin headlight adjustment by parking 25 feet from a wall on level ground. Place 121 pounds in the driver’s seat and check tire pressure for accuracy. Mark each lens center with masking tape, then transfer these measurements to the wall. Locate adjustment screws near the headlight assembly using your owner’s manual. Turn horizontal screws until beam alignment matches wall marks, covering the opposite light while working. For vertical adjustment, rotate screws to create a slight downward angle—clockwise raises beams, counterclockwise lowers them. Re-check alignment after completing adjustments, and clean lenses regularly with microfiber cloths to maintain peak performance. While professional alignment equipment provides the most accurate results, these temporary adjustments are suitable for correcting critically misaligned headlights. A night test drive will verify that your headlights provide proper illumination without blinding oncoming traffic. Headlights may require realignment after hitting large potholes, as impacts can shift the positioning of your headlight assemblies.

Package Dimensions: 2.794 L x 11.43 H x 3.81 W (centimeters)

𝗦𝗟𝗘𝗘𝗞 𝗙𝗜𝗡𝗜𝗦𝗛: White nylon nuts pair with precision-threaded black automotive bolts for a clean look, blending easily with external hex bolts and other car repair components.

RLB-HILON Headlight Adjuster Kits including 8pcs Screws and 8pcs nuts and 4pcs Springs